


You can see the little mister HERE
and the (big) Mister HERE
Well, I hope you, like me have been loving the nautical inspiration around this summer. Because I've got more for you! Yea! (Don't worry, after this one there's only one more... then I'll be done with stripes.) (I mean, nautical stripes.) (I'll never be done with stripes. I love stripes.)
SO. How about turning your little missy into a sailor with some cute stripes and a seashell pocket?!

Firstly, I would have just made a regular circle skirt, but the fabric I used for all of this was actually just a very LOOOONG strip of fabric that was not super wide that I got at the thrift store (so no buying more...) It was only $2. I love that.
ANYWAY, I DID make a circle skirt, just with panels instead instead of a circle. First, you will decide how wide you need your skirt to be. Then you can decide how many panels you'd like on your skirt (I had 5) and if you divide one by the other, you'll have the width of the top of each panel. Capish?
I folded my fabric up and cut all of the panels at the same time so they matched. Just cut a trapezoid shape with the top the width you previously calculated very mathematically.

Then you'll take your first two trapezoids and lay them right sides together and
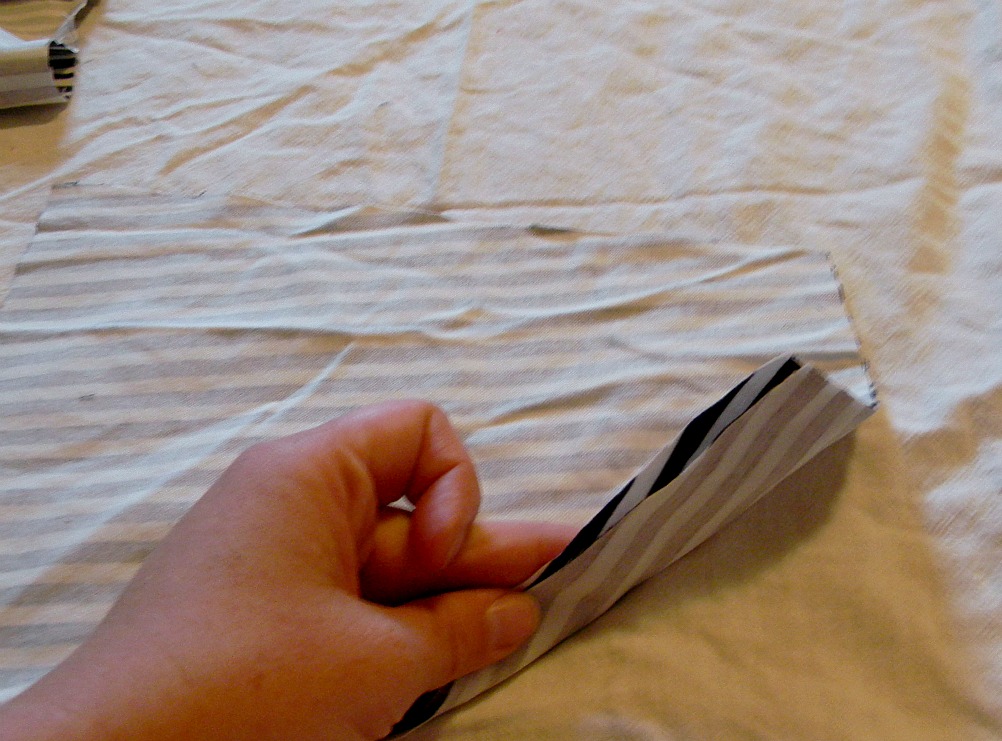
pin along one edge.

Next, take the next trapezoid and lay that under the second trapezoid with right sides together.

Pin the edge.

And do this again.

And again. Here are all the trapezoids pinned together and lined up.

Then you just sew a straight stitch up each edge that you pinned. Easiest thing ever.

Fold it in half with right sides together. Pin the two free edges together and straight stitch up this seam as well. Sorry. I guess I kind of ran out of pictures, here. Huh.
So measure a piece of elastic the size of your daughter's waist and add an inch. Sew the two ends together. (I usually do two rows of zig zag stitches for stretch and stability).
Turn the top edge of the skirt over, iron and pin it down and sew the hem.
Pin the top of the skirt to the inside of the circle of elastic. Sew the skirt to the elastic, stretching the elastic slightly to lay nicely on the fabric.

Cut out a pocket shape. Kind of like the pocket on a sweatshirt. Iron all the edges over. On the curved edges, cut some notches (look close, they're there. There's even a tiny arrow by one of them.) so the curve will lay flat.

Sew all the way around the pocket about 1/4 inch in. Add a second set of stitching along the curves about 1/8 inch in (so just outside the first stitch line).
Pin your pocket to the front of your skirt. Sew along the straight edges - just outside the hem line. Now you have double stitching - pretty sweet looking.

All you have to do after that is hem it! I hemmed it with a double stitch as well, to match the stitching on the pocket.
And here it is all finished! (Sorry for the lack of pictures in that tutorial. Totally unintentional.)

And here is mini's cute little bum on the beach. Ha ha! Her "beach bum." Oh, man. I crack myself up. Especially when it's late...

That bit of tulle you see poking out the bottom is actually another skirt we bought at Target at the beginning of summer on clearance. A cute skirt on its own, but I love the oomph it adds to this skirt, kind of like a petticoat would.
"Yea! I've got a stick!" I can't resist posting her goofy poses.

I don't have a tutorial for her headband, but it's the easiest thing ever. I used the ribbon/hair elastic technique I posted here. Basically you just cut a piece of ribbon to stretch across the front of your head and cut a bit off of a hair elastic to add up to the circumfrence of your head when it's stretched out. Then glue the ends of the ribbon to the ends of the hair elastic. Then I made some yo-yo's and one ruffle flower and glued them right to the ribbon. I glued the buttons on too - I needed quick and easy people, don't judge me. I think the two buttons with the knots in the center are PERFECT.

I love the way it looks with the outfit.

And here she is actually keeping it on her head which is a miracle in itself. She's finding shells, by the way, and putting them in her seashell collecting pocket. (Look at those little staples in her head... tear... so sad)

Of course, she prefers my large yellow beach hat to the headband anyway.

And THAT is how you turn your little miss into one stylish sailor girl.

*Be sure to check just below for all the fun parties I link to!


8 comments:
I love the hair piece! I might have to give it a try. Thanks so much for sharing!
Found you through the Sew Much Ado I Made It Wedensday meme!
Love the headband! Super cute.
SO ADORABLE!!!
P.S. Feel free to not publish this comment, but I just wanted to make sure you knew about EmmaJean's Boutique (new on MAIN ST in Oshkosh) They are always looking for NEW Consignors :) HINT HINT!
Cute skirt and girl!
What an awesome tutorial- I love it! Hope you'll link it and any other kid or teen related posts that you have to our "Crafts for Under Twenty Somethings" party tomorrow!
Melanie
bearrabbitbear.blogspot.com
Oh wow, I love it all! You are so talented! I would love to have this skirt for my girls!
Thanks for linking up at Show & Share! I hope you come back next week!
Girl I love this your little girl is adorable and the skirt is just so cute on her. Good job friend. And thank you for linking up to Show and share by me and Lindsay.
A mommy's life...with a touch of YELLOW
tyandwhitneyulrich.blogspot.com
Post a Comment