Showing posts with label no*sew. Show all posts

Thursday, October 16, 2014

About time.

gift it. 2014 button photo 0ffd9711-0261-4e13-9866-83ff36f6739d_zps43748e9a.jpg


Ok, ok.  As promised, I'm done with the DIY gift posts now.  It dragged on and on, but I hope you stuck with it and got some AWESOME ideas for the now approaching all too quickly holiday season.  (yikes)

If you need a quick reference back to all things Gift it. 2014, here's your wrap up!


2. Stud Earring Holder - Young and Crafty Sisters
3. 5 Grandparent Gift Ideas - Hi! It's Jilly!
4. Fat Quarter Doll Quilt Tutorial - Simple Simon and Company
5. Birthday Sack Lunch - A Girl and a Glue Gun
6. 8 Gifts for Gadget Lovers - Melly Sews


10 Must-Make Gifts For Mother's Day, 
10 Fabulous Gifts For Father's Day, 
5 Fantastic Gifts for Grandma, 
5 Super Fun Gifts For Grandpa
25 A+ Gifts for Teacher, 
25 Highschool Graduation Gifts, 
25 Friendly New Neighbor Gifts, 
25 Lovely Housewarming Gifts
10 Valentine's Gifts (for anyone and everyone), 
10 Wedding Gifts (they'll love to use), 
10 Anniversary Gifts (for those you love)

There you have it!  Gift it. 2014!  That's exactly 362 gift ideas for you to make for every kind of occasion you could imagine! Also, don't forget that most of these come with free printable gift tags, etc., just click on the post and scroll to the end. Now get cracking!  We've got gifts to make!

If you don't know what this series was all about, read the explanation here.

Also, you can see even more ideas:


*Be sure to check below for all the fun parties I link to!*

Thursday, June 26, 2014

A simple craft for little hands.


The other day, mini came inside with a bunch of dandelions and asked me to make her a "hat".  Well, I totally took her hat, and raised her one full blown princess crown.  And by her reaction, I totally KILLED that request - you'd think I'd magically called some gold and jewels out of thin air or something - and I was pleasantly surprised at how a 5 minute "project" for me could result in something so fun, endlessly entertaining and cherished (we still can't throw it away) for her.

Once bug saw mini's awesome crown, he had to have one, too.  Hence our "nature crowns" were born.


I realized the potential to make this something super meaningful, though at the time it was just a simple, thrown together, very quick craft for us to do together.  I let both mini and bug "design" their crowns, collect the "ingredients" themselves, and help me pull it together.


 They couldn't stop collecting things, even after their nature crowns were complete!

The tutorial here is specifically for the Dandelion Princess Crown, but it's obviously very easily altered.


You need scissors, dandelions (buckets and buckets of dandelions), skinny elastic, ribbon and matching washi tape.
Also, and most importantly so I'm not sure how it managed to elude the list up there, you need a large piece of poster board.


Now, I can't, unfortunately, give you specific dimensions or anything, mostly since I didn't measure, but also because every kids head is going to be a little different.  So take these general instructions and run with them.
1. Start with your poster board laid out flat and begin your cut near one of the bottom corners.
2. Continue cutting up so that you have a half circle that's a little over 3/4 of the width of the poster board.
3. With the flat side facing you, a) bring the corners of the half circle towards the middle and b) then overlap the one corner and continue pulling it until the point of the crown is well-established and the bottom of the hat is fairly flat around.
4. Let go of the outer corner a bit, put on a lot of hot glue and
5. Curl it back up onto the cone and press down hard.
6. Pull the inner corner down away from the inside of the cone and
7. put on a bunch of hot glue, then
8. Push it back up against the cone and hold it for a few seconds.
9. Now your cone, or crown, is glued together.
10. It may be totally uneven or lopsided.  Just trim around the bottom to make it level.
11. Cut some elastic to fit snuggly but not too tight under your kids chin.
12. Dab some hot glue (which is really hard to see) on the inside of the crown at the side and
13. Press one end of your elastic onto it.
14. Then dab some more hot glue directly across from the first and press the other end of the elastic onto it.  Make sure your elastic isn't twisted before you glue.


Now, we decorate!
1. Wrap washi tape from top to bottom at an angle.
2. Continue wrapping pieces of washi tape bottom to top at angles and overlapping until you like the pattern.
3. Take the stem off of the dandelions.
4. Put hot glue on the back of the dandelion head.
5. Press the dandelions heads all around the bottom of the crown!

Now, I don't have pictures of this, but take your ribbon and cut it in three pieces.  Use your hot glue to glue one end of each piece into the inside of the point of the crown.  Hot glue another large dandelion over the point.

And now, you are The Dandelion Princess!  (make THAT into a movie, Disney...)

 I couldn't stop taking pictures of her smelling dandelions.  She was so funny!

When bug wanted in on the action, I charged him with the task of collecting items he might want on a prince crown.  He chose several long pieces of grass, some dandelion STEMS, some rocks, and a few leaves.  And I looked at the assortment and went, uh... (the dandelion one was pretty straight forward...)

 Ignoring the fact that he plucked leaves off of my hostas... It was kind of fun working with bug to come up with the perfect "plan" for his crown.  I made a cone like mini's and glued on the elastic.  Then I wrapped some green and white washi tape around it.
I started by gluing the 3 rocks in the front, like jewels.  Then I figured the leaves could nicely wrap around the bottom of the crown - and I like how the kind of curl together.  I glued some long grass and some dandelion stems into the inside of the point and then wrapped two dandelions stems around the point.  Voila!  A boy version!

He called it his "Crazy hat" - which I think is a compliment.

 And now, you are the Prince of Pebbles and Leaves!  Or something...


 What I think is great about this project, is how customizable it is.

1. Go for a "nature scavenger hunt" with specific items in mind.  Then use those items to create your Nature Crown!
2. Go on a walk around the park or neighborhood and see what items jump out at you.  There might be some really interesting things you never would have thought of that you find along the way!
3. Collect items when you are on a special trip - when you take a break to stretch your legs on a road trip, when you're picnicking somewhere special, when you take a day trip to a special place, when you go camping or bike riding or to the beach!  Use your natural "souvenirs" to make your crown!


Don't forget to stop and pick some dandelions along the way.


*Be sure to check below for all the fun parties I link to!*

Tuesday, April 15, 2014

yarn on the windows. seriously. And someone WON!


Ok.  First things first.  Thanks for entering the giveaway!  
The winner was picked randomly and you can see who it is over on the giveaway post... it's Danielle!  You'll get an email soon from Call Her Happy.  Congrats!

***

Time for my second yarn project!  This is one I'm really in love with, but unfortunately, it does NOT photograph well.  Know why?  Because it's yellow.  In a yellow room.  I adore yellow - you know it.  But yellow indoors does NOT take pretty pictures.

I digress.  What I'm really here to talk about today is this:


Yes!  A valance made of yarn!  See, we started out with something like this in mini's room:

I got the valance in a crib bedding set and I thought the giraffe print was perfect for her safari mural.  BUT, all we had were this super cheap cafe rod thingies.  And the curtains are tab top.  So you can see I was committing all kinds of decor faux pas here... too matchy matchy, ugly cheap rod, tab top curtains so the ugly rod shows... you get the idea.

Instead of buying a new rod and some normal curtains, I decided to keep the ugly cheap rod and use something I had on hand to make an awesome valance that would totally go with the look and feel of the room.

If you want to make one too, all you need is:


Yeah, and it doesn't even have to be yellow.  I used 6 different colors of yarn - mustard, yellow, pale yellow, tan, brown, and white.  You can use however many colors you want, just keep in mind that the more colors you use the less of each skein you will use (and vice versa).  So I still had a bit of each skein left when I was all finished.  

I don't have photos of the actual process, because I'm pretty sure I lost them to the ether world.  But, here are some drawings.

1. Wrap yarn around a big book.
2. Cut yarn from the book along one edge.
3. Do this with each color.
4. Take multiple strands at a time of different colors.  Fold them in half and put the folded middle under the cafe rod.
5. Pull the ends of the yarn over the rod and through the loop made by the folded middle.
6. Pull tightly.
7. Adjust the yarn so it's hanging down nicely.
8.  Repeat all along the cafe rod.  Scootch each one down close to the previous one so that the rod is completely hidden by the yarn bunches.  I did the whole rod, even the curved ends.

What's that you say?  This tutorial looks familiar?  You mean it's the exact same technique I used for the hula girl?  And the pixie tutu?  Huh.

You can go to the pixie tutu for an actual picture tutorial if you'd like - the only difference is that it's elastic instead of a metal rod and it's in a circle, not straight.

I should mention that I did this while the cafe rod was OFF the wall, obviously.  Otherwise my arms would have turned into weird jelly mush.  I sat and watched TV while looping and pulling about 75 (thousand) bunches.  Then I hung it on the window, scootched bunches around a little, and trimmed the ends, but not too much.  I didn't want it to look PERFECT.  I also unraveled a few strands, but not as many as the tutu, and I didn't braid any or tie any knots.  

I really think this complements the safari look, but maybe I'm weird.  It kind of looks like a thatched roof or something.


In any case, it's WAY better than what was up there before, am I right??

Don't worry.  Not all the projects are looping yarn around stuff.  I promise.


Don't forget to link up your yarn projects!! (just click the button)


*Be sure to check the right sidebar for all the fun parties I link to!

Sunday, April 13, 2014

An updated classic


Well, I'm super excited because the time has come for me to share my own yarn projects with all of you!  One more week of yarn goodness and then we'll show this series the door... but I couldn't let my guest bloggers have all the yarn fun!

So, first up, I'm sharing an updated take on a yarn look from two years ago.  Remember the pixie tutu I made mini?  That turned into one of my most popular posts and pins to date!  The other week it was Hawaiian day at Zoe's school and she wanted to know what that looked like.  I showed her a few pictures of hula dancers from online and she was ENTRANCED:
"Can you make me one of these??"
"One of what?"
"One of these to wear?!"

And, assuming she meant the whole ensemble - particularly the fun skirt and gobs of flowers, I set to work.


This is a cute little dress up idea that is very easy, requires next to NO sewing, and is super fun - for a theme day at school, playing pretend at home or even for Halloween!  Here are the separate components of the ensemble:
A flower laie (because what hula girl would walk around without one???), wristlets, a flower belt, a "grass skirt", and anklets.

So let's break it all down, shall we?

You do NOT need to go buy a grass skirt that is going to shed itself all over your carpet and leave your child bare in spots!  Nope!  All you need is some yarn and a little elastic!   I had all this yarn on hand, so I didn't buy a thing to make the skirt itself.  
Obviously, the tutorial for this skirt is exactly the same as the pixie tutu, except I didn't unravel any yarn or tie any braids or knot anything.  I just sewed the elastic in a circle the size of mini's waist, cut strands of yarn DOUBLE the length I wanted the skirt, grabbed about 5-9 yarn pieces at a time, folded them in half, stuck them under the elastic, pulled the ends through the loop of the fold and pulled, but not too tightly.  Bam.  Done.  Basically you're making one of those no sew tulle tutus but with yarn.

Next up, the anklets and wristlets.  These were present in every hula dance photo we looked at, so I assumed they were important.  And guess what.  No tutorial needed, because you make them EXACTLY as you make the skirt, but with skinny elastic.  Holla!

Ok, moving on to the belt.  In keeping with the general theme, this is EASY.  You cut a thick ribbon about the size of your child's waist, a little smaller.  You cut two more pieces of ribbon that are thinner width.  They can be as long as you'd like.  Then you dismantle six thousand dollar store flowers.  Ok, maybe not six thousand.  But close.  You want to take them apart completely, because you don't want any of the pokey plastic parts sticking your kid in the stomach and making her whine.  Then you take the thin ribbon and hot glue it to the ends of the thick ribbon, wrapping the thick ribbon around it nicely.  Hot glue the flowers all along the thick ribbon.  And you're done.  Belt.  Just wrap it around the top of the skirt and tie a bow in the back.

 Finally, the laie.  It's a lot like the belt, would you believe it?  You only need one thick ribbon though.  So you cut some thick ribbon to the length you want - so you can slip it over your child's head and it will hand about to their belly button.  Tie the ends in a knot.  Hot glue disassembled flowers all along on one side of the ribbon.  Done!  Woo hoo!

I discovered that the dollar store had a number of different flowers that looked very tropically, to me.  Many of them lose their shape when you pull all the plastic parts off, but you can glue and pinch them together in such a way that they look good as new.

I had all of this on hand except the flowers so the whole thing only cost a couple bucks!  And one short evening of crafting.


 Watching this crazy hula dance and seeing this grin?  Totally worth it.

***


And, guys.  My link party is looking so very sad.  Please link up!  Come on!  It's fun! (that's a button down there.  Click it.)


*Be sure to check the right sidebar for all the fun parties I link to!

Wednesday, April 9, 2014

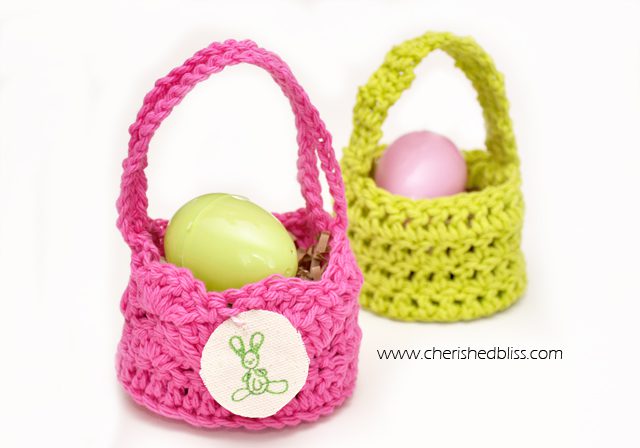
Mini Easter Baskets - with Ashley from Cherished Bliss


I love Ashley's blog, Cherished Bliss.  It's been a favorite read of mine ever since Yarn it all 2012 when she linked up her yarn tote and I featured it!  She's got some amazing ideas, tutorials, recipes and more, so don't miss out on that!  Today she's sharing an adorable idea for Easter fun that can extend throughout the year!

***

Cherished Bliss IntroHi Everyone! Ashley here from Cherished Bliss! I am so excited to be part of the Yarn it All Series : ) Easter is coming and I made these little baskets for my kids last year to decorate with. I think they got a little jealous that I was playing with all the Easter decor ; ) They had a blast carrying these around, and they make great toys throughout the year. We still play with them! Mini Crochet Easter Baskets These are seriously the easiest things ever to make. A great beginner project once you know your basic stitches. So I don’t have an exact pattern for these since I just whipped them up real quick, but I can give you a simple little tutorial. Please note: This is a tutorial on how I completed the project, not an actual pattern. How to make a Mini Crochet Easter Basket Basket: -ch 3, sl st to join. -dc in loop with as many stitches as you wish. -Then just keep increasing around until you get the diameter that you want. -Once you are happy with your diameter and sl st your final st, ch 2, and dc in the front loop of each stitch. This will give you the sides of the basket. Keep double crocheting until you are happy with the height. -Once you sl st your last stitch don’t fasten off. Next you will make the handle. Handle: -ch 2, dc in next two stitches, turn repeat. Keep going until you are happy with the size of the handle and sl st to the other side of your basket. That’s it! : ) Now you can enjoy these fun little mini Easter Baskets! I made a shell stitch basket for my daughter that was a little more "girly" you can find that pattern over on my blog HERE. Mini Crochet Easter Egg Baskets And here are the rest of my crochet projects... brace yourself, there are lots < -- Not really, there are 4, haha. But I'm hoping to spend some time crocheting over the summer while I watch my kids run in circles at the park! : )
I would love to stay connected with you! You can find me here:
 
***

My kids love baskets of any kind - these would be a big hit around here to carry all sorts of fun treasures... hot wheels, loopsies, squinkies, rocks... the usual.
I might have to take up crochet.


Enter the yarn it all giveaway from Call Her Happy HERE.


Saturday, April 5, 2014

Free Crochet Patterns with Leslie from Try to Keep Up


Today's guest is the lovely Leslie from Try to Keep Up.  She's got some great stuff on her blog (like these yummy cold rolls or these pretty scarves.)  She's basically a crochet machine, and has some awesome ideas for us!

* * *

Hello Bugaboo's (bugaboos? I dunno, I'll just go with it).  
Hi there!  I'm Leslie and I blog over at Try To Keep Up, and I blog a little bit about everything, but mostly recipes and crocheting.  I am so excited about Yarn It All!  When I found out about Kim's yarn party I just had to be a part of it!  I've been a crocheting machine for the past year since starting my business West Coast Leslie Deigns.  WCLD (for short) specializes in one of a kind, handmade crochet apparel for women.  And I wanted to share a few of my favourite patterns with all you lovely peeps.

First is a super duper easy pattern for boot cuffs!


I found this pattern over at Domestic Bliss Squared.  Her pattern isn't the easiest to read, but there is an update from another blog that helps a bit.  And like any good DIY-er I couldn't just follow a pattern (they're more like guidelines, aren't they?) You see the scallop pattern at the top?  Yeah I changed that.  I found that the 5 DC didn't give a nice enough scallop, so I did 6 DC.  I also looked into how to do a proper scallop, which helped.  Oh, I also added some super cute, vintage inspired, wooden buttons. Those buttons are probably my favourite part of these cuffs!

I've even come up with a few patterns myself! Like this one, the Half Ribbed Ear Warmer.  Check out the pattern on my blog.  I like a relatively plain look, but wanted to punch it up, so I used back post and front post double crochet stitches to add a little texture.

Ooh, or if that's not your style check out this Turban Style Earwarmer.  I found this yarn with sequins and couldn't help but buy it!  (It's Loops and Threads Dewdrops, if you were curious)  Check this out for the pattern.  It's super easy and a great first project for new crocheters or teens.


Or hey, maybe you just want an ear warmer but don't have the time to make one.  I got you covered.  Shoot me an email - I love to make custom orders.  Or check out my online store for my full product line.  I'll make pretty much anything and ship all over North America so don't be shy!

Thanks for having me, Kim!  I can't wait to see the rest of the superb yarn projects coming up this month!


* * *

Thanks, Leslie!  I'm beginning to think I'll have to take some lessons from my mom so I can make some of this fun stuff!


AND, don't forget to link up to the yarn party!!  I'll be featuring some of your projects - so if you've got a craft, painting, project or idea involving yarn, link it up!


*Be sure to check the right sidebar for all the fun parties I link to!
Related Posts Plugin for WordPress, Blogger...