Showing posts with label stashbusting. Show all posts

Wednesday, February 5, 2014

A new take on an upcycled oldie.


A while ago I realized we needed a new Valentine garland, because quite frankly I have no idea where our handy heart garland went.  I mulled it over for a bit, since there were some important criteria for said garland - a. it had to use readily available materials and 2. it had to be easy - and decided to do a new take on our pumpkin garland of many, many moons ago.  I like this new take even better than the first one.


In our new version, I wanted to add interest to the tubes without simply spraying them or painting the whole thing.  In my mind, lace is always associated with romance and therefore Valentines - so that's the direction I went.

Here's what you need to make the garland:
TP tubes.  Several - the exact number depends on how long you want it.
Baking sheet
paper
lace scraps
acrylic craft paint in your choice of colors
foam brush
scissors
fingers
hot glue gun
*optional: ribbon*

1. Lay several layers of paper in a baking sheet.  Preferably a baking sheet you don't actually use for baking anymore.
2. Cut a piece of lace to fit easily on the sheet.  Note: the ideal lace will be about as wide as the tube is long, have an interesting design without being too fine or delicately detailed and NOT be curved - like mine is.  Ces la vie, right?
3. Pour some normal craft paint in your choice of color right over the lace.  
4. Spread the paint out over the lace with a foam brush.  Really get into those details.

Here's where it gets fun.
5. Carefully roll your tube over the paint saturated area on the lace scrap.
6. Pour paint in other colors over the rest of the lace.  Spread it out with the foam brush.
7. Roll one tube at a time in each of the separate colors.
8. Make sure you roll only once, in one direction, pressing down quite firmly as you do so.  I used both hands, not just one as it appears in the photos.
9. Let your little hands help you!  They love this messy part.
10. The lace details will not transfer perfectly to the tubes, though if you had a straight piece of lace and not a curved one like mine it would be much easier to stamp the design more accurately.  We did notice that the designs were much easier to see with the darker colors.  Not sure why.

Repeat these steps with all the colors you want on all the tubes.  We did white, light pink, dark pink, red, turquoise, and gold.

Be sure to let all the tubes dry completely before moving on.  It should only take about 15 minutes.

11. Use a scissors to cut slits in the tube, 
12.  starting at one edge and stopping about 1/2 an inch from the other edge.
13. Begin on one end of the tube and alternate which side you cut in from so the slits are not all on one side of the tube.
14.  This will flatten the tube.  So take the tube in your palm and squish it back into a circular shape again.

15. Gently pull on the ends of the tube to separate the slits and unfold them into circles.  You will need to really bend the circles together where they are attached to get them to open up all the way.
16. Pinch the top, middle part of the circles together and down into the circle to make the top of the heart.
17. Pinch the bottom middle of the circles together and down to form the bottom of the heart.
18.  Look!  A chain of hearts!
As you can see, the little helper was pretty fascinated that it was so easy to create hearts from toilet paper tubes...
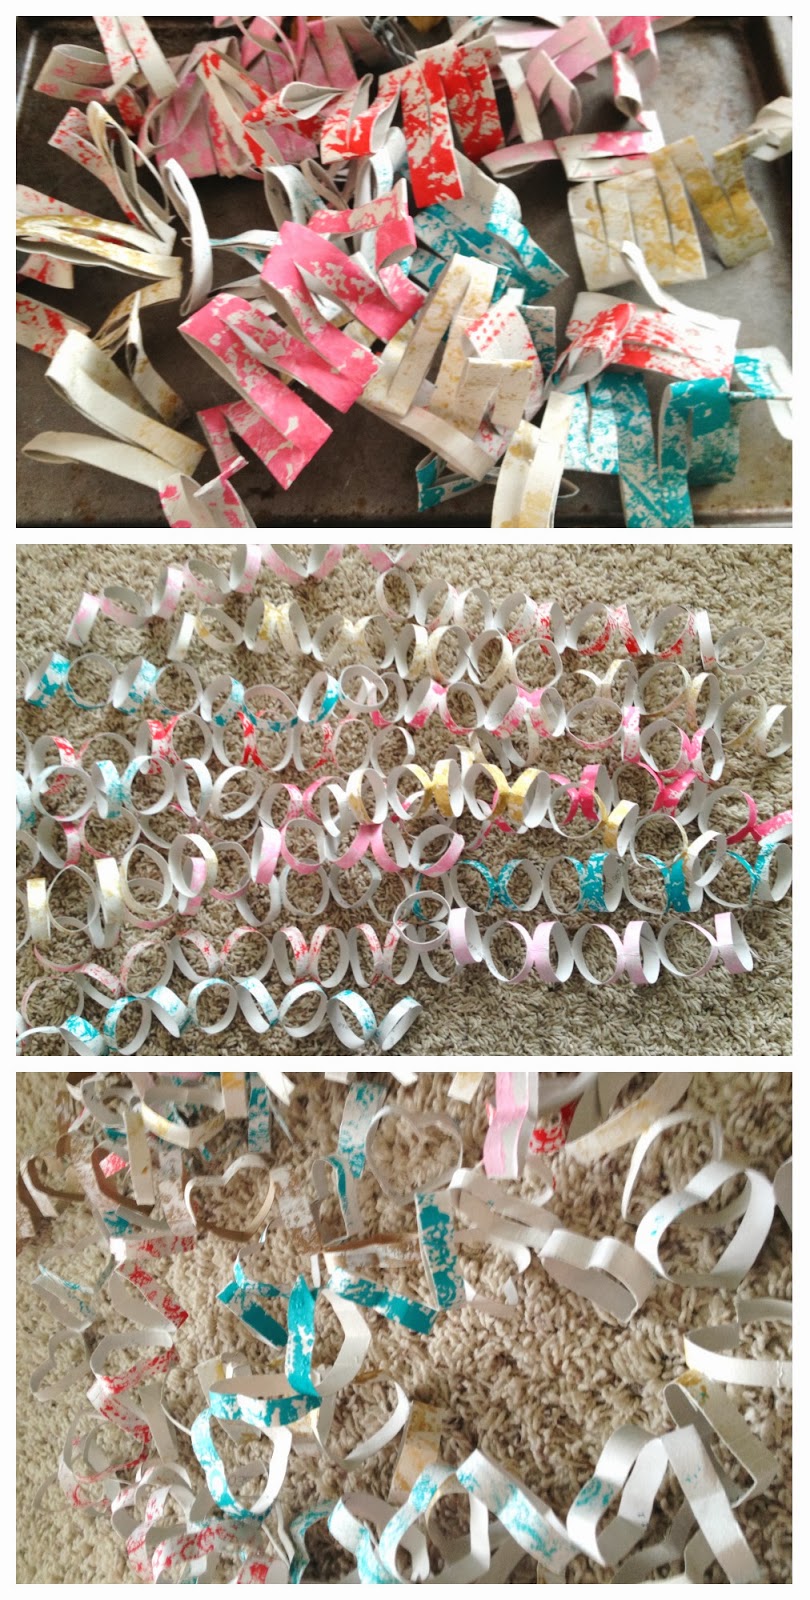
If you have a lot of tubes - and we did have quite a few - you'll likely want to do these past few steps conveyor belt style - first cut slits in all the tubes, then squish all the tubes back into circles, then open all the tubes into chains of circles, and pinch all the circles into hearts.

Then all you have to do is use a hot glue gun to glue the chains of heart together end to end to make the chain as long as you want it.  For some reason there's no photo of this step.

This part is totally optional, but a cute way to finish it off.
19.  Use your scissors to make a slit in the outer side of the last heart.  Stick a piece of ribbon through the slit.
20. Tie a knot in the end of the ribbon that's inside the heart.
21. Tie a bow in the end of the ribbon that's OUTSIDE the heart.
22.  Do this with the heart on each end of the garland.

You may wonder, as I did, why you would bother to stamp the tubes at all if you're just slicing them up.  Below you can see that some of the details are still noticeable after cutting.
Now, how noticeable the patterns are will depend on how much space you leave between slits - or how wide you make each heart.  The wider you make them, the less hearts you will get out of each tube.  I also discovered that the really wide ones didn't keep their pinched shape as well as the slightly smaller ones.  

I like the somewhat distressed look.


And no, my "mantel" isn't done yet.  Sheesh.

But at least I have a cute, upcycled, kid-friendly, Valentine appropriate garland to show off.


*Be sure to check the right sidebar for all the fun parties I link to!

Friday, August 30, 2013

Buttoned up gifts - from Sophie


Hope you didn't miss me much yesterday... the gift I wanted to post just isn't quiet ready yet, and it's best not to rush these things, right??  I know I don't need to explain to you what crazy is like when you're running around to back to school shopping and open houses and registration and you're totally new to the public school parent thing because your kid is just starting kindergarten (eek!) and the school he's going to was just completely rebuilt, ground up, so everything is totally chaotic and crazy and disorganized as they try really hard to make sure everything is actually ready to open by September 3rd, and of course you're 8.5 months pregnant as well and OH! Did I mention mr is in CHINA AGAIN?!?!  Plus you've just gotten your second respiratory infection of the summer.  Yea!  Anyway, you know exactly what that's like, right?
I knew it.

SO.  Today is our last guest post for Gift it, which makes me sad.  BUT it's Sophie, from Cirque du Bebe, which makes me exceptionally happy.  If you haven't stalked her blog, it's high time you go do it, it's one of my faves.  She can sew like nobody's business.  And her tutorial today?  It's so prettily versatile!  


Hello and thanks for having me! I'm so excited to be taking part in the 'Gift It' series and sharing a super easy, super fun DIY for cover button hair pins. Since taking up the sport of cover button hair pinning I've made and gifted, hmm, probably close to thirty sets and to all different ages. Every time the 'WOW!' has come before the 'did you make that?' which we all know is the best case scenario for a hand-made gift. And that's the best part, for a less than five minute project, they look so un-handmade when you're done. Plus you get to do some scrap-busting in the process. Make them kitsch, make them pretty or funny or yummy but I must warn you...once you pop...


...you won't stop! 

Getting set up
For this easy project you will need flat back self-cover buttons (regular buttons have a shank back and won't stick to your pins). Each button is made up of a round smooth piece which becomes the front of the button (bottom right) and a flat piece which presses into the back (bottom left). A range of sizes work well for this project, these buttons here measure 28mm in diameter but I have also used the slightly small 23 mm (cute for small florals). If you were making earings / studs you go smaller still. The tool you need to make your buttons (top left) is made up of a 'pusher' and a 'holder'. Depending on where you source your flat-back buttons, the tools may come included or can be bought separately. The easiest way to get started, in my opinion is to buy a 'kit' with the buttons and tools included. Etsy is a great source of all the self-cover buttons you could ever want for and I picked up all the buttons / tools / glue / pins you see above from here.

 You will also need hair pins with a 'glue pad' and you can choose between silver, brass or bronze. I've used both the brass and the silver and they both add something different. Once again, Etsy is a mecca for 'hair pins with glue pad'. Now, a word on glue. E6000 is the BEST and you could be lucky enough that your local craft dealer otherwise you can get it online. Which is the case for me and I ran out after the last button making festivities so here I'm using some regular craft glue, which does the job but E6000 it gives the best results and the strongest hold. This is the perfect project for using up those scraps, small prints work well and if you are low on those you can started out buying scrap bags just for this purpose on Etsy. 'Kawaii scrap bag' wields awesome results!

Find a little spot of magic on your fabric with cover button potential.

Cut a rough circle around this part that is approx 3/8" bigger than diameter of the self cover button. 

You can see here the size of the fabric circle in relation to the button...and no biggie if it's not a perfect circle, we will trim later.

Place the fabric circle face down over the 'holder'.

Put the smooth round side of the button face down on top of the fabric.

Press to the bottom and let the fabric curl in around itself.

If you have any extra long sections you might want to re-line the fabric up and try again (only important if trying to center a print) otherwise just trim of the longish part.

Grab a flat piece and place over the top, tucking all the fabric in underneath.

Place the 'pusher' over the top and press with all ye might until you feel a little 'pop' (hopefully not you).

Push that baby out...

Naaaawwww! It's a dog!

If you're making a pair of hair pins, follow all the steps again up to this point. You could even play with a little narrative and pair a girl and a dog, a cat and a bird cage etc.

Place a dab of glue onto glue pad and press firmly onto back of button.

 Leave to dry.

Poke some holes in a piece of card, wack them on, gently, and admire your perfect hand-made gift, made with love and scraps.

And if you feel the urge to make a few...

...hundred more, best not to fight it.


Thanks Sophie!  I am in LOVE with covered buttons and have used them for earrings, but never bobby pins.  I'm going to have to try it.


Guess what?  Due to Gift it.  Gift it good.  starting a little late this year (whoops) I have decided to extend it into the first week of September because 1) it's my blog and I do what I want, 2) it's my birthday on the 9th!  And that'll be the wrap up day, and 3) then it'll be a whole month.  ish.  Stay tuned!


Thursday, June 27, 2013

See? I did stuff.


Before we go any further, I feel I should let you know that I changed this blog's email address.  Unfortunately, it was hacked (sorry if that affected any of you) and I felt it best to just dump the old and get a new one.  This means that 1) there were a lot of emails that never got responded to.  And I'm sorry... really.  I've made it a goal to keep up with emails from here on out. AND 2) if you have my other email address, it won't work anymore.  I've updated the link on my blog so if you just use the button to send me an email I'll get that.  Otherwise, if you'd like to email me, here's the new address:
bugabooblog @ yahoo . com

just take out the spaces or it won't work ;)  I feel it's much shorter and sweeter than the old one anyway, right?

SO.  Today I don't have a tutorial or anything, but I wanted to convince you that I have tried to be mildly productive while lying around eating potato chips.

See?  I made a vest.

A while ago, See Kate Sew sent out an inquiry looking for people who would be willing pattern testers for a few different patterns she was working on and I had the enormously good fortune of testing this adorable guy - The Aztec Hooded Vest.  This was something she put together for one of her PR&P Allstars looks.  For a number of reasons, I was really excited to get started one it.
1) I don't sew with patterns.  Did you know that?  I can't read a pattern to save my life.  I've tried.  I buy them sometimes.  Then I take them out and the instructions are like GREEK.  It's a totally different language than I speak.  The last time I sewed from a pattern I was in Costume Construction in college and I had a VERY easy pattern and LOTS of help.  I gave them up years ago.
2) There were lots of little variations that came with the pattern.  Pockets?  No pockets?  Interfacing the hood so it's stiffer?  Reversible?  
3) I was eager to see what I could do with help from a good pattern and clear instructions.

The result?

Goodness I love that dimple in her cheek and her lone little freckle on her chin... but that's beside the point.  

The pattern was so easy to put together!  You just printed it out, taped the pieces up, cut them to the right size, and pinned them on the material.  I thought is would be more difficult to make the pieces line up or to maybe I'd have to print them out a weird way or something, but nope.  Very straightforward.  

I chose to use vintage fabric from my Grandma Beth.  The first is a soft gray sweatshirt knit with stripes and the second a regular, non-stretch knit with rows of little flowers.  I thought that would sufficiently girlify it.  I was excited to find something suitable to use my Grandma's fabric for.

I only ran into two little snags.  Even though I was double and triple checking the instructions and pictures, I accidentally sewed the welt pockets wrong, NOT putting the wrong sides together.  Ooph.  I had to very carefully pick out the stitches, and since I had no extra lining fabric to use, I had to make due with my woefully stretched out fabric.  

Yes, that's a sad little welt pocket.  But it's the first pocket I have EVER SEWN in my LIFE.  So, I'm just gonna be glad she can stick her hands in there.  My sister told me to just pretend I made them that big on purpose, for aesthetic reasons and all.

The second snag was that never having lined anything correctly before, I couldn't for the life of me figure out how to attach the lined hood to the sweatshirt.  I sewed it on twice with horrible results and unfinished seams.  But a quick little email to Kate cleared it all up and I felt like a big doofus for not figuring it out.  See?  Perfect.

I admit it.  I love it.  I especially love all the clean, finished seams.  Mine isn't truly reversible, because I couldn't find a separating zipper that was reversible.  *frustration*  Is that something fabric and craft stores usually have?  In any case, I let her wear it whichever way she wants to, zipper or no.

The pockets aren't true welt pockets, I know, but this way she can fit a lot of little treasures in there.  And keep her hands warm when it's raining.  Which it was when I was taking these pictures.

In short, I think this may be the most "professional" looking article of clothing I've sewn.  I suppose there's some good in using real patterns, after all.  I might try my hand at a few more, provided they're written in English and have pictures.

I urge you to go check out See Kate Sew's pattern shop at big cartel.  She's got some good ones, not just this hoodie vest!  She also has some free patterns you can find here.  I'll for sure be making the skinny tie pattern for a few boys in my life...

I know I'm probably more that a little biased, but isn't mini the cutest thing ever?


*Be sure to check the right sidebar for all the fun parties I link to!

Wednesday, December 5, 2012

Good thing I hoard.


I realized on November 29th that I had been intending to create an awesome advent calendar.  Truly, truly awesome.  Big dreams, guys.  HUGE.  This realization was followed by procrastinators remorse, since I was fairly certain there was no way I could recreate any of the advents I'd pinned in only two days, with no money left in the craft budget.
The fact is, this has happened literally every year for the past 3 years.  And once again, I was going to put it on the to-do list for next year - resolving to finally check it off early in November.

And then I thought, no.  No, by golly.  These kids need an advent.  (And quite frankly, I kind of needed one too, to help get me in the right mood for Christmas...)  So I decided to quickly dig around the house and in only two nights create:


It's groundbreaking, really. I know.  Make some cute printable circles - red, turquoise, citron green - with numbers 1-24.  Print them out on white card stock.  Punch the circles out with your circle punch.

Brown paper lunch bags.  Plain white card envelopes.  Washi tape.  Ribbon.  Baker's Twine.  Decorate to your hearts content.  Though, I do discourage you from staying up until 2 to finish this step.  
Slip in a tiny scrap of paper with a fun family activity and two small treats - which may or may not be leftover Halloween candy.  And by may or may not I mean definitely was.  I was going for on-hand here, remember?  I also slipped in a few non-sugary treats like some super balls and sticky hands.


I needed an "on-hand" way to hang the bags and envelopes.  I created a bow with some heavy cotton fabric that was kind of stiff and would hold its shape.  I sewed a casing using some white fabric for the inside of the bow.  After making the casing, I sewed it into a rectangle.  Then I squished it in the middle and wrapped some knit fabric around it, tying it tightly in a double knot in the back.  


I left the ends long so I could attach the goodies.

I used wooden clothespins that I had - you guessed it - on hand. 

 I didn't buy a single darn item for this project.  Not one.  Not even the goodies, which is probably me being extra cheap, but I did only have two days to whip this whole thing up.

Maybe next year I'll make something crazy awesome.  I'm saving the bags as we open them as a backup though.

It's only December 5th.  You still have time.  Especially if you go this route.


*Be sure to check the right sidebar for all the fun parties I link to!
Related Posts Plugin for WordPress, Blogger...