Showing posts with label games. Show all posts

Wednesday, May 21, 2014

It's just not a party without a piñata.


Today I thought I'd show you the Dora party activities we did!  There were only two: a treasure hunt and some Pull-pinatas.  I set up the treasure hunt like a Dora adventure!  

Here's how we did it!  Before all the kids got here, I set up the three stations (Babbling Brook, Singing Gate and Treasure Island).  I taped up little instruction cards at each station so the kids could read them and know what to do in order to move on.
Once the kids arrived, they each got their favor cinch backpack and looked inside to find their own personal map (I made them on the computer with clipart and printed them on normal paper).
The first stop was babbling brook.  I laid down blue fabric on the floor for the brook.  I used red, white and yellow construction paper for "stepping stones."  The kids had to use the stepping stones to cross the brook, but they were all messed up, so first they had to complete the color patter by laying the paper stepping stones in the right spots.
It was pretty fun seeing them hop on from "stone" to "stone"!

Next stop was singing gate (which was the baby gate we had for when the kids were tiny).  There was a piece of card stock taped up with a bunch of tiny clip art pieces all mixed up on it.  The kids had to help singing gate sing the right words to his song by putting the pictures in the right order and then all singing together.  
Too cute!

Finally, the gate opened so they could go down the stairs to treasure island.  I put our ottoman in the middle of the room and put a chair on top of it, then covered it with a sand-colored blanket.  I attached different sand-colored shapes all around the ottoman by taping them to the blanket.  The shapes were "keyholes".  The kids had to look through their backpacks and find the correct item to help them "open" the locks.  In each backpack, there was a different white shape - a key.  The kids matched their shapes to the keyholes and taped their keys up.  Then I lifted the blanket off to reveal...

A treasure box!  Inside were awesome gold and silver chocolate coins!  (I found them for cheap at Aldi)

Once the kids had divided up the treasure into their backpacks, my hubby jumped through the door and pretended to be Swiper!  The kids all joined in keeping him away, which was adorable.  Don't tell mr I used this photo, he'd be all embarrassed.

After the treasure hunt was over, we did the pinatas!  I bought a 3-pack of paper lanterns in the party section at Target.  They were bright Dora-esque colors.
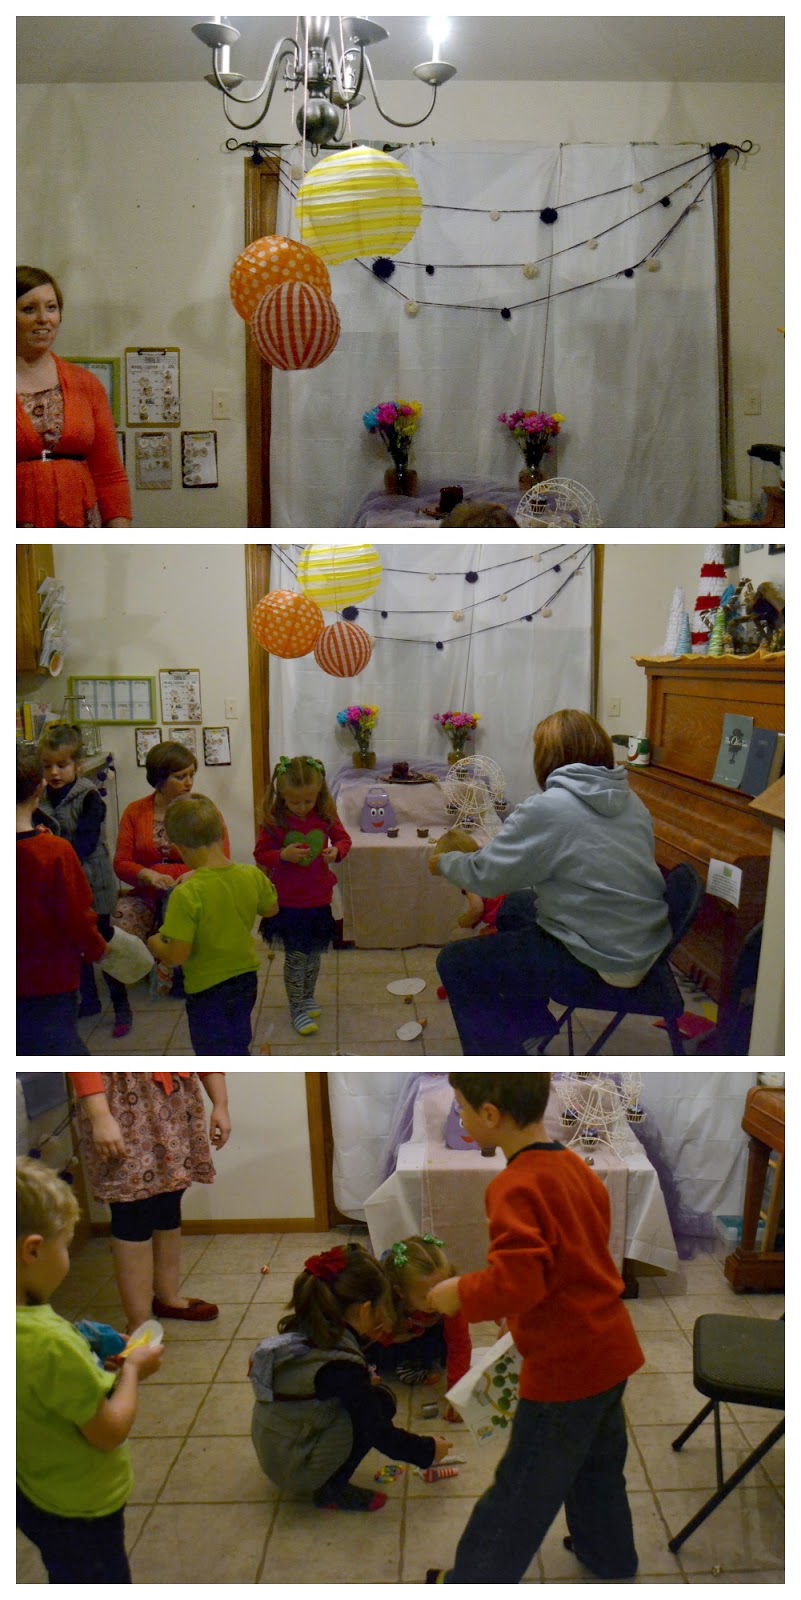
Then I cut out three pieces of card stock to fit inside the lanterns in the bottom.  I punched a tiny hole in the middle each piece of card stock, put a piece of cotton twine through, knotted it and taped it, letting it dangle down through the small hole.  Then I placed it in the bottom of the lanterns and put some small candy and trinkets in each one.  I had the kids work together to pull the three strings at the same time and as they pulled the card stock popped out and all the goodies fell!  It was pretty much the only way we could have a piñata in our small house!  You can see a full tutorial on how to make a pull piñata like this here.

The kids really seemed to love the activities and have a blast!  I had fun watching them!


*Be sure to check below for all the fun parties I link to!*

Tuesday, January 28, 2014

A roaring good time. Part 2.


Welcome to part 2 of bug's monster party!  Which actually wasn't his most recent party, but was from a year ago... whoops.

Today:

As I related yesterday, I always procrastinate too much to do everything I'd like for the party, so the decorations were pretty simple.  

We used red and white striped table cloths all over, like the ones you see in the pictures below.

Other than that, the only real decoration was the front door:
I folded a green plastic tablecloth in half and cut it to the width of the door.  Then I cut strips in the folded side and taped it up on top for hair.
I colored the center of a white paper plate with a black circle for a pupil and taped it up.
I taped a long strip of red duct tape across the door, and stuck in a piece of normal 8.5x11 card stock in it, so it was sticking up out of the duct tape mouth like a tooth.
bug laughed and laughed when he saw it.

We played pin the eye on the monster, which I don't have any pictures of.  I printed out this monster, which I found on picmonkey:
I whited out the inside of his eye.  That way, there was a general area to get the eye into, but nothing SUPER specific so it wasn't TOO hard.
I glued it to poster board, taped it up on the closet door, gave every kid a big self-adhesive googly eye, blindfolded them, twirled them, and let them have at it.

For the big activity, we made:

Here's the craft station I set up:
Ahead of time, I cut:
Several strips of fake fur.  I had scraps in my stash and I just cut them long and thick enough to be a cuff bracelet.
Lots of shapes from red and white self-adhesive felt.  These were for eyeballs, teeth, mouths, noses, etc.
The craft station consisted of: 
a very low-temp, kid-friendly glue gun
glue sticks for said glue gun
self adhesive velcro squares in tan and white
scissors
little cups of the precut self adhesive felt pieces
self-adhesive jewels
goggly eyes in an array of sizes (some with lashes!)
fake fur strips

The kids lined up and went by the craft station to pick the main pieces they wanted.  Then they sat at the dining table to put their bracelets together.  I had adults helping cut the fur strips to the right size, glue things on if needed, put the velcro where it needed to be, etc.  The adhesive pieces were really a good idea because otherwise kids would have been impatiently waiting for adults and hot glue guns.
I think they were a hit, because several kids made more than one.

The bracelets were part of the favors, but here're the rest:

For the play dough favors, I simply hot glued on googly eyes, drew the mouths and x's with a black sharpie, and used white address stickers which I cut out for the teeth.  Super simple and cute.

bug was excited to help me stick these self-adhesive googly eyes all over the suckers.  He'd been begging for these colorful suckers from Walmart for forever, so I gave in for the party.  He picked out each flavor with a cousin or friend in mind.

For the sucker stand, I just turned a shoe box upside down, wrapped the top and edges with tissue paper like I would a present, stabbed some holes in the top with a knife, and plopped them in.  Then I put the whole thing in a low basket.  Ta da!

And that was pretty much the whole party.  It wasn't a huge deal, but it was right after Christmas, so let's face it.  This kid gets the shaft.


*Be sure to check the right sidebar for all the fun parties I link to!

Wednesday, August 28, 2013

A Fun Toddler Gift For MOM.


No, that's not a typo.  This is a fun toddler gift.  It's also a gift for mom!  She's going to love it as much as said toddler.  Why?  Because it's guaranteed to keep toddler happy and busy, it's portable, and it's cute.

It's a:

You've probably seen quiet books before.  You've probably also seen busy bags before.  This is a combination of the two!  It's super easy and inexpensive to do, too.  (and wouldn't you know it, anytime you think you've come up with something so very GENIUS, you do a quick search and find a million other moms who've come up with the same thing...)  BUT.  I've got free printables!

Ok.  So.  Here's what we're making:

Except yours will very likely not be for Zo-Zo.  I've got some printable covers at the end of the post you can use, or you can create your own with the gift recipient's name.

And here's what you'll need:
1. A HUGETASTIC binder... I don't know how big that one is, because I had it in my stash - something my mom gave me forever ago.
2. Binder pouches.  I got mine at Walmart for around 85 cents each.  You'll need one pouch per activity you create.
3. Busy Bag Activities!  

Now.  A few notes about GIFTING busy bag activities:
You want them to be age appropriate, so keep your recipient in mind as you decide.
You want them to be engaging, but NOT expensive.  I mean, the most expensive part of this present should be that giant binder.
You want to personalize the gift, so think about what the kid likes to do - interests, favorite colors, favorite characters, whatever.

I'm going to show you the activities I decided to put in my book for my daughter (though, truth be told, I think my son will play with it just as much).  I will own up to something right now:  Ready?  I did not make all of these activities.  I (like many of you, probably) went to a busy bag swap.  It was organized by a mom I go to church with and I didn't know most of the people there, except for the friends from church that came, so I can't really credit a lot of these activities by name or anything, but where I could, I've listed links to tutorials and such for you.


This was created by my friend who organized the swap.  It's all the animals from "Brown Bear, Brown Bear, What Do You See?" printed on cardstock, cut in half and laminated -  as seen on Frogs and Snails and Puppy Dog Tails.  For any child that loves to read and is familiar with the book, this will be a fun treat - they may even start quoting the book, like my kids did.


I didn't know the person who made this fun kit, but it's just felt cupcake shapes - cupcake, paper wrapper, frosting and extras - in different colors.  You can find this on Alphamom.  The kids put the cupcakes together however they want to.  Bug likes to pretend that big red piece is licorice.  Think of the variations!  Mini loves cupcakes, so it's perfect for her, but if your child likes snowmen, or a specific animal or ice cream cones you can easily personalize this one!


This one was also made by the mom who organized the swap.  I cannot send you to the link where she got this, because I can't find it.  Sorry.  It would be easy to make, though.  You have three picture "mats" - one with a caterpillar (the longest), one with a fish (medium) and one with a dog (short) - that you print on card stock, cut out and laminate.  Then you also print out three "rulers" with the same pictures and a bold mark across the top for measuring against (laminate that too).  Finally, you cut different things - yarn, ribbon, pipe cleaners, fabric, felt - to the three different lengths.  The kids hold the items up to the ruler and then place them on the appropriate mat.  While bug got a little bored with this game, mini loved it.


A church friend brought this one, and I thought the numbers were adorable.  You know how to play memory, right?  This game is just numbers printed on cardstock and laminated.  Unfortunately, I have no idea where she got these printables.  BUT, there are a million DIY memory game ideas out there.  I like this one.  And this one.  And this one, too.  mini was so excited every time she found a pair.


Also made by the organizer.  You sew felt popsicle shapes in different colors, then use markers to color the tips of popsicle sticks.  The kids match the sticks to the popsicle.  Found on Planet of the Apels.


I love this idea.  Each puzzle is a 4x6 photo, spread with glue, with popsicle sticks stuck on the back, then cut apart.  The girl who made this used generic photos of toys, but if you know the kid you're making these for, you can use photos of family members or favorite animals or the like.  Both bug and mini love these.  Also, she put them in tiny snack-sized ziploc bags, which were the PERFECT size.  You can see a full tutorial for this at Empowering Mommy.


This was one of my contributions.  You can find the full tutorial at Craftiness is Not Optional.  This was a really inexpensive idea since I already had clothespins (you can get them at the dollar store, though!) and the paint chips are free.  You need two matching paint chips for each color strip you want to make.  Again, you can customize this according to favorite color!


This isn't something I made for the swap, but something my kids and I did together.  We made family stick puppets.  Given mini's love of small dolls and creatures, I thought she'd like these a lot.  Unfortunately, the "Zoe" puppet has gone missing already.  These are so easy to make - just draw the recipient's family with crayons and cut around, OR take pictures of the individual family members (full body, not close-ups).  Make sure to make them out of sturdy card stock.  You can laminate them, too.  Then we just used strong tape to secure them to the popsicle sticks - sticks.  The kids love playing with their own little mini puppets.


Again, I didn't make this for the swap, but for a little "home school" I was doing with my own kids.  I created the two charts (one is a picnic blanket with the numbers across the top and the other are fishing boats with poles out the back).  The kids place the correct number of ants or sea creatures along the chart next to the numbers.  I got the little plastic ants online here.  I got the plastic sea creatures at the dollar store.  We use them for other games I've made up, too.
Here are the printables for the picnic/ant counting and for the fish counting:


AND LASTLY:
A while ago, online, I saw a felt busy book with a car page that had a figure 8 racetrack on it with an accompanying car.  I don't know where.  Sorry.  BUT.  I thought to myself, what a fun way to have kids start "tracing" their numbers.  mini needs some practice with that, anyway.  I couldn't find any large numbers that looked like roads or tracks, so I made my own.  I printed them out on cardstock and placed them front and back in page protectors.  There are numbers 0-9.  I included small cars in bright colors to drive around the numbers and dry erase crayons (not markers!) in matching colors to the cars so they can write on the numbers and erase them.
Here are the printable number roads for you, so you don't have to make your own (I won't lie, it was a pain):


Phew!  That's a lot of ideas!  The best part about the activities I included, is that you really don't need anything expensive or super special to create them.  Mostly you need felt, card stock/computer/printer, contact paper OR access to a laminator, popsicle sticks and a few odds and ends like clothespins and scrap ribbon.  No biggie!  

So, let's put our busy bee book together so you can give it away!  
All you have to do is put each activity in its own binder pouch, then slip them in the binder.  Here's the order I put it all in the book, though it's up to you.


Basically, I put all the activities first, then the ants and fish, the cars and dry erase crayons, a few normal crayons, the ant chart, the fishing chart, the number roads, and then blank paper in the back so they could color with the normal crayons.

As you can tell from the photos, I needed the kids to try it out for me so I could write this, otherwise, this would totally have been a birthday present.  I'm definitely planning versions for my nieces and nephews for Christmas though.

Now, all you need are the cover pages I promised!  So here you go!


And here are about a billion more ideas for busy bag/book/box activities:
My Small Potatoes - Busy Bag Round Up
Second Story Window - Preschool Busy Bag Activities
Second Story Window - Toddler Busy Bag Activities
The Princess and the Tot - Busy Bag Ideas
Josh, Laura, Brynlee and Mya - Busy Book Felt Page Ideas

And if you want a million more search "busy bags" on pinterest.  Whoa.

And now, the longest post in the history of the world is done.  I swear.  Over.  Finished.  Oh, wait.


Now it is.  But there will be another one tomorrow.


Tuesday, October 2, 2012

"I Spy" an addiction being born.


Since we're on the subject of traveling 6 hours to the backwoods, (well, ok, we were most recently on the subject of food, before that Spumoni, and before that santa and ninjas.  But before THAT we were talking about driving up north and staying there for a week and the need to entertain our children, so...) I figured there was no better time to share a simple and fast car diversion I whipped up for the kiddos.  (These obviously did not replace the awesome car bags my sister made the kids... rather ADDED to the options of travel distractions available.)


I saw somewhere (pinterest?) that someone had drawn a scavenger hunt and covered it with giant bubble wrap.  That was the catalyst for my project.  I didn't have giant bubble wrap and couldn't find it anywhere, actually (lame, people.  Will you please stock giant bubble wrap?  Thank you.) so I decided to just use normal bubble wrap.  And it worked out just fine.

I came up with two different "I Spy" games using this same method.  First is your typical scavenger hunt type I spy and second is for those car lovers out there, like bug.

So, for this easy shmeezy project, you'll need:
The printables available below
white card stock
bubble wrap
double sided tape
scissors

Your first step is to print out the cards below on card stock.  They were created to be about 5x7.  At this size, they are perfect to use with the mini clipboards you can find at Walmart and sometimes the dollar store.  A mini clipboard is pretty invaluable when traveling with kids.


Once your card stock I Spy cards are printed, you just need to cut them out, like so: 


 and put pieces of tape around the edge of the box of pictures:

Next, cut a very loooooong piece of bubble wrap to the width of your card.

Line up the top edge of the bubble wrap with the top edge of the outlined box.  Smooth the bubble wrap down onto the tape, making sure it lies flat.  Don't push too hard, or you'll take all the fun out of future attempts to play the game.

Trim the bottom of the bubble wrap.

And you're done!

Repeat this with more cards, so you end up with several per child.

For the "How Many Cars" game, you simply repeat the above steps with the other printable!

You don't need to put bubble wrap over the car pictures, just next to them.

First version, pretty self-explanatory.  Your child watches out the car windows for the pictures and pops the bubble over that picture once he/she finds it.  You can have contests to see who can complete the card the fastest.
Second version.  Your child watches out the car for the colors indicated by the cars (for the truck and bus, they just need to find any semi truck and any school bus).  Once they see that color, they pop a bubble.  They continue popping bubbles next to that color car every time they see that color.  If your kid has a scientific mind like bug, they can track which color most frequently appears on the road!  Or they can just see how fast they can fill the card in.
Maybe up the ante with prizes?

And there you have it!  Two quick games that you can take with you anywhere!  As long as the popping sounds won't drive you nuts, that is.
If your children are anything like mine, they will quickly become addicts.  In which case, you can refer them here.


*Be sure to check the right sidebar for all the fun parties I link to!
Related Posts Plugin for WordPress, Blogger...