


This post was originally published over on Christina's Adventures a few weeks ago. If you don't follow her already, go check her out! Love her home decor and frugal ideas.
***

You won't believe how easy it is to turn a t-shirt:

And save a BUNCH of the t-shirt for later projects too! In fact, all you need are the sleeves!


4. Cut the seams off both sleeves.
5. Now you've got two rectangles with one finished edge each and no seams. Open them up and lay them with right sides together.
6. Fold them in half together.
7. About two inches down from the top, cut in from the fold.
8. Continue cutting across, angling up at a curve toward the outer corner.
9. When you open it up, your two rectangles will look a little like batman.

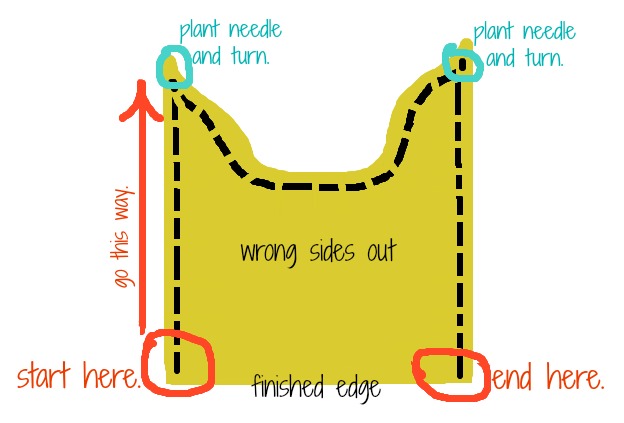
11. Sew up one side. When you reach the first point, plant your needle, lift your foot, and turn your hat. Set your foot again and sew along the top curve. When you reach the second point, plant your needle once again, lift your foot, turn your hat, set your foot and continue to sew down the final side.
When you sew, make sure you back sew at the beginning and at the end.
Here's a poorly drawn diagram that may help:

13. Once you're done sewing, trim the excess seam allowance off.
14. Turn it right side out. You can iron it now if you'd like.
15. Tie a single knot in each of the pointy parts.

Was that easy, or what?!? I told you! I love the stretchy-ness of this hat. It's also nice and soft, since the t-shirt was already "broken in". The lightweight fabric is perfect for this time of year, at least around here where it's kind of chilly, but not super cold yet.

It's so easy, it's addictive. You'll probably want to use all of your old shrunken or stained t-shirts. Don't worry, you can do variations!
For this red one I cut only one long point up the middle instead of two smaller points on the sides. Then I sewed it and knotted it the same way. I added the button placket from the front of the short sewn at an angle on the side of the hat for a little detail. I kind of love the fact that she looks like a garden gnome.

This green one is really fun. I cut it out much like the first hat, then I made two pom poms out of the gray and white striped t-shirt. I tied them onto longer pieces of the t-shirt, then stuck them in between the two hat pieces when I placed them right sides together. When I sewed around the hat, I made sure to sew through the long strings that had the pom poms on the other end.

I may have, perhaps, gone just a tiny bit crazy. In addition to the 8 I made my own children, I possibly made 6 more to add to a baby shower gift.

I'm not sure if that's resourceful, or just sad that I have that many old shirts hoarded. Huh.
In any case, have fun making some cute, one of a kind hats this fall! When you're not doing that, come check out my facebook page, pinterest boards, or instagram!


No comments:
Post a Comment