


So, this one time (at band camp...) I was looking through this awesome blog I follow (Elle Apparel) and happened upon a tutorial that looked so very easy, so very comfy, so very ME that I instantly said, "I can do this!"
Let's pause a moment in our story to take a little meander down memory lane. You may remember other such incidences when I have dared to think I could do what someone else has done. For instance: Number 1 - The pancake hat. I got that one from Disney. Not that you could tell. Number 2 - The ever-popular MADE circle skirt; or rather a ridiculous version. (Did I ever mention this was actually the SECOND attempt? The first one turned into a little doll skirt since I made it to fit a 12 inch waist. On accident.) Number 3 - The sweater turned sweater vest that I made before I learned that there were different types of needles for different types of fabrics. Stupid knit. Really, it's remarkable that it resembled a vest at all. Also remarkable is the fact that I made him wear it in public. AND that I was kind of proud of it. And coming soon: Number 4 - the Starboard Skirt that Isn't. A Starboard Skirt, that is.
Well, that was fun, wasn't it? Now that we've looked through some of my more flagrant failures, back to the story at hand!
So, I happened upon a tutorial that looked so very easy, so very comfy, so very ME that I instantly said, "I can do this!" and I pinned it.
Fast forward several months. I catch a glimpse of the items I'd bought to make said tutorial. Oh, by the way. It's this tutorial for a Shirt Dress . I know you won't be able to tell from my pictures. That same night, I catch a glimpse of this tutorial from Mommy by day, Crafter by night. Stinking cute dress, right? She developed this dress from the same Elle Apparel tutorial I fell in love with and that was when I said, "Dag Nab it! I'm making that dress once and for all!" And I did. Uh. Kind of. Here's how.
(I apologize that there are no pictures for my process. Trust me, you wouldn't have wanted to see all of these steps in images, anyway.)
1. Read over the tutorial.
2. Think, "easy shmeezy!" - famous last words.
3. Run down to the dungeon, er, craft room and start cutting things out.
4. FIRST, cut a rectangle of knit (bonus points if it is your very favorite piece of knit that you inherited from your dead grandmother). Cut this double your waist size and the exact length you want it to be plus about 2 inches. THEN, cut your shirt off - good idea to try it on and mark how long you want the torso to be. Then you'll make sure it doesn't look like a maternity dress, when, in fact, it is not. NEXT, measure around yourself where the shirt and skirt part of the dress will meet and cut a piece of very wide elastic to that size.
5. Fold your elastic in half and sew the ends of the elastic together. Then flatten the ends down against the inside of the elastic band and sew them down. Go here for some photos of this process.
6. Think, "hot dog, this is going well!"
7. Fold the rectangle of knit in half and pin up the seam. Yep. Pin. Unheard of around here.
8. Using the correct needle (ballpoint - see you HAVE learned a thing or two!) and the correct stitch (straight stretch stitch - I'm amazing myself here!) sew up that seam where you pinned.
9. Attach the skirt with pins to the inside of the elastic band, using this method.
10. Congratulate yourself for how well things are going.
11. Use a straight stitch to sew the knit to the elastic all the way around.
12. Pin the bottom of your shirt to the top of the elastic, using the exact same method as the skirt.
13. Use a straight stitch to sew the shirt to the elastic.
14. Holy cow, it looks like a dress. AND the stitches are straight.
15. Measure from the front of your shoulder around the top to the back. Cut two pieces of knit that are that length and about the same width as your shoulder. Cut two tiny rectangles. Wrap the tiny rectangles around the middle of the bigger small rectangles width wise and hand sew it in place. Look! They look like big, floppy bows! Hand sew the middle piece to the middle of the shoulders on your shirt. Then tack the floppy corners down so they don't fly all over the place. Super cute, trendy bow-type things.
16. This is going too well.
17. Run upstairs in uncontrollable excitement to try it on.
18. Realize the first signs of an issue when the skirt part gets stuck around your shoulders. Carry on anyway because you are, apparently, a glutton for punishment.
19. Yank and tug that skirt down around your hips, wondering how on earth you could have mis-measured so thoroughly.
20. Begin the arduous process of pulling the sausage casing off. Get it stuck over your, ahem, chest.
21. Cry a little bit. Struggle. Pull. Freedom!
22. Run back to the basement. Study the dress. Study the hastily recorded measurements. Study the dress. Study the measurements.
23. Realize you sewed the skirt part together not WIDTH wise, but LENGTH wise. You made the length the width and the width the length. Which would be fine if you weren't short and stout.
24. Cry a little more.
25. Consider trashing the whole thing, but after speaking with your mom, decide to cut it apart and try again. You're nothing if not determined.
Sooooo.... I didn't promise the tutorial would be helpful.....
BUT, I think I managed to scrape together some semblance of a dress in the end. How, you ask?
After consulting with my mother, who went and bought me some knit fabric because she loves me and I used up all of my favorite grandma knit (so sad...), I decided to triple the width for a lot of gather. I thought roomy would be more comfortable anyway, right?
Then I repeated the process above, which led to this dress which I have named:

Yes. The Flamenco Dress. Why? Well, that voluminous skirt with all the extra material and crazy amount of gathering makes it much more like an actual circle skirt. You know, the kind of crazy, twirly things they wear onstage. I totally felt like I was in some kind of musical - West Side Story, dancing with the sharks' girls to America. I was going to chalk it up to yet another "I didn't follow the tutorial well enough and made stupid mistakes" kind of fail. But then I wore it around for a while. And I kind of liked it.
I liked the bows on the shoulders.

I liked the belt I made, using my Svelte Belt tutorial. And I liked the Yo-Yo Bow Brooch (coming soon to shop bugaboo!) I created using the same method as I did for the shoulder bows, along with a yo yo and a covered button. I was trying to tie all the colors together.
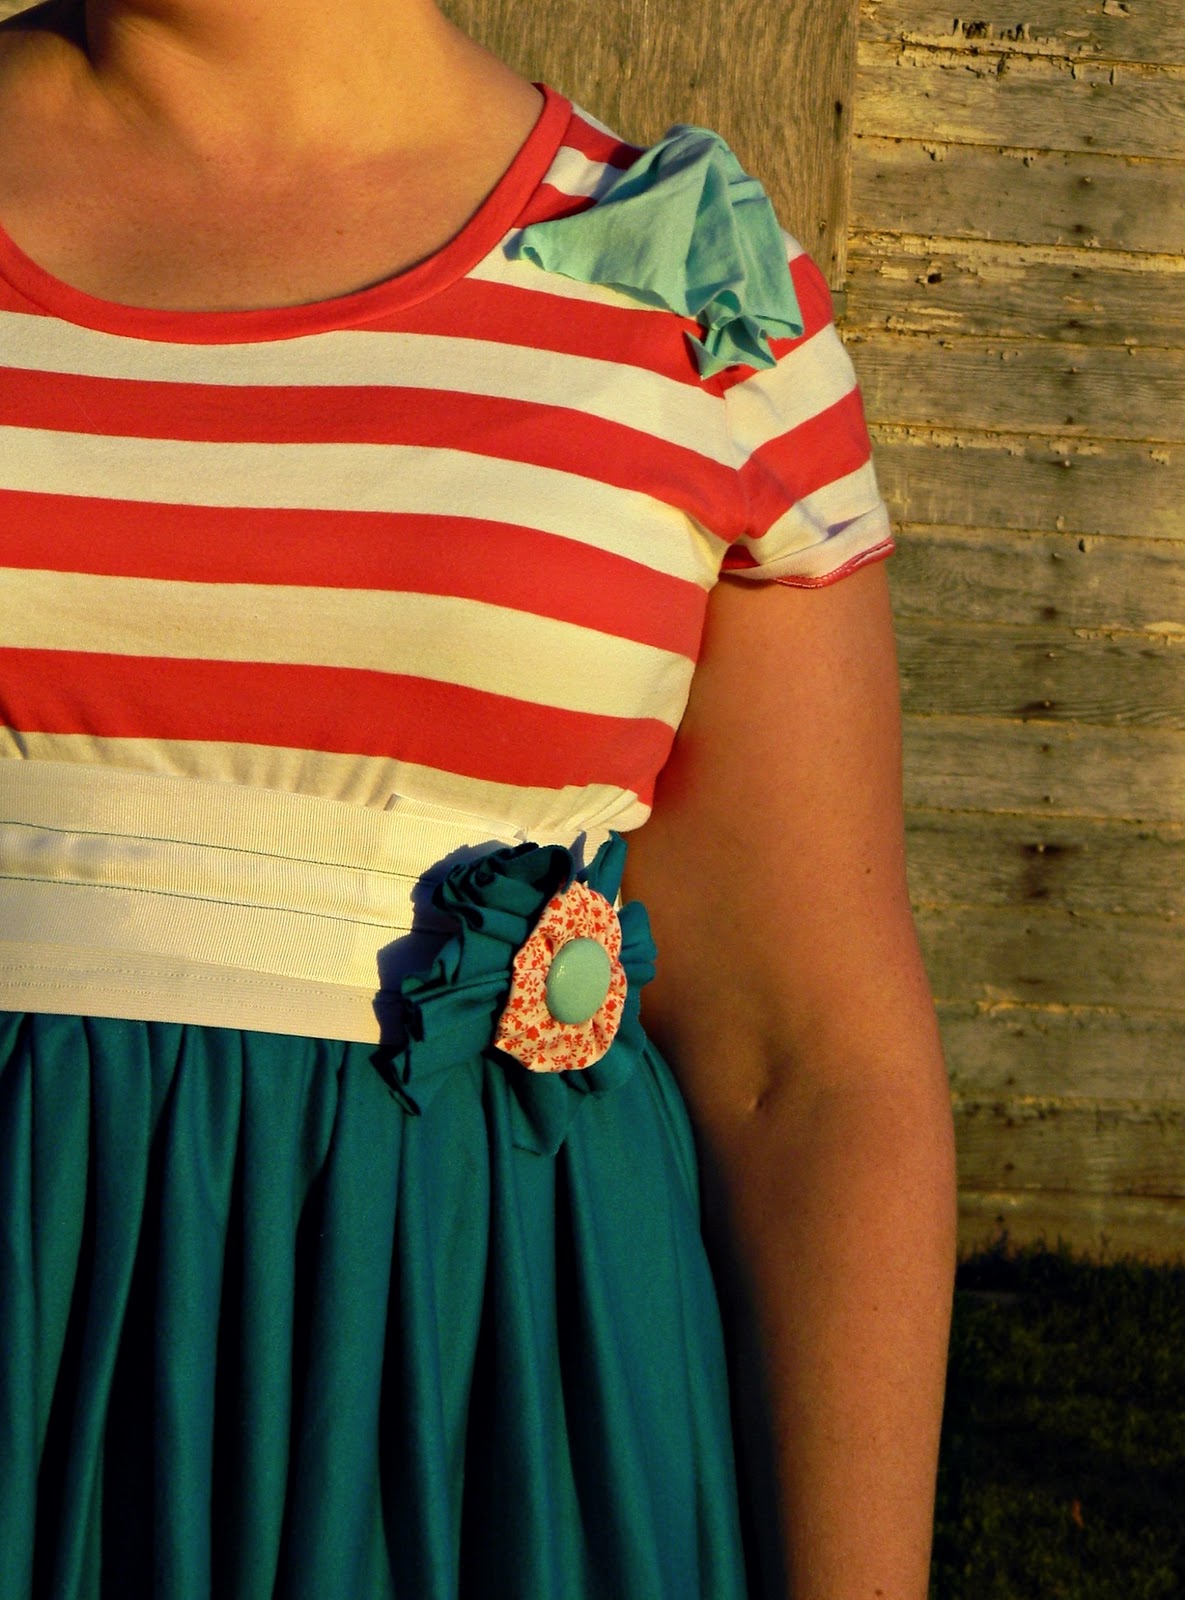
Also in an attempt to tie colors together, I cut apart my grandma's knit into little strips and sewed them into a pleat around the bottom of the skirt. That might be my favorite part - even though the pleat is so wide I should have sewed over the top and the bottom instead of right down the middle.


And, quite frankly, it IS the best dress I have for twirling.

Mr. was having way too much fun capturing my spinning shadow. I had to lose the shoes and ended up falling over. True story.
AND, if your forget your blanket, the crazy excess fabric on the skirt can double as a blanket, no problem.

ACTUALLY, in all honesty, while it may not be the best look right now, I think it will actually make a cute maternity dress. No, that's NOT an announcement. I'm just saying that if I need a cute maternity dress in the future, I've already made one. And why is this not the best look right now? Well, I've already been asked by two different people at church if I am pregnant. I don't need my clothes starting any other rumors.
Oh, here, for fun, are the ridiculous out-takes. Because it's not just mini that bombs photo shoots.
knock, knock. Anyone home??? Can you open this creepy door so I can stop touching it?

This is the face I made when I looked up and realized that hanging directly over my head were exactly 7 billion birds nests in the eaves of this building. 7 billion. That's accurate. And I don't know if you're aware, but I don't like birds. I find them creepy. I was hoping against all logic that every single nest was empty. (Hence why we moved around to the other side of the building for the rest of the shots - despite the direct sunlight.)


*Be sure to check just below for all the fun parties I link to!


11 comments:
I have so much to say my words are going to trip over themselves.
First--this may be my favorite post EVAH. You crack me up!!!
2--weird. Your finished dress is the color scheme I was thinking about for my girl's room.
3--I wore a maxi dress to the store a couple weeks ago. Not tye most flattering for my shape, but comfy and I was all "whatevs". Until a lady PATTED MY BELLY and said "oh! And you're having #6?!!!?" true story.
4--I'm pretty much convinced adding 'true story' at the end of any true story makes it like a bajillion times funnier. So I've made a vow to use it much more often. Glad to see you agree.
5-- your dress is super cute! You look hawt--especially with the yellow shoes!
6--awww--have another one! 2 kids are soooo 90's. Five is the new black.
OMG!!! I think birds are creepy too!!! I hate their eyes...all on the side of their head and beady...eeks just gave myself shivers. I love birds to decorate with, but NOT in real life. No way. Everyone said I was crazy but now I know I am NOT because I have you to back me up! Win.
Love the dress too, I was paying attention to that first but then you talked about birds and I lost my words.
haha that's terrific! I love your run down of all the whole process. I often have the same conversation with myself when following tutorials. "Oh look how good it looks. It actually looks like the pictures! Congratulate yourself now." and then... well not everything can turn out right the first time around. I like the fix. The dress turned out beautiful.
VERY fun and entertaining post and your dress turned out great!! Good luck on the SYTYCS contest!
Love it!
Amazing! And those colours look gorgeous together :)
Love it and awesome sewing. Keep sharing for us.
Woman! This is amazing! I always read tutorials and think "I can do this!" with equally horrible results. Although if I ever get the guts to sew I'll try to make this!
LOVE the colors and the bows on the sleeves. so cute!!
SO glad that you were still able to include some of your favorite granny's knit.
SO glad that you were able to redeem a negative experience (yea for mommies who can help with this!).
And twirls. :) Yea for being a little girl again. :)
This was so. much. fun. to read. Thanks for giving me a reason to stop skimming. Thanks for linking up to Inspire Us Thursday on The Inspired Wren.
Post a Comment