


Here it is folks! This is the moment you’ve all been waiting for! It’s time for the Valentine edition of Kimberly’s wreath! Remember this wreath? And this one? And this one? When I made two for Halloween and three for Christmas, I became the butt of jokes. (mostly by my husband) (Oh, he teases because he loves...)
It isn’t like I have always had a love of wreaths, mind you. It just so happened that when I started my blog and began reading other inspirational crafty blogs, I became acutely aware of my lack of holiday decoration - and my door was blatant proof of that. My poor unadorned door. I vow that my poor door will never again go naked.
And so, for this cupid and heart adorned holiday, I have decided to fancy my door up with the

Made entirely with items from my stash. Yep.
What you’ll need:
A wreath form (mine’s a simple circle, and it was 25 cents at the thrift store! I get all my wreath forms there...)
Tissue paper of a desirable color - I went with red
A few sweaters you don’t mind parting with
Plain straight edge lace trim
Scalloped edge ruffle lace trim (Both of my lace pieces are vintage - from my grandma! Thus the name of the wreath. But you can use whatever lace you want to.)
Hot glue gun
Scissors
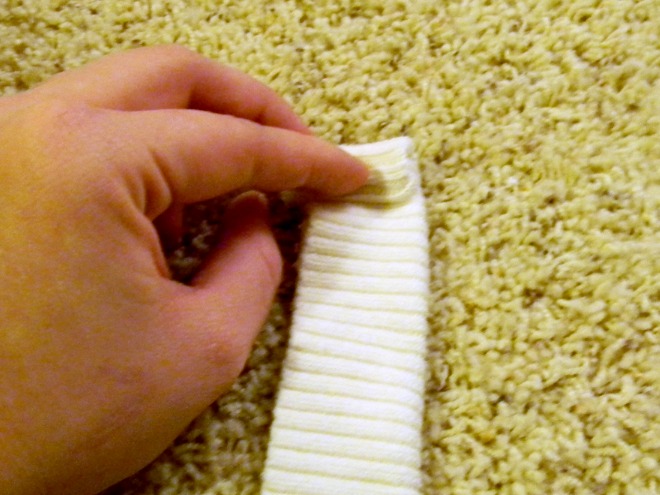
Begin by cutting some of your sweaters into strips about an inch or two wide.

On the wrong side of the fabric, run some hot glue down one edge

and fold the strip in half.

Now, dab some hot glue on the end of the strip

and start rolling it up.
Roll and roll, adding hot glue here and there to keep it all tight and together.

Use a little extra hot glue on the end to make sure it’s really secure AND that any jaggedness is covered.


So you have a little flower.

When you turn it over to the back side, it will most likely look like this:

So take your scissors and trim across to make it flat.

Do this oh, I don’t know, a million times or so.

And set your cute little rolled up flowers aside.
Now, prepare your wreath form. Lace is, obviously, see through - so you don’t want that yucky beat up styrofoam showing through.

Cut your tissue paper into strips about three or four inches wide.
Take a single strip, and hot glue the end onto the back of the wreath form.

Start wrapping it around the wreath form, overlapping the edges, until you get to the end of the strip. Hot glue the end to the wreath form - making sure to do so on the BACK. If it’s longer, just trim it so you don’t have to glue it to the front.


Keep adding tissue paper strips until the whole wreath is covered.
A cheap and easy way to de-uglify your wreath form!

Now, grab your rolled flowers and lay them out on or next to your wreath to get an idea of the layout. Measure how far around your flowers reach. Mine happened to go about half way.

Take your plain old straight edge lace trim.

Hot glue an end to the back (starting at the same place your rolled flowers will begin),

wrap around ONCE,

hot glue to the back, and trim the excess.

Now, overlap the lace a bit, and hot glue the end down again.
Wrap it once,

hot glue and trim.

Keep glueing the lace trim on this way, wrapping it only once, so you can pull it straight and tight to the wreath form.
If you don’t do it this way, and instead just keep wrapping it around and around, it will look like this:


Which actually, now that I look at it, looks kind of cool. Darn.
ANYWAY, wrap this around your wreath from the spot your rolled flowers will begin to the spot they will end.

Now, take your scalloped edge ruffle-y lace trim,

and lay it slightly overlapping the STARTING point of the first lace trim, with the scalloped edge facing down (or TOWARD the other lace.)

Hot glue the end to the back of the wreath form.

Wrap it once, and glue it where it meets the other glued spot of lace - but you don’t need to trim it. The glue will keep it in place enough.

Now overlap slightly, and dab some hot glue along the back of the wreath form and stick the lace in place,

wrap once and stick in place with hot glue.
Then move up a bit, overlapping the lace just slightly, glue,
wrap,
glue.
So it looks like this:

When you have covered HALF of the remaining wreath form like this, STOP.
Now, begin at the other side of the wreath, where the FIRST type of lace trim is glued to the STOPPING point.

Mimic the wrapping method you just used, with the scalloped edge facing the bottom of the wreath - or TOWARD the straight edge lace.
Wrap this side of the wreath form until it touches the other scalloped edge lace - or until the entire wreath form is covered with lace.

See how the scallops are all pointing downward toward the bottom of the wreath now?

Take your rolled flowers and begin hot gluing them down in your desired layout.

Adjust where needed until you get the look you want.

Make sure to add hot glue BETWEEN the flowers too, and glue them to each other for stability.

When you are finished with the flowers,

take a strip of the straight edge lace and tie the ends together in a double knot.

Lay it over your wreath, at the point where the scalloped lace meets at the top.


Wrap the loop of lace under the wreath, stick the knotted end through the loop

and pull tight.

Hang it on your bare door.

Happy Valentine’s Day, you pretty, fancy door, you!


*Be sure to check the sidebar for all the fun parties I link to!


13 comments:
I love how simple this is and yet, so elegant. Beautiful.
LOVE this!! Love the lace, love the red, love the sweater flowers, just plain love it!
So pretty! I didn't know you could use so much of the sweater. I thought it was just the cuffs. I learned something new today! Thanks for linking!
SERIOUSLY CUTE! STOP BEING MY LONG LOST TWIN RIGHT NOW!
I read that first part about starting out the blog, finding inspiration...realizing I was lacking decor in every season but Christmas! LOL!
BONUS for Bustin' YOUR Stash!
I like this a lot.
Gorgeous! I would love to be your neighbor. :)
Great idea. It is very pretty!
This is just so beautiful!! I love it! The instructions are easy to read, and the pictures are great. I am a new follower :)
Gillian
kevinandgillian.blogspot.com
Love all the textures and YAY for using up stash! :)
I love the lace!!! So pretty...
Please check out the party I host every Friday... we would love to have your projects linked up! http://www.bubblynaturecreations.com/2011/02/project-party-weekend-make-your-blog.html
Fancy! Thanks for linking up to Mad Skills Monday!
Pretty colors! Thank you for linking to my blog!
Oh So so cute!! I'd love for you to share this at I Heart Nap Time
Post a Comment