Monday, July 29, 2013

Philly!


I've never been there.  Have you?  I've never had a Philly cheesesteak, either.  Am I missing out?  They look delicious, it just seems like one of those things you can't do justice to unless you're a street vendor in Philly, you know?  Kind of like, it would seem wrong to make your own Chicago Dog or Memphis BBQ.  Right?

Well, anyway, I saw a pin on pinterest for Philly Cheesesteak Stuffed Peppers.  And I love peppers.  (The bell kind, anyway).  BUT, when I followed the link I'd pinned, it led me to a photo collage and a generic description like "use thin deli roast beef, salt and pepper to make this easy stuffed peppers" or some such nonsense that doesn't constitute a real recipe.  Don't you hate that?  So I used my powers of observation, the photo collage and my prowess in the kitchen (ha!) to create for you:

And then after I did that, for the heck of it, I googled "Philly Cheesesteak Stuffed Peppers" and came up with about 6,592,031 different recipes.  So, if this doesn't seem authentic enough or something, you can always feel free to do that...

And on to our review of said recipe.  Seriously?  It was so good!  I was impressed with myself - but then realized it was more the general idea that was impressive, and that I can NOT take credit for.  Everyone agreed the innards (aka the stuff I sautéed) was super delish.  Even bug liked the it - though he apparently HATES peppers.  My mom said they were the best stuffed peppers she'd had and we all agreed that they were better than the tomato-based ground beef/rice/whatever versions that are pretty standard.

Our peppers were not very peppery tasting, but I attribute that to cheap peppers at a big chain store.  If you grow your own or get them at a farmer's market or something I bet the flavor would be CRAZY GOOD.

So, in short, make these.  Yep.  Not a fail.  And you won't feel like a poser because they aren't REALLY a Philly cheesesteak.  Phew.


*Be sure to check the right sidebar for all the fun parties I link to!

Thursday, July 25, 2013

Gifts! Lots of gifts!


Remember last August when I did a whole month of handmade gifts?  It was a super fun series, complete with lots of guest posts, lots of great gift ideas, lots of round-ups and a whole lotta motivation to GIFT IT GOOD.  (Yep.  Gift it.  Gift it good.  Inspired by DEVO.  There's a disclaimer like last year.*)

I loved the series so much, I wanted to do it again!  So, I declare August HANDMADE GIFT MONTH.  I have some guest bloggers, I have some round-ups, I have some tutorials.  All about gifts and such.  Know why?  To give you that motivation you need.  You can gift handmade, I know you can.  We all have our own reasons for spending a fortune on store-bought presents.  Handmade seems daunting.  We lack inspiration.  We lack confidence.  We don't want to seem cheap.  But handmade = Thought + Time + Effort = LOVE.


And that's all there is to it.

There will likely not be a post every single day - as there was last year, but there will still be plenty of awesome ideas - promise.  AND furthermore, if you'd like to help EMAIL ME!  Yep! Looking for some more guest posts!  bugabooblog @ yahoo.com

It all starts on August 1.  1 week.  Woo!


*(Now, before I go any further, I'd like to address the offense that some of you have no doubt taken with the song I chose to base my series title on.  Before you get all tense and huffy about it, I would like to point out that this classic 80's song by DEVO has a whole lot of hype and total misunderstanding surrounding it's origins and meaning.  You know what I'm talking about, I know you do, or you wouldn't be all up in arms, so I won't go into details about the assumptions people have made and continue to make, but I will refer you to songfacts to get your facts straight.  Even the band admits that the lyrics have been misrepresented and the common understanding is simply "a myth."  Short story, this song is about getting off your duff and DOING something - anything.  It's about moving past the laziness and "whipping it" into shape.  Plain and simple.  And you know what?  I think that's  pretty appropriate for this series.  Get off your duff.  Make some presents.  Overcome the insecurities.  Just do it!  Ok, I'm done.)


*Be sure to check the right sidebar for all the fun parties I link to!

Monday, July 22, 2013

Giving dip a run for its money.


Have you seen The Pioneer Woman's gorgeous Spinach Artichoke Pasta floating around on Pinterest lately?  The second I saw it I pinned it to my "To Eat" board.  It didn't last long there before I jumped onboard and made it myself.  

It was easy to follow her recipe and still alter seasonings and such, mainly to meet my tastes (and the fact that I can't tolerate spice worth beans on a good day, let alone when I'm hugely pregnant).  And because I didn't really do much different besides change up some amounts and use cavatappi instead of penne, I'm not providing a recipe card.  She's got it all tied up with a pretty bow over on her site, so follow the link.

All I can really say here is eat this.  Eat it now.
The one and only thing I'll do differently next time is add a smidge more cheese.  Because we ARE in the dairy state after all, and doggone it, I like cheese.  And spice up the panko a bit - maybe mix it with some melted butter.

You know the deliciousness of spinach artichoke dip?  You know how you kind of just want to scoop it up with a spoon?  Now you can.  Although, a fork would likely be easier.
If you've seen it but weren't sure about it, consider us your guinea pigs, because the entire family loved it.  Even bug.  mini had a hard time eating the artichokes, but maybe that's an acquired taste?  


*Be sure to check the right sidebar for all the fun parties I link to!

Wednesday, July 17, 2013

Remember how much I love old t-shirts?


This little number is something I whipped up last summer, and never had a chance to show off.  I had a shirt I liked - with these water-color-esque flowers all over the front on a yellow background (so of course I loved it) but it just didn't fit right anymore.

It was destined to be something new.

No.  I do not have a tutorial.  But you know what?  You don't need one.  It's just that easy to do.

Have you ever shirred before?  This is the first and only shirring I've ever done, because no matter what I try, my machine simply refuses to shirr.  REFUSES.  I've read tutorial after tutorial.  I've read troubleshooting tips and tricks.  Nothing works.  I feel like shirring is one of those things ever sewist should be able to do - like one of the first things you attempt and master and think "I'm a true sewist!"  And it looks like until I get a new machine, I will not be a true sewist. (Here's a good explanation of shirring.  And measuring.  Thanks, googiemomma.)

So, I had a little crafty date over at my sister's house.  We share custody of a serger, and she lives with Lis, so I went to visit.  While I was there doing various things, my sister decided I needed to whip this baby up, and it took about 5 minutes.


Steps:
I took a t-shirt.  
I cut it off right below the sleeves.  
I serged around the top (you could probably skip this, knit won't unravel).
I shirred 6 lines around the top, starting just under where I serged.  I didn't mark where to shirr.  I didn't use a ruler.  I just went for it.  And it was totally fine.
I made four casings out of the top of the t-shirt that was left over.
I sewed two to the front and two to the back for shoulder straps.
I was done.

So the best part was that there was no hemming.  Yea!  I just used the bottom of the shirt, so the hem was already there!

Really there was no sewing whatsoever.  I used the side seams as they were, too.  Like I said, easiest little play dress ever.  

Comfy, light, stretchy, airy, AND she can STILL wear it THIS summer!  Perfect.

Now, if you would feel more comfortable with an actual tutorial, and if you'd like to get the deets on shirring, as well as lots of helpful measurements according to age, check out this tutorial on Jorth! - shirred dress tutorial.  This is an actual dress with actual sewing.  So, you know, in case you don't have an old t-shirt to cut up.


*Be sure to check the right sidebar for all the fun parties I link to!

Monday, July 15, 2013

Two desserts in a row?? As if that's abnormal...


Oh, you know how I feel about dessert.  Seriously.  Especially chocolate ones.  So this shouldn't be a surprise to you... PLUS.  mr was called away to Colombia (the one in South America, not Columbia, in South Carolina, as mr corrected me.) unexpectedly, and when that happens, my chocolate consumption increases.  

In any case, I bet you feel like cake mixes are blah.  They're easy.  You use them.  But they're nothing special.  Want to make this
into something super moist and delectable and lick your plate clean delicious with VERY VERY little effort?  Oooh, good.  Because I have a trick.  All you need are three ingredients.  Well, four, I guess, since the frosting is pretty important, too.

Cake mix.  Eggs.  Cherry pie filling.  Bam.  Secret ingredient revealed.  

No oil necessary!  Of course, to make it extra fudge-y and gooey and delicious you'll want to add the chocolate fudge frosting.  Which you can make from scratch as I did, or for extra ease, just buy the can.  Bam.

Because honestly, some of those canned frostings are better than homemade, am I right?  

But if you DO want to make some really creamy fudge frosting, I've included that on the recipe card.

Bam.


I've gotta stop.  I sound like, I don't know, one of those big New Jersey chef people on cake boss.  Or something.


*Be sure to check the right sidebar for all the fun parties I link to!

Thursday, July 11, 2013

Perfect for a Picnic


You know I'm a fan of picnics.  There's no better way to enjoy summer, in my opinion.  You know what's even better than a picnic?  A picnic where there's very little mess.  And THAT is why I love single-serving, finger-food, no-utensil type options.

Speaking of, remember this gem from Delia Creates back during my picnic series?  Yeah.  How low-key, no-mess can you get than putting your entire lunch on sticks??

But let me come to the true point of this post.  What food says summer like no other food?  Ok, besides ice cream.  And popsicles.  Ok, so what FRUIT says summer like no other?  STRAWBERRIES!  I love them.  And my absolute favorite strawberry dessert is strawberry shortcake.  Love it.  
I went to Farewell BBQ and needed to bring something summery for dessert.  Of course, I wanted to share strawberry shortcake, but it seemed like a lot of mess and plates and plasticware and FUSS.  So I devised a way to turn one of my summer favorites into a portable, finger-food version!


FIRST things first!  Let me share some recipes with you.  They're fairly basic, and you may already have them handy in your repertoire, BUT if you don't now they're all in one place for you!

I should preface my "shortcake" recipe by saying 1) this isn't REAL shortcake (which, if you so desire, you can find here) and 2) I don't like angel food cake.  And I REALLY don't like those little ones you use for strawberry shortcake.  I prefer a hardier, butterier, biscuit-like shortcake.  

So, here's the recipe I generally use:

Easy Shortcake Biscuits
2 1/3 C Bisquick mix
1/2 C milk
3 T sugar
3 T butter, softened

Mix everything together with a mixer until well combined.  Preheat oven to 425.  Place rounded scoops of batter on a cookie sheet and bake for 8-10 minutes or until golden.


There are an infinite number of ways to prepare your strawberries, but this is the method I used for my cupcakes:

Chunky Strawberry Syrup
1 pint strawberries, washed and sliced
1/3 C sugar
1-2 T flour
1/2 tsp vanilla

Put the strawberries in a sauce pan over medium heat.  Add the sugar, flour and vanilla and mix well.  For thicker sauce, use 2 T of flour, for thinner sauce use 1 T.  Use a potato masher or similar to mash many of the strawberries, leaving some small chunks.  Mix again and cook until it barely begins to bubble.  Remove from heat and let cool.

I don't have a potato masher, so I used this:

Which is actually a "guacamole maker." (???) Yeah...

And now, for the whipped cream.  Not like I haven't shared this with you again and again because homemade whipped cream is so very ridiculously better than store-bought...

Homemade Whipped Cream
1 half pint of Heavy Cream (sometimes called whipping cream or heavy whipping cream)
1/4 C powdered sugar

Pour the heavy cream in your mixers bowl and use the whisk attachment.  On high speed, whisk the cream until it begins to thicken.  Don't get impatient, if you add the sugar too soon, it WILL NOT THICKEN.  Once the cream starts to get thick and keep it's shape, add the sugar.  Continue whisking until the whipped cream is your desired consistency.

So, let's talk about what makes this a finger food, huh?


Put your biscuit batter into well-greased cupcake tins.  
Bake them for 10 minutes (or until golden).  Let them cool a bit.
"Core" the biscuits - use a small spoon to scoop out a hole in the center of the biscuits.
Place each cupcake in an extra large cupcake paper (I got mine at the dollar store).  Spoon the strawberry sauce into the hole.
Spoon whipped cream on top.

DONE!


Easy.  No fuss, no mess.

I bet you're wondering what to do with all the insides you scooped out aren't you?  Well, there's bound to be leftover strawberry sauce and cream, so I don't have to spell it out, do I??


*Be sure to check the right sidebar for all the fun parties I link to!

Tuesday, July 9, 2013

Anthro-inspired! (Is that still trendy?)


A long, looong, looooooong time ago, I did a season of So You Think You're Crafty.  And one of the themes was "knock off."  I ended up going with my version of the famed Zulily Yellow, Big Bow Dress.  (It was also an upcycle, which you know I love.)

Before I made the Zulily knock off, though, I made this guy.  An ANTHRO knock off.  Yep.  Me.  Making an Anthro knock off.  It doesn't happen often, but I saw a blouse I was pretty sure I needed.  But not for $100.  So I set out to recreate it.
(By the way, I've been gone from blogland for a while... is that whole Anthro thing still trendy and whatnot?)


Also.  It's an upcycle!  Big surprise, right?  I just can't help it.  I made this "anthro-esque" shirt from 2 XL Hanes Mens T-shirts - the undershirt kind that comes in a 3 pack.  So it's super affordable as well as adorable.  Unfortunately, once it was finished, the elastic in the waist would barely fit over my head.  Duh.  FORTUNATELY I know this super cute girl at church who was willing to model for me.  Yeah!  (I let her keep the shirt, so she was compensated :) )  So let's get to the tutorial!


Alright.  These photos stink.  It was not sunny when I was sewing in my dungeon.  My apologies.  
This first group of photos show you how to cut your two shirts.
1. Fold one shirt, bottom up to top.  Cut off the side seams and arms.  Cut two strips, one on each side of the neckline, that are about three inches wide or so.  Set the strips aside. (You can use the rest of that shirt for something else!)
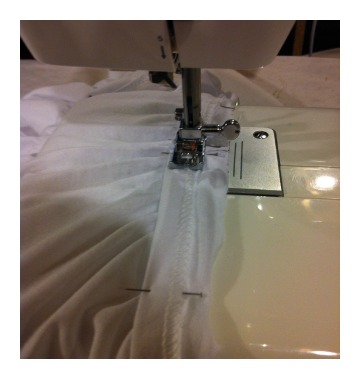
2. With the second shirt, fold it in half down the middle.  Use a pencil or chalk or what have you to make a nice wide neckline starting about two inches away from the original neckline.
3. You can cut the neckline while folded, but you will want to cut the the back a little higher than the front.
4. Now, cut the hem off the bottom of this same shirt, about an inch or a little less up from the hem.
5. Cut the hem along one seam (leave the other seam intact.)  Then, cut the extra bit of shirt from the hem so that the hem is still a casing, but there's very little fabric left in addition to the actual hemmed piece.
6. Take this excess strip of fabric you cut off the hem and stretch it out all skinny to make a knit cord.

Now that you have all your pieces prepared, you can get sewing!
1. Turn your shirt inside out and iron the bottom raw edge up.
2. Use a straight stitch to sew this new hem in place.
3. Iron the new hem again once it's sewn to make it lay nice and flat.
**Note: You can, of course, turn this raw edge over TWICE and iron it, then sew, to make sure there's no raw edge even on the inside of the shirt.  The only reason I didn't do that was because I was afraid I would make the shirt too short for me.  I believe that If I made this again (for myself instead of that skinny mini girl up there) I would likely use all three shirts, using the bottom half of the third shirt under the ruffle waist for more length.  Plus, then I wouldn't even have to sew a hem!

Now let's ruffle the things that need ruffling!
1. Take the two strips you cut off the other shirt.  Sew a gathering stitch down one long edge.  Then sew another gathering stitch right next to the first one.  Do this on both strips.
2. Take the assembled shirt and starting at one shoulder seam, sew a gathering stitch all around the neckline (backside too.)  Leave a tail.
3. Then, starting in the same place, sew ANOTHER gathering stitch just underneath the first.  Leave a tail.
4. Pull the strings (tails) on both sets of gathering stitches (separately) to gather the neckline of the shirt to a suitable neckline width.
5. Once the neckline is gathered to a width you like, tie the strings into separate knots so it stays securely gathered for the time being.

Remember the hemline you cut off your shirt?  This is now the neckline casing.
 1. Take the "hem" or casing and place one end of it in the center of the FRONT of the shirt neckline.  
2. Place the casing right side against the right side of the shirt and pin the raw edges of the casing and shirt together.
3. Pin the casing in place all around the gathered neckline, right sides together, raw edges pinned together.
4. When you've pinned it all the way around, and it meets the end pinned to the middle part of the front of the neckline, cut the casing and pin this end to the middle as well so the ends touch but don't overlap.
 5. Now just use a straight stitch to sew all along this casing - just below the existing seam of the old hem.

When it is all sewn and ironed, your neckline will look like this:

I don't have awesome pics of the next part, but I'll explain it the best I can.
 1. Use very thin elastic cut to just smaller than your chest size.  Turn your shirt inside out and pin the end of it to the side seam of the shirt just above the natural waistline.  Use a zig zag stitch to secure the end, then stretch the elastic out quite a lot as you zig zag stitch the elastic all around the waist of the shirt. 
2. Keep this as straight as possible by going slowly and straightening the shirt out as you sew.  If you need to adjust the shirt, just do so with the needle DOWN into the fabric, then lift the presser foot and adjust.
3. About two inches or so down from the first elastic piece, do the exact same thing again.
4. Add small elastic pieces around the bottom of the SLEEVES, just above the hemlines in the exact same fashion to gather them and make them stretchy.
**Note: if your sewing machine will "shirr", I suggest using that method instead.  It will likely be more comfortable, easier to keep in a straight line, and much more stretchy.  My machine refuses to do this, however, and yes, I have tried it many different times, in many different ways.  Poo.

Now, the last two steps for some reason have no pictures.  No clue why.  

1. Pin your first ruffle just above the top elastic piece so that the right side of the ruffle is against the right side of the shirt and the top of the ruffle is the edge that's against the elastic and being pinned (so in other words, the ruffle is flipped up so the bottom is up top and the ruffle is wrong side facing out).
2. Sew all around this ruffle to secure it just above the elastic, all the way around the shirt.
3. Do the same for the second ruffle, just above the second, lower piece of elastic. 
4. When you hold the shirt up, the ruffles will flip down and the raw edges, seams and sewing will be hidden under the ruffles.
5. Take the stretched out knit cord you made and use a safety pin to thread it through the casing along the neckline.  You can pull this drawstring as tightly as you want, or leave it loose.  You can tie it in a bow, or just a loose knot.  Whatever you prefer.

And you're done!

Ta-da!  It might not be silky like the anthro version, but it's about $95 cheaper, too.

Pretty impressive what can be done with some plain old, pocketless, tagless, XL men's t-shirts, right??


 I may have to attempt another one for myself using 3XL.  Ha!


*Be sure to check the right sidebar for all the fun parties I link to!
Related Posts Plugin for WordPress, Blogger...