


I've shown you my super crazy audition project. I've shared my dollar store "good CLEAN fun" Scrubby Bath Puppets. I even posted my thrift store Padded Shelf Bench which scored me a tie! That brings us up to "Knock Off" week at So You Think You're Crafty. It was a fun one for me, and it was in the top three - so not too shabby!
For knock off, I decided to tackle a cute little Zulilly dress I've had pinned for ages.

I picked out some cute mustard with white polka dot fabric from the stash and went to town. When I was finished, it didn't quite make the cut. The binding I'd used was too thick and bunched in some places and all in all, I just wasn't quite happy. So I went back to the drawing board.
But I had no fabric left. I felt I was in a conundrum until I saw this perfectly colored men's dress shirt in the "repurpose" pile. Why, don't mind if I do, thanks!

Good news? This means I've got two tutorials for this dress! A from scratch with fabric kind of tutorial and a let's take this old shirt and make it work kind of tutorial.
Today, I'll share the men's dress shirt refashion, because it's the one I entered in the contest and the one I'm most proud of. Later on I'll share the other.

Use a simple A-Line dress that fits your child well for a pattern. (I traced around it on some packing paper.) My dress had sleeves, so I just tucked them in so I could trace the arm holes. Now, you'll want to modify the A-Line shape a bit. On the back pattern piece, you'll want to make it a little wider in general. On the front pattern piece, you will need to account for some pleats. I cut the neckline out, then folded some pleats into the paper until I liked the look, then traced out the lines and cut. That way I knew I'd be cutting it wide enough so I'd be able to add the pleats in the fabric.
Just so you know, I only use the BACK pattern piece for the upcycle version. The front pattern piece is only for the made from scratch version.

Now, lay the back pattern piece out on the shirt. Line the shoulders up at the shoulder and the neckline along the bottom of the collar. Cut the arms of the shirt off.

Cut out the basic A-Line shape. Do NOT cut across the shoulders - leave that seam alone - one less for you to sew. Leave some allowance on the bottom for a hem. Cut off the collar of the shirt, being careful about how you cut the front. You need to salvage as much of the shirt as possible, but you don't want the collar.

At this point, the shirt looks like this from the front.

Take off the bottom button.

See the back of the shirt? Notice how it already has a nice fancy pleat? Iron the baby all down the shirt to really set the pleat in. This is now the FRONT of your dress.

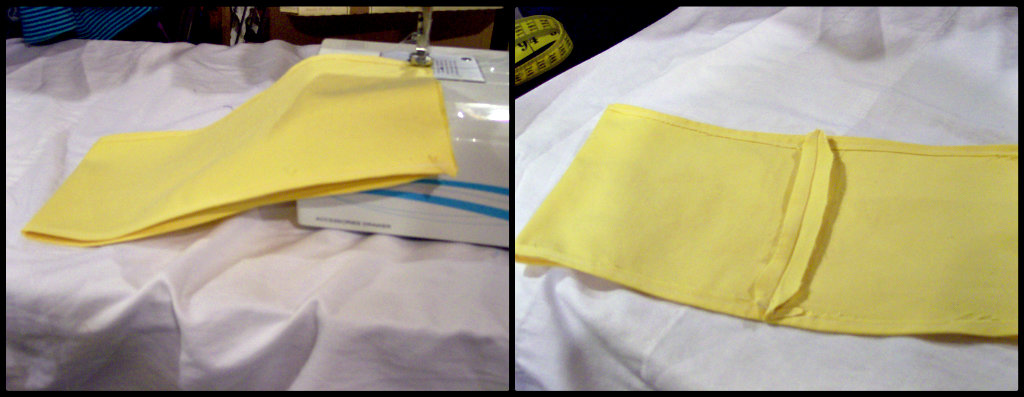
Take some matching cotton fabric - lightweight. Cut it into two inch strips.
For each strip:
Fold the edges into the center and iron. Then fold the whole thing in half. Iron. This is your binding.

Notice that annoying little polo player? Not really the look I want on the BACK of my dress. Take a seam ripper. Rip and rip and rip... this will by far be the most time consuming part of the process. Seriously. Some kid in China really knows how to embroider a little polo guy PERMANENTLY.

You're shoulders are already attached. So. Unbutton your shirt. Take your binding, and pin it along the neck hole, sandwiching the shirt inside it. Sew along the very bottom edge being careful to sew through all the layers of the sandwich. At the ends, fold the binding under and sew across.
Use this same method to sew binding along what will be the arm holes - they're currently just a straight edge of fabric.

Now, the tricky part. It's "tricky" like kind of difficult and "tricky" like kind of sneaky. See that awesome wordplay there?
Ok. About 1/2 an inch or 1 inch down from the neckline, you will need to sew two buttonholes - one on each side of the pleat. But not just NEXT to the pleat. Like, INSIDE the edges of the pleat. So when the pleat is flat, you can't see the buttonholes at all.

This is really hard to get a good picture of, by the way. Here are a few shots of the buttonholes to help you understand just what I mean. Kidding. These pictures won't help at all because they stink.

Once your buttonholes are in place beneath each edge of the pleat, turn the shirt inside out and sew the sides.

Button your shirt. Pin the bottom of the line of buttons so it doesn't move. Starting underneath the second button, sew down first one side of the button placket, then the other.

Now, fold up the bottom to the inside of the shirt, twice. Iron. Sew around this hem.
Take the excess fabric you cut off the bottom, and cut it into a nice straight long rectangle.

Fold the long edges over just a little to the back side and iron. Sew this hem with a straight stitch. Fold the rectangle in half, short end to short end, with right sides together. Sew a straight stitch down the short ends. Lay out your tube and iron it, being sure to iron the seam flat. This will be your big flouncy bow.
Turn the tube right side out. Twist it up all tight and little. Feed it through one buttonhole from the front of the shirt, then across and up through the other buttonhole. Pull. It'll be tight and a little difficult. That's good, it's what makes it a) stay and b) look like a bow and not a rectangle.
Just add a few hand sewn stitches here and there between the bow and the shirt.
And done!


And because I was worried that the first one I made was a bit too small for mini, I added to all the measurements for this one. Which means it's about 2 1/2 sizes too big. I'm not kidding. Mini's 2. K is 4. It was a tiny bit big ON K. Sheesh. So in two years, mini can look this cute.


And, not tooting my own horn here, or anything, but they look pretty darn cute. No Zulilly needed!

*Be sure to check the right sidebar for all the fun parties I link to!


4 comments:
wow you are to talented I love the dress! good job
This is madly adorable!!!! what a stellar upcycle, too.
I've had it pinned for ages too. Love it! Great job!
so pretty!!! You are an amazing thinker to be able to figure this knock off. :)
Post a Comment