


*Week 4 - "Scraps Only" - is in full swing at SYTYC! Head on over and vote for your fave!*
There's something about the theme "dollar store" that just gives me mental block. I can't understand why, since I craft from dollar store items much of the time... but there I was, wandering the ailes aimlessly, pulling items willy-nilly, trying to put them together in a fun and unique way. With children in tow, I realized I needed out fast (or I'd spend all my money on crayons and stickers) and without a real plan I headed to the checkout. That's when I happened upon the most deliciously brightly-colored, super soft, hand towels. And immediately I thought of a crab, an ocotpus and a turtle. Wouldn't you?

These uber pet-able little sea critters were cut freehand and machine sewn. They are stuffed with sponges - making them very bath-friendly - and are hand sewn onto little mittens that are specially sized for little hands made from the same soft towels. The mittens have an elastic bottom to keep them snuggly on your child's hand during bathtime.

They're Scrubby Bath Puppets! One side for playing, one side for scrubbing.
At our house, like so many other homes, bathtime IS playtime. With these little puppets "onhand," you're gauraunteed hours of good, clean fun!
***
Since I've shared my audition project tutorials with you, I thought I'd go ahead and post the tutorial for "Dollar Store Crafts" - which was our week one theme for So You Think You're Crafty. You may have seen this on the SYTYC blog already, since you fabulous readers/voters voted it number one that week! Thanks!
***
I just loved the bright colors and super soft feel of these hand towels, so the scrubby bath puppets were pretty much a must. To make them, all you need is:
1 towel in each color (one towel should be enough for each bath mitten AND the critters)
1 plain white "bar mop towel" (just a plain white washcloth)
Approximately 6 sponges - more or less...
Some knit scraps from your scrap pile (or use t-shirts from the dollar store!)
Skinny elastic
A few small circles of black felt
a sewing machine
a needle and thread


First, let's go over the different pieces you'll need for each bath puppet. You will be able to find the pattern pieces to print over on my blog. Or you can just wing it and cut them freehand.
You'll need a mitten in every color - obviously. Fold your towel in half. Have your child lay his/her hand on the towel and mark lightly around it. Cut your mitten shape out. Make sure that you use the finished edge of the towel for the bottom of the mitten (both front and back). Also, make sure that the width across the bottom of just ONE side is the DIAMETER of your child's wrist. (In other words, when you sew them together, the mitten should be DOUBLE the diameter of the wrist).


For your little turtle, cut two of each of the following: a large leaf shaped body with a straight top, a small half-oval with a rounded point for the head and (not pictured) a little triangle for the tail. Cut FOUR: long, curved, somewhat pointy flippers, and little squat feet with a kind of toe bump. This is all extremely technical, of course. Especially the toe bump. Ok, I did look at pictures of sea turtles, but I don't know what the actual anatomical names would be.

For your crab, you'll need two pieces of body and four pieces of the pinchers. It's easiest if you keep the towel folded and cut so they match. For the pinchers, keep it folded, cut the shape once, then flip the pattern piece and cut again.


I did also attempt to make the little legs out of towel material. The idea was to create casings for each one, sewing them inside out and turning them right side out to attach them... big fail. Don't do this! I mean, those are some ridiculously skinny casings. There is NO way you will be able to turn them the right way - and had I been in my right mind while starting this project I would have known that right away. So get yourself some scrap stretchy knit (an old shirt works great) and cut it into skinny strips about and inch or two wide. Pull the ends to make the strips curl up a bit. More on that later... Just don't do this:

For your octopus, use a kind of leaf shape and cute around it for a total of 5 pieces. You'll see I also made the same mistake with the tentacles here, thinking I'd be making some super skinny casings... um, no. Stretchy knit, people. Stretchy knit.


Here's the overview for the mittens. Pretty straightforward and you'll make all three this way. Ready?
Pin your mitten right sides together. Use a zig-zag stitch going up one side, around the curve and down the other side. Leave the bottom open - you know, since you'll want to put your hand in there.

Then trim the excess towel off.

Fold up the bottom once. Since you've used the finished edge from the towel, you don't need to worry about fraying or double folding or anything. Use a zig-zag stitch and sew around the fold. Leave a small opening.

Cut your skinny elastic just slightly smaller than your kid's wrist. Use a safety pin to thread it through the casing.

Sew the ends of the elastic together.

Sew the opening closed.

Turn your mitten right way out. Done!

Let's make a turtle!
We'll begin by assembling the limbs. For each one, you'll simply put right sides together, pin, zig-zag stitch around and leave an opening to stuff them.
You'll sew the flippers much like the mittens - up one side, around the point, down the other side, leave the bottom open.

To stuff them, cut a piece of sponge the same approximate shape as the flippers just a bit smaller. Then, cut the sponge shape in half so you have two of the same shape that are 1/2 the thickness of the original sponge.

And they look like this:
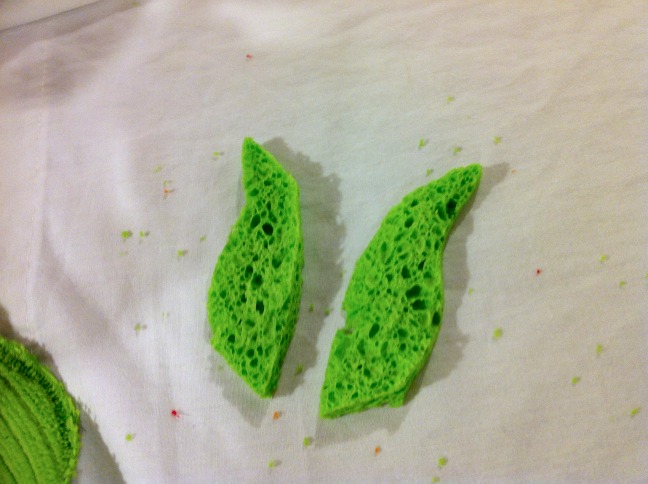
Turn your flippers right side out, and stuff them with the sponge shapes. Use a skewer to smoosh them into the right shape. Don't worry about sewing the openings closed, that'll be taken care of later.

Do the same thing for the head.


You won't be stuffing the feet or tail. So just sew around them with right sides together, turn them the right way, don't worry about the openings.

In a fit of what I can only assume was temporary insanity - or over-tiredness I suppose - I missed a few pictures. So you get to see my awesome computer drawn illustrations. Ahem.
To assemble the whole turtle together, you'll be making what I describe as a "sandwich." Place the bottom piece of the body right side up. Lay your limbs, etc, in place on top of the body all pointing in.

Lay the top body piece on this - hence the sandwich - with the WRONG side facing up. Pin all around the edge - especially through the limbs. Sew around the body with a straight stitch, leaving the top open. Trim off all the excess fabric.

Turn your body piece right side out. Tuck the head in the top. Fold the top edges down into the inside just a little. Straight stitch right across. And that's it!

You'll use your needle and thread to hand sew him to the mitten. Just sew around the perimeter of the turtle, making small, nearly invisible stitches.

On to the crab!
Let's take care of the pinchers.
As per previously, put the pinchers right sides together, sew around and leave the bottom open.

Turn them right side out. Cut sponges to fit inside. I left the the full thickness - not 1/2, like the turtle's flippers.

Tuck a stretched out strip of knit into the pinchers. Sew straight across the opening.

Make a crab sandwich, the same way you created the turtle sandwich. Bottom body piece (right side up), all the limbs/pinchers (all made out of stretched out knit) in place, top body piece WRONG side up, pin all the limbs. Sew around the body with a straight stitch. Leave the top (in between the pinchers) open.

Trim the excess fabric.

Turn it right side out.

Stuff it with sponges the approximate shape of the body. This is stuffed three sponges thick:

Sew across the opening with a straight stitch. Cut the limbs to the desired length and tie some knots in the ends for cuteness.

So easy! Just hand stitch to the mitten.

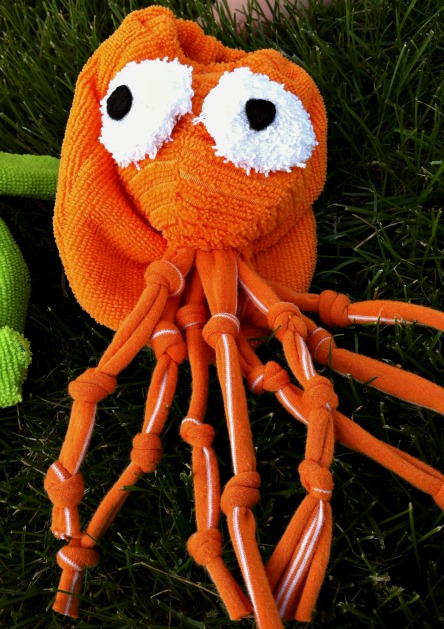
And now for the octopus. I'm afraid I will be horrible at explaining this. But I shall do my best.
Basically, you're just making a ball with legs. Set your first piece right side up. Put your second piece on top, WRONG side up. Stitch down the right side, from point to point, following the curve. Lay these pieces out flat, right side up. Place the third piece on top of the second piece, WRONG side up. Stitch down the right side, from point to point, following the curve. Lay these out flat, right side up. Lay your fourth piece on your third piece, WRONG side up... continue in this fashion until you've got all five pieces sewn together, but DON'T attach the fifth piece to the first piece yet.


Here's the little ball shape with the opening.

And here is what you DON'T want to do with the tentacles. Please, take my word for it. Just use knit.


Turn the ball right side out. Now, stuff it with sponges. Stick the knit strips inside, between the layers of sponge.

Sew up the flap. Just sew the last piece to the first piece, tucking the edges in. Then, sew across the bottom of the ball to secure the tentacles.

Trim the tentacles if you'd like. Tie knots along the tentacles, two or three on each. You know, for cuteness.

Hand stitch it to the mitten and voila!
For the eyes, I made yo-yo's out of the plain washcloth. You can find an excellent tutorial for yo-yo's here. I just turned them around backwards and stuffed the edges up into the yo-yo so they look puffy. Then I hand stitch black felt to them and hand stitched the whole eye to the critters. Just remember when you cut the circles out of your washcloth that the yo-yo's will be HALF the size you cut the circle.

When you're all done, you'll have some seriously lovable sea critters. Who apparently like to kiss. And chase each other around the yard.


One side perfect for scrubbing,

and the other side super fun AND scrubby. Bath time never had it so good.

Thanks for the votes!


2 comments:
You seriously rock Kimberly! These are awesome. Congrats on getting voted number one!
What a brilliant idea. Bath time will be even more fun now.
Post a Comment