This is one of those things I wish I could take credit for, since it's so ingenuous. But I first saw it on babble.
Here is how you can make your own birthday cake in a jar:
First, you'll need frosting in two fun colors. (Just use white frosting and food coloring.)
You'll also need a white or yellow cake mix and bright, multicolored sprinkles. (Just mix up the cake batter per normal and add the sprinkles in. Mix it a bit more, then pour it into your pan and bake as directed.)
Finally, you'll need pint-sized mason jars, a spoon and washi tape. (I used wide mouth jars since it seemed it would be easier to get everything out. I used two jars for this particular project but one cake should make about 5 jars.)
1. Crumble up some cake in the bottom of your jars.
2. Add some sprinkles.
3. Spoon in one color of frosting.
4. Add more crumpled cake.
5. Add more frosting, in a different color.
Just make sure to leave enough room at the top of the jar to put the lid on.
Speaking of lids, I needed something to prettify the lid, but since I used wide mouth jars, even the giant cupcake papers wouldn't cut it. What to do?? Enter:
I don't drink coffee, but I always keep these on hand for fun kid projects.
To make your filters cute, you'll need a double layer of filters, ink in two colors, and a round stamp - I used a small round biscuit cutter from the thrift store! (You can use hole punches as in the photo below, but I didn't end up using them)
6. Using one color of ink, take your cookie cutter and stamp circles all over - some of them overlapping each other and some of them running off the edge.
7. Then use the other color and repeat.
That's it!
Now you can put it all together.
8. Place your lid on the jar.
9. Cover it with the coffee filter.
10. Twist the seal on over the coffee filter.
11. That's it!
12. Just use the washi tape in two small pieces to secure the plastic spoon to one of the jars - I crossed them in an "x".
But no birthday cake would be complete without candles. You can tote these along with the jars in a super cute way, as well!
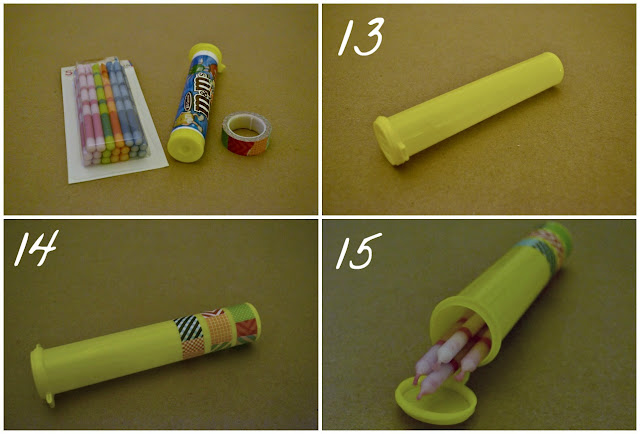
All you need are the cute candles (got mine at Target), a mini m&m's container and washi tape!
13. Take the wrapper off of the container.
14. Wrap a few pieces of washi tape around the container at the bottom end.
15. Stick some candles inside!
There should be room for quite a few candles. I only included 4 - 3 for one jar and 1 for the other... 31!
Now the coolest part is that these are totally cute to drive on over to a friend's house or a very easy, no mess way to serve cake at a party, BUT...
They are also totally mailable! The cake will stay good for a while in the sealed jars. You should probably make sure it will arrive within two days for MAXIMUM freshness. My jars were bound for Chicago and made it down in one piece in time for my bestie to celebrate 31 awesome years.
Of course I've seen (and even sent) the birthday packages that include the cake mix and everything needed to make the birthday cake... but honestly? Who wants to make their OWN birthday cake?? No one! And this way, they don't have to!
Go send some cake of your own!

*Be sure to check the right sidebar for all the fun parties I link to!


No comments:
Post a Comment