


As I brainstormed gifts my mr would actually use and not throw in a corner (don't worry, I've already given him plenty of those...) I remembered an awesome possum gift idea I'd pinned from my fellow Kim's blog. (that's A Girl and a Glue Gun, if you weren't sure.)

Cool, huh? It was getting dark by the time we put it up during the party, so the picture's a little dark, but you get the idea. Here's the inspiration photo:

This was built by Kim's sister and brother in law for her kids for Christmas. AND it fit perfectly with the theme for mr's party. There weren't super specific instructions about how to actually build it, but there were enough that I knew I could do it!
After I enlisted the help of my dad, that is.

Yes, for those of you who are super observant, there are only two pipes in the picture. That's because both my father and I had the same momentary memory loss and bought the wrong amount. Actually, it's a miracle really we even brought the two pipes home, since I warned my dad they were too long for his truck and would fall out and he assured me they wouldn't; then he spazzed out while he was driving and swerved all over to avoid another car and we didn't realize the pipes had fallen out until we were two miles down the highway and we had to drive to the next exit and then all the way back to find them... phew. ANYWAY.
I wanted my football target to be collapsable so we could store it easier. That meant a bit more work on our part, but it really didn't take long at all.
So. Our tarp was 10 feet by 8 feet. We wanted the top and bottom of our frame to be just longer than 10 feet and the sides to be just over 8 feet so the tarp would fit nicely inside and not overlap the frame. We had to take the length of the three connectors per pipe into consideration for the measurements as well.
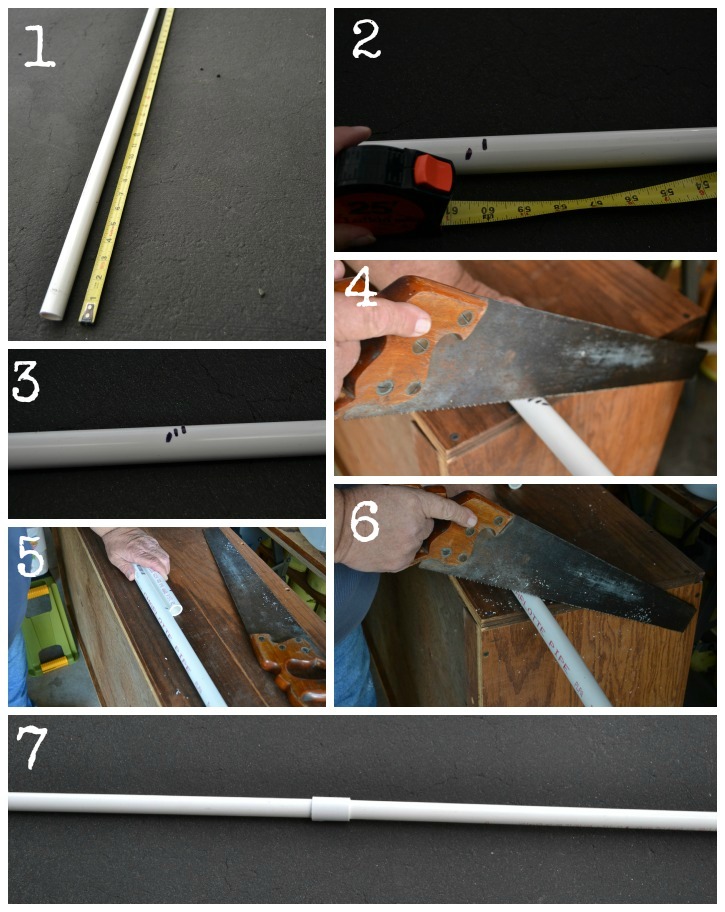
2. We measured 5 feet from the other end and made a mark. Obviously the pipe wasn't EXACTLY 10 feet long, which is why we used this method.
3. We made a mark in the middle of these two marks,
4. then used a hand saw to cut the pipe on that mark. Actually, my dad did all the cutting. I can't cut a straight line with a hand saw to save my life. So if any weird psycho killer tells me I better cut the wood for his shelf or else, I'm screwed.
5. Then we held the cut pieces up to the second pipe and used that as a measurement to cut it.
6. We then had to cut a bit more off the pipes to make room for the inches the connectors added to the length.
7. Use one of the Connectors to put the two pieces together for both the top and the bottom.
Then repeat this whole process for the sides - the sides should be slightly longer than 8 feet.
BUT, if you have a 10x8 tarp and you don't want to do all that measuring and guessing and adding the length of the connectors and subtracting and stuff, well, you're in luck! BECAUSE I measured and subtracted and added and stuff FOR YOU, and this is all you need to know:
Cut two pipes - one for the top and one for the bottom - like so:
Cut the 10 foot pipe in half.
Cut 11 1/2 inches off of one end of one of the halves.
Cut 11 1/2 inches off of one end of the OTHER piece.
Cut two pipes - one for each side - like so:
Cut the 10 foot piece in half.
Cut 23 1/4 inches off of one end of one of the halves.
Cut 23 1/4 inches off of one end of the OTHER half.
There you go! You're frame is all cut!
You will probably want to file or sand just a bit if the ends are jagged from being cut.
Now, let's make the target.

9. You can also use a large bowl is you want to make a circle target. I cut a few triangles also.
10. Use a scissors. Stab through the middle of the shape you want to cut,
11. Then cut around the outline.
12. Cut all of the shapes out (I had three on each side and two in the middle) and it'll look like a cut up mess.
13. Now you'll line each shape with your duct tape. Just flatten a strip of tape along one edge, on the front. Turn the tarp over and fold the tape over and flatten it down to the back.
14. Do this for each straight edge.
15. If you have any circle, flatten a length of tape along the front, then cut slits all down the length of the tape, fold over each piece of cut tape to the back. Do this all around the circle.
16. Use your sharpie to write the point values around the duct tape.
17. Put two zip ties through each corner grommet. Put one zip tie through each grommet along the top, bottom and sides.
And that's it!

As far as point values - as I was drawing and cutting the shapes I made sure to have four different sizes of targets as well as the different shapes, for different degrees of difficulty. The I assigned the middle rectangle (which is HUGE) 10 points. The next biggest targets - the big triangles on top - are worth 20. The two circles on the sides are 30 - even though they are smaller than the triangles, they are centered on the tarp, so I thought they'd be easier. The blue triangles are 40 and the circle on top is 50. They are color coded!
To put the whole thing together:
Use the straight connectors to put the sides, top and bottom together. Slide the pipes through the zip ties - making sure to slide the sides of the tarp over the side pipe pieces and bottom and top over the longer pieces. Use the Standard T's to connect the top to each side piece and the side pieces to the bottom. Use the rubber mallet to hammer the nail stakes into the ground (the nail stakes are super heavy stakes that look like nails. You can find them at the hardware store near the lumber), using the frame to measure how far apart to hammer them. Then slip the standard t's on the bottom of the frame over the nail stakes so the frame is standing up. Use the rope to tie slip knots over the top standard t's and the smaller tent stakes to anchor the rope to the ground. You'll need to do this twice per side - once to the front of the frame and once to the back of the frame (so you'll have to cut the rope into 4 pieces). You're just making guy lines here. And that's it! It held up even in the Wisconsin wind! Though, pretty soon after the guys got it up, it was too dark to see the targets...
I had to make something to contain the whole thing, since I was going to so much trouble to make it collapsable and portable.
So I made:


The whole party is tomorrow!!

*Be sure to check the right sidebar for all the fun parties I link to!


No comments:
Post a Comment