


Kind of like I pretend to sew. But more pretending involved. Since I really, REALLY don't know how to embroider stuff. BUT, my sister IL DOES do cross stitch and I thought for Christmas I'd give her a little wall decor that paid homage to her hobby. So I faked it. I made an:

And if I can fake it, you know you can too.
So, let's get started, shall we?
1. Gather your supplies. You'll need an embroidery hoop of your desired size and shape, some canvas-y material cut to the shape and size of the hoop, two spools of thread in your desired colors, buttons of varying shapes, textures, and colors, two needles, scissors, and - NOT PICTURED - green embroidery floss. I used two different greens.
2. I'm sorry, did you just ask me if these tutorial pictures were taken on a towel? A towel?? What kind of shoddy operation do you think we're running here??? Oh, and make sure you've got buttons of all sizes.
3. Thread your needles - one with each color.
4. Stretch and tighten your canvas into your hoop.

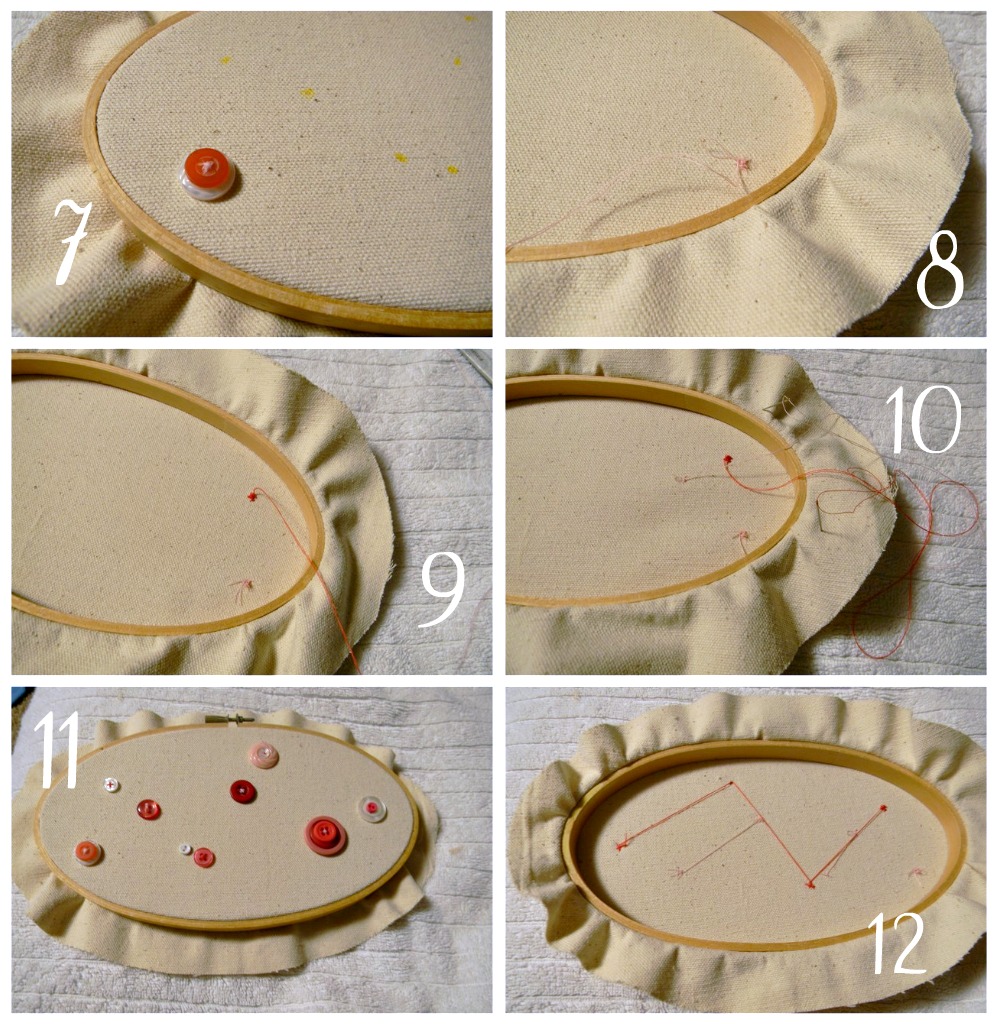
5. Lay out your buttons in an aesthetically pleasing manner. Keep in mind that you will be stitching stems and such as this will affect your layout.
6. Mark each spot for a button with a small dot in light marker that's incredibly hard to see in this photo.

7. Begin sewing your buttons to your canvas. Lay your buttons on the marker spots and use the threaded needle in contrasting color to the button. Sew the button on as you would normally do. Even if you stack some buttons together, just sew them all as one button.
8. Knot the thread at the back of the button as per normal, but don't cut the thread off.
9. Attach all of the buttons as you would normally sew them, using the contrasting thread color to the button (in my case, red thread for pink buttons and pink thread for red or white buttons.)
10. Continue in this manner, knotting the thread at the back of each button, but NOT cutting the tail.
11. On the front you will have a cute display of buttons.
12. On the back you will have a hot mess of thread and knots - but at least you didn't have to rethread the stupid needle 50 million times.
13. Begin stitching in the stems with the green embroidery floss. Start at the base of the button and use small stitches from back to front all the way down to the bottom of the hoop.
14. Once you reach the bottom of the hoop, make sure to end the stem by stitching down to the back of the canvas, then just lift your needle and begin sewing the next stem at the base of the next button.
15. Use small, simple stitches from the button down to the bottom of the hoop.
16. Continue doing this for each button. You can use two colors to add a little visual interest. Continue stitching and moving from button to button on the back of the canvas without cutting and threads or having to rethread any needles. Again, the back looks like an abstract art exhibit. But the front is all pretty and has stems now!

You could leave it at that, or you could become obsessed with french knots, as I did. In that case, you'll probably want to add some french knot leaves. Below, you will see how to make some french knots.
17. Stick your needle up through the back of the canvas where you want your leaf.
18. Pull the embroidery floss all the way through to the front.
19. I have to admit, I think I threw a superfluous photo in this collage for no reason. See, the floss is coming through the canvas from the back to the front???
20. Now, position your needle, point side down, near where your floss emerges from the canvas. Wrap the floss around the needle two or three times.
21. Pull it tight against the needle.
22. Stick the needle down into the canvas, close to the point of origin for the floss.
23. Pull the needle all the way through the canvas to the back side, turning the wrapped floss on the needle into a knot. Repeat as desired.

When you're finished with that, trim your canvas material fairly close to the hoop. With your fingernail, fray the edges, like so:

To cover that crazy mess on the back, just cut a piece of felt slightly larger than your hoop. Use hot glue to attach the felt to the INSIDE of the hoop on the back. (So the hot glue isn't touching the actual project, just the wood of the hoop).

And there you have it. A pretty little garden blooming in the unfortunate months of winter.

For the record, it just barely snowed for the first time this winter, the temperatures have now reached below 0 and I am once again questioning the sanity of living in this tundra. And it's only snowed once. It'll be a looooong winter...

*Be sure to check the right sidebar for all the fun parties I link to!


2 comments:
This is really cute, I will have to pinch it for my wall I think. And look you can embroider, there was no faking there, french knots and all. It took me ages to learn french knots!
This is adorable!
Post a Comment