


Um. Maybe. You'll have to read to the end to find out.

It is now officially time for the final installment in our short series: "tutorials for the Mommy and Me, Mix 'N Match Spring Skirt Combo!" It had to end sometime, right? If you've missed it, you can see the first snapshot of this project here. We've also already covered the following pieces:
Today I'll be showing you how to make the Baby Overskirt. It's a cinch. Although, once again, there was a bit of trial and error. Don't worry, I'll be sure to point them all out to you.
Remember when you hacked apart that horribly out of fashion but ever-prevalent 80's (to late 90's) tapered pleated monstrosity? And I told you to save the top part that you didn't use? Well, guess what? We're using it!
First, you'll cut this top section apart at the side seams. Because it buttons down the front, this will leave you with THREE pieces - not two.

Measure how wide you need your skirt to be, and carefully cut your sections so that the proportions are the same, but the width is small enough for you. Just cut several inches off of each piece - making sure to cut the same amount.

Ok, here I will admit error one. Which isn't really a huge deal, but pretty dumb on my part. I totally wanted to salvage the pockets on the side of the skirt. I thought it would be ridiculously cute for mini to put her arms in pockets that reach down to the hemline. How funny, right? Didn't translate well. Mostly because, as you see below, the new width of the skirt places the pockets right at the seams - meaning they are at the back of the skirt. Not the sides. Whoops. Luckily, they are flat pockets and you can't tell they are even their. Shhhh...
Once you've measured and cut your skirt to size, pin the pieces together - just lay them right side down, line up the cut edges, and pin - making sure the right edges are together when you do so.

Use a zig zag stitch along the pinned seams - you could use a straight stitch too, I just thought this would kind of sew the seam and finish it off in one step.

Now, your skirt looks like this. Basically, the bottom appears as though someone took a hack saw to it.

So, even it out a little by trimming. Then, fold up the bottom, just a bit and iron.

Fold the fold again and iron.

Then pin and sew this using a straight stitch. There! You've hemmed it - nice and even.

Iron all those pleats.

Ok. Here's where I admit my second error - though I don't have pictures, you'll just have to take my word for it. At this point I thought I was done. I put it on my girl and tied the sash I'd made around her waist. Did NOT work. The skirt wasn't quite tight enough to stay up on her and the sash kept slipping up while the skirt fell down. Lame. So, back to the drawing board.
While the little bambino is wearing it, pin the back to the size you need.

Now, measure some elastic to fit across that section. I cut my elastic a bit smaller than the section, just in case.

At the side seams, use your scissors to cut a little opening in the INSIDE of the waistband - do not cut all the way through the waistband.

Put a safety pin on your elastic and thread it through one of these small holes. Feed it through until the end of the elastic is lined up with the hole. Then stop and sew the elastic to the waistband while simultaneously folding the open section over and sewing it closed.

Continue feeding the elastic through until it comes out the other small opening. Take the safety pin off and sew this side the same way as the previous side - making sure to secure the elastic to the waistband.

Here's what it looks like now:

Ok, so with this fix, you've kind of messed your pleats up a little. They will stick out all funny like wings in the back. Not flattering. Maybe we should make the back more of a bubble tushy?
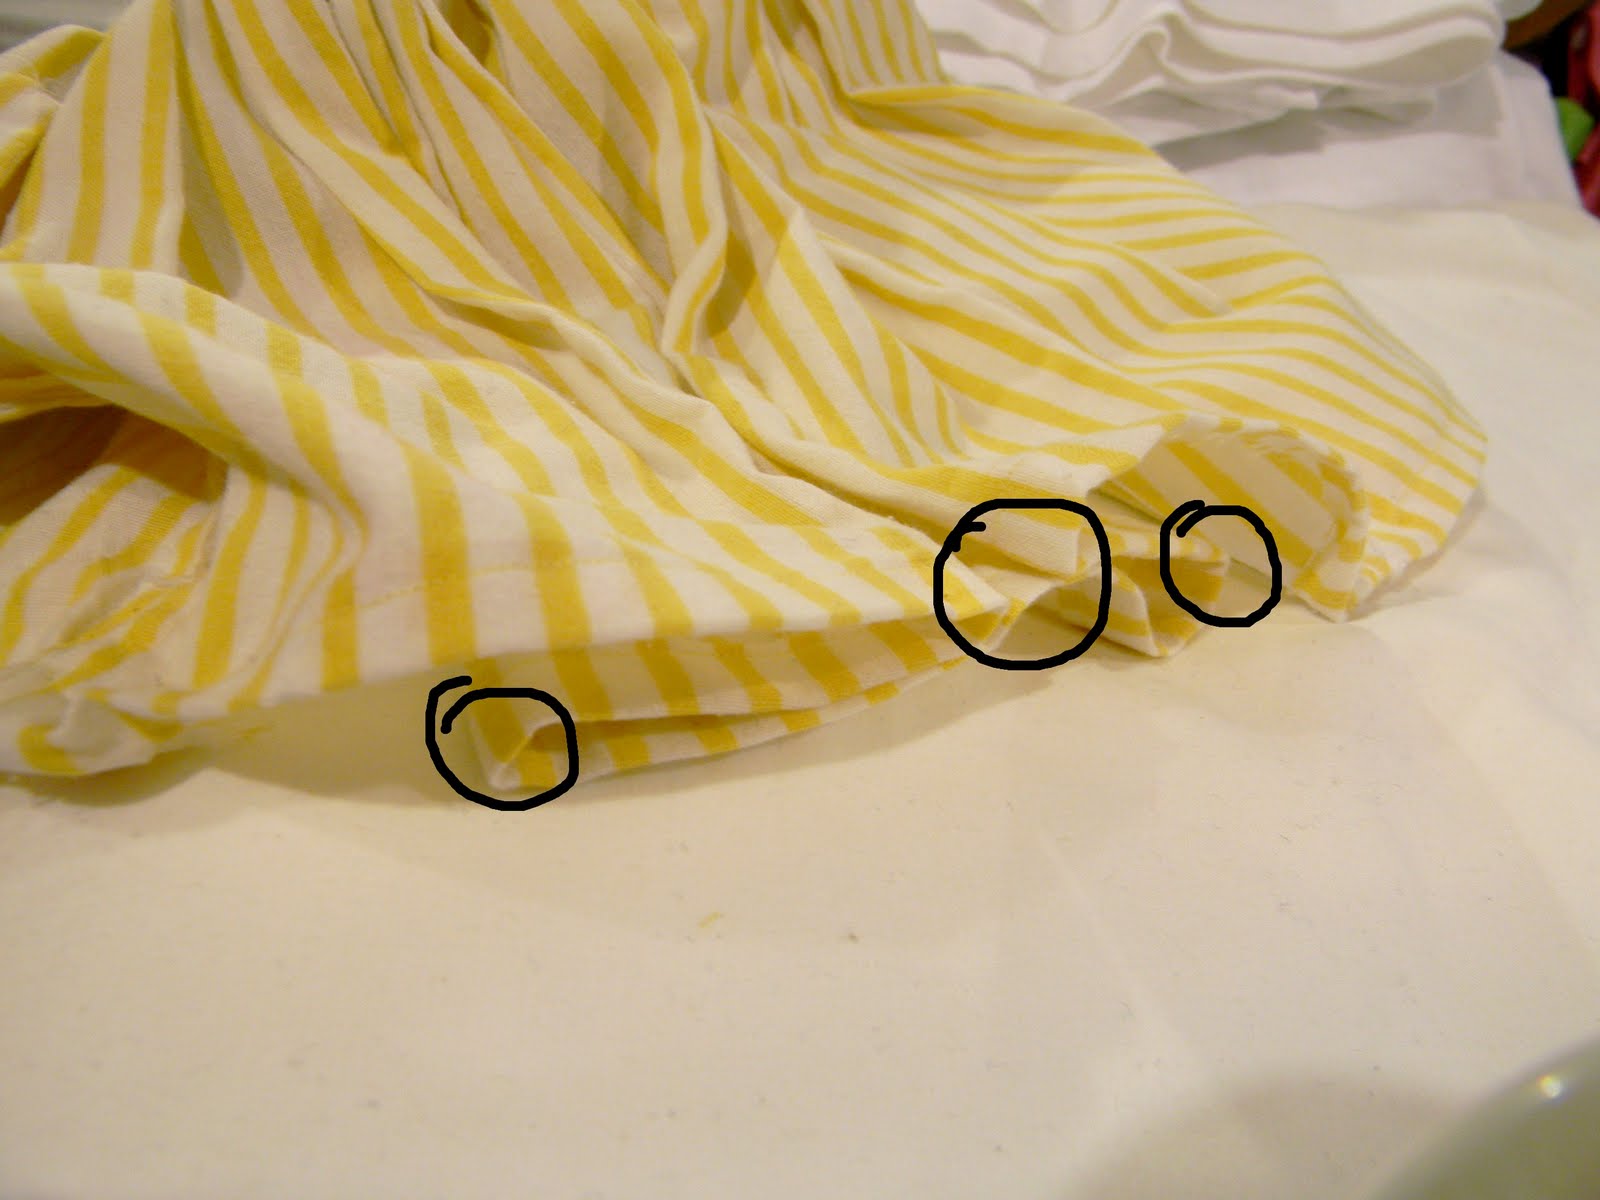
At the very bottom of the skirt, in the middle of the back (right down from where you just added the elastic), pin the pleats together.

Then, you will simply tack the pleats together, once where the pin is, and then on each side, so the pleats underneath will also stay in place. (To tack them down, you simply run a very small section through your machine back and forth two or three times). The areas you will need to sew are circled in black:
Now, you will tack on your sash. A note about the sash: I used the leftovers from my sash when I had to take it apart. You can simply measure how long you want it, how wide you want it and then multiply that width by four. Fold the sides in lengthwise so they touch in the middle and iron it. Then, fold it in half, lengthwise and iron it. Now your unfinished edges are inside. Now just topstitch all the way around the rectangle.
So, tack this sash to your waistband. First, pin the middle of the sash to the middle of the back of your skirt. Then, every few inches, just run a few stitches forward and in reverse along the TOP of the sash - not the bottom. Line up your stitches with the existing stitches and you won't even be able to tell. So, every few inches, along the top of the skirt, your sash will be sewn like this:

When you are lining your sash up on your skirt to make sure it is even in the middle, make sure it gaps just a little bit over the elastic area so that when the elastic stretches, the sash will be tight against the skirt.

Now, tie in a cute bow, and you're done!

A cute little summery skirt, for all occasions.

Well, hello, beautiful! Lovely skirt you have there!

Look at that cute little bubble bum...

Shall we zoom in for a closer look?

I do need to learn to tie prettier bows.

But all in all, I do believe it's a success!

You may think this is too many photos of the finished project, you've already seen the skirt in action, etc, etc, etc...

But you tell me, how in the world was I supposed to decide amongst all these gems?

One more quick photo?


*Be sure to check just below for all the fun parties I link to!


8 comments:
is adorable!!!
hi from your newest google follower/s via blue cricket design, Karima from
www.karimascrafts.com
and
www.karimasblogs.blogspot.com
OMGosh - so cute.How lovely. Following you from blog hop Hope you can stop by sometime.. http://theartsygirlconnection.blogspot.com CUTE blog :))
That is so freakin adorable. I pinned it right away so I can make it when I have a girl one day. Your little one is so precious and you seem like such a cute mommy.
A mommy's life...with a touch of YELLOW
tyandwhitneyulrich.blogspot.com
I LOVE IT!!! great tutorial. I love love love/ thanks for sharing
Popped over from tshirt diaires. Love this, so very cute!
cuteness! i need to get my craft on again. your newest gfc follower www.momsopinion101.blogspot.com
I featured these on my blog! Thanks for sharing!!
www.craftychicka.blogspot.com
Post a Comment