


Yesterday, I showed you a fun little magnet activity I made for bug to take along on the airplane - Mr. Magnetic Head. I loved those printable magnetic sheets so much, I couldn't resist another fun game. For this one, I'll first refer you to I am Momma, specifically this post, where I originally got the idea.
Start out with one of those mini novelty lunch boxes. To save you the same grief as my father, I will point out from the start that this is NOT a VINTAGE Lone Ranger lunch box. Just one of those little throwbacks you get with a t-shirt or something inside. I nearly gave my dad a heart attack when I moved on to the next step,

Which is to spray paint it. If there are any plastic parts, like the handle, tape them off first. Once upon a time, I learned that the hard way.

Now, you'll make your magnetic puzzles.
Use whatever software you are familiar with. Again, I just used pages (word processor on the mac). Start by creating rectangles slightly smaller than HALF of the TOP of the lunchbox. On the left side, type the Upper and Lowercase letters - one per rectangle. On the right side, find a picture of something that starts with each corresponding letter and resize it to fit. Once you've created the picture element of the rectangles, use the "insert shape" function to insert a jagged line on each rectangle, making sure that each one is different.
Once again, I simply used pictures that I found either on Google Images or on stockxchng - which is an AWESOME source for finding royalty-free images. I am Momma used picnik images for hers.

I also created very little rectangles with the words for each picture written out.

Now, cut out all the rectangles along the black border (I used my paper cutter),
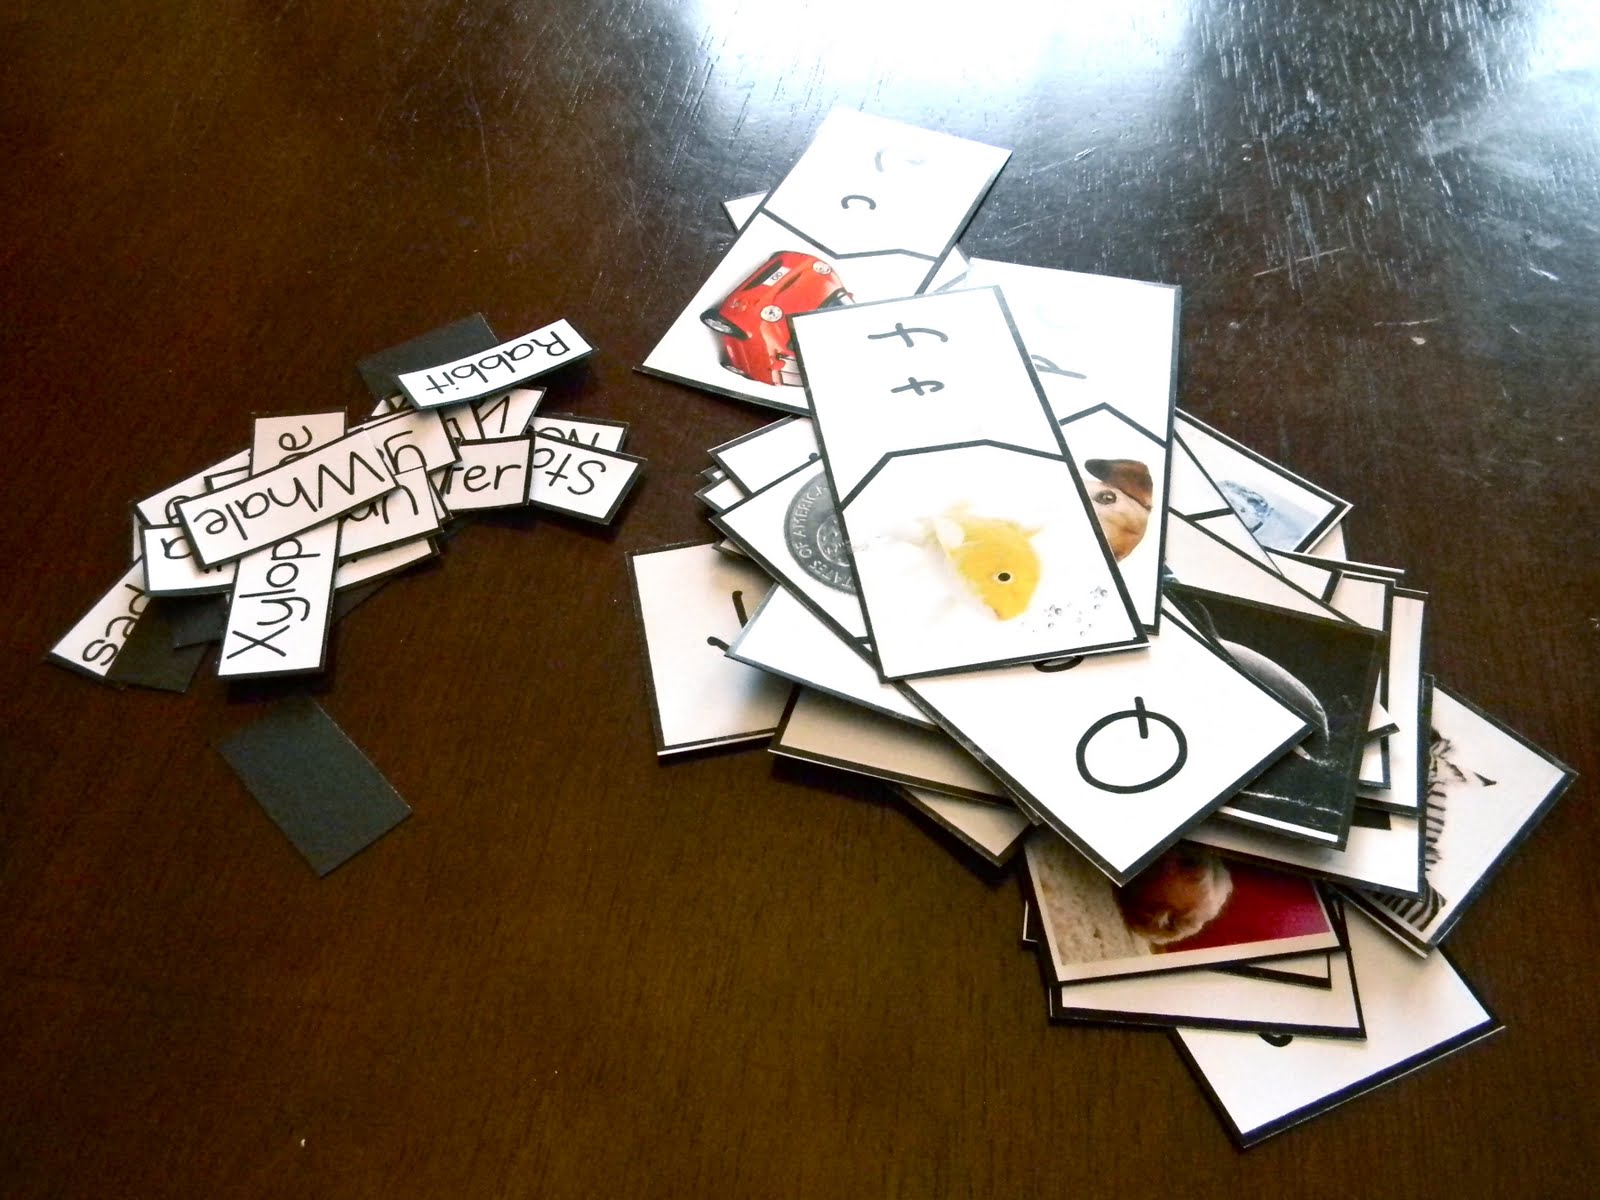
and then cut along the jagged line down the middle (I used my scissors).

Do this for each rectangle.

And there you have it! Mini Alphabet Puzzles, with their corresponding word to help learn spelling or reading.

And because they're magnetic, you not only store them in the lunchbox, but you also put them together right on the inside of the lid!

And everything folds up nicely for some compact storage and easy handling.

bug is thoroughly enamored with lunch boxes now.
Because I like you all, I thought I would provide you with a full set of alphabet mini puzzles, ready to print and cut. Please note that these are for your personal use only. Copyright stuff, you know. I know you may want to make your own to suit your child's interests, but If not, here is the Alphabet Mini Puzzle Download, in PDF format. There are 5 pages total within the PDF.
Alphabet Mini Puzzles
Now, just to seal this whole magnet miniseries up tightly, I thought I'd have a word with you about magnetic sheets - my unasked for advice, which I noted above.
I used two different brands and types of sheets for these projects. The first one was this:

I got it at hobby lobby for about $6. It is high gloss, 8.5x11 size and there are 3 pages per set. When I ran out of these sheets, and didn't want to make a special trip to HL, I got THESE:

I bought them at good old Walmart for just over $5. They are also 8.5x11 and there are 3 pages per kit. They are NOT high gloss, they are matte.
Here is my opinion on which sheets to use - in case you were wondering. (And no, this is not an official review, just trying to help you out. Not that I would be adverse to compensation if you magnetic sheet people want to help me out there...)
Use the cheaper ones. There I said it. Done.
Oh, you want to know why? OK.
1. They are cheaper. (They're cheaper at Walmart than they are online, just so you know)
2. The high gloss sheets tended to get stuck in my printer and caused a few jams. If you read my sidebar, you know that one of my pet peeves is printer jams. So, yeah. I didn't have that problem with the cheaper ones.
3. For some reason, the ink on the glossy sheets was NOT color fast - especially the black. To this day, the black borders and lines are rubbing off all over, getting our fingers all grubby. Yuck. This is NOT the case with the cheaper matte sheets. You can rub those babies all day and the ink stays put.
4. Did I mention they are cheaper?
So, I do believe the high gloss sheets are only appropriate for printing out actual photos to then stick up on the fridge. Or locker. Or car door. Or, really, anything that's metal. They just aren't meant to be manhandled. And if you have a 3 yr old, these little puzzle magnets WILL be manhandled. Just sayin'. So save yourself some headache and lots of baby wipes (and $1!) and just get the matte ones.
Also, I have these as well, but haven't used them yet. They can't be put right through the printer, but they are adhesive. So you just run your stuff through on normal card stock or whatnot and then stick them on. Can't vouch for them, since I didn't use them yet, but they are relatively cheap and you get to pick the type of finish on the image, so they may be a viable option as well.

And, now that I've talked your ear off about magnet sheets, I think we can move on to other mediums, yes?

*Be sure to check just below for all the fun parties I link to!


3 comments:
Thanks for the beautiful set of printables! What a cool project for mini peeps! Thanks for the tips, it makes sense to use matte, which I never knew existed - gonna hunt for some for sure!
okay you may have just saved my sanity. I am so making some of these for my kids to use at church maybe now they will be quite or at least behave better! thanks!
This is so cute! I really like this idea! :)
Post a Comment