


Here is where I again show you how behind I am by finally getting around to posting some handmade Christmas presents. All this week.
You are so over Christmas, I’m sure. You’ve probably all gotten out the candy hearts and rose-y wreaths. I’m sure you aren’t shocked to learn that I haven’t taken down my Christmas tree OR put up the valentine decor (what little there is...).
The good thing about most homemade Christmas presents is that they aren’t exclusively Christmas presents. I didn’t make one gift related to trees, ornaments, stockings or santa, so I’m pretty sure you could make all of these items any time of year, for all kinds of occasions.
On mr’s side of the family, the kids draw names for the gift exchange. This year, mr drew his sister and I drew her husband. After some brainstorming, research, inspiration-finding and almost no help from mr, I came up with the following ideas:
1. Some pretty dashing bow ties (if I do say so myself).
This is for the hubs (obviously mr’s sister doesn’t wear bow ties.) I used Disney’s tutorial, at Ruffle’s and Stuff, and just adjusted the measurements for an adult size. It was the most basic one I could find, and since I am still a very basic sewer, I thought that was pretty imperative. Why bow ties, you ask? Well, you know how some people just seem like bow tie people? And I like bow ties. So, that’s pretty much that.

2. A (very easy) fabric covered mini notebook and matching mini pen.
I don’t have a picture of this, which is pretty depressing. I probably don’t have pictures of the majority of items I created simply because picture-taking was kind of the last thing on my mind at 3 in the morning on Christmas Eve. Soooo, basically I took a mini composition book, covered it in fabric and sewed it on. I cut an elastic hair band so it was a straight piece of elastic and sewed the ends under the fabric to the top and bottom of the back of the book. Well, was that a convoluted sentence or what? Anyway, the elastic hair band keeps the notebook shut. Then I just did this with a mini pen so they matched.
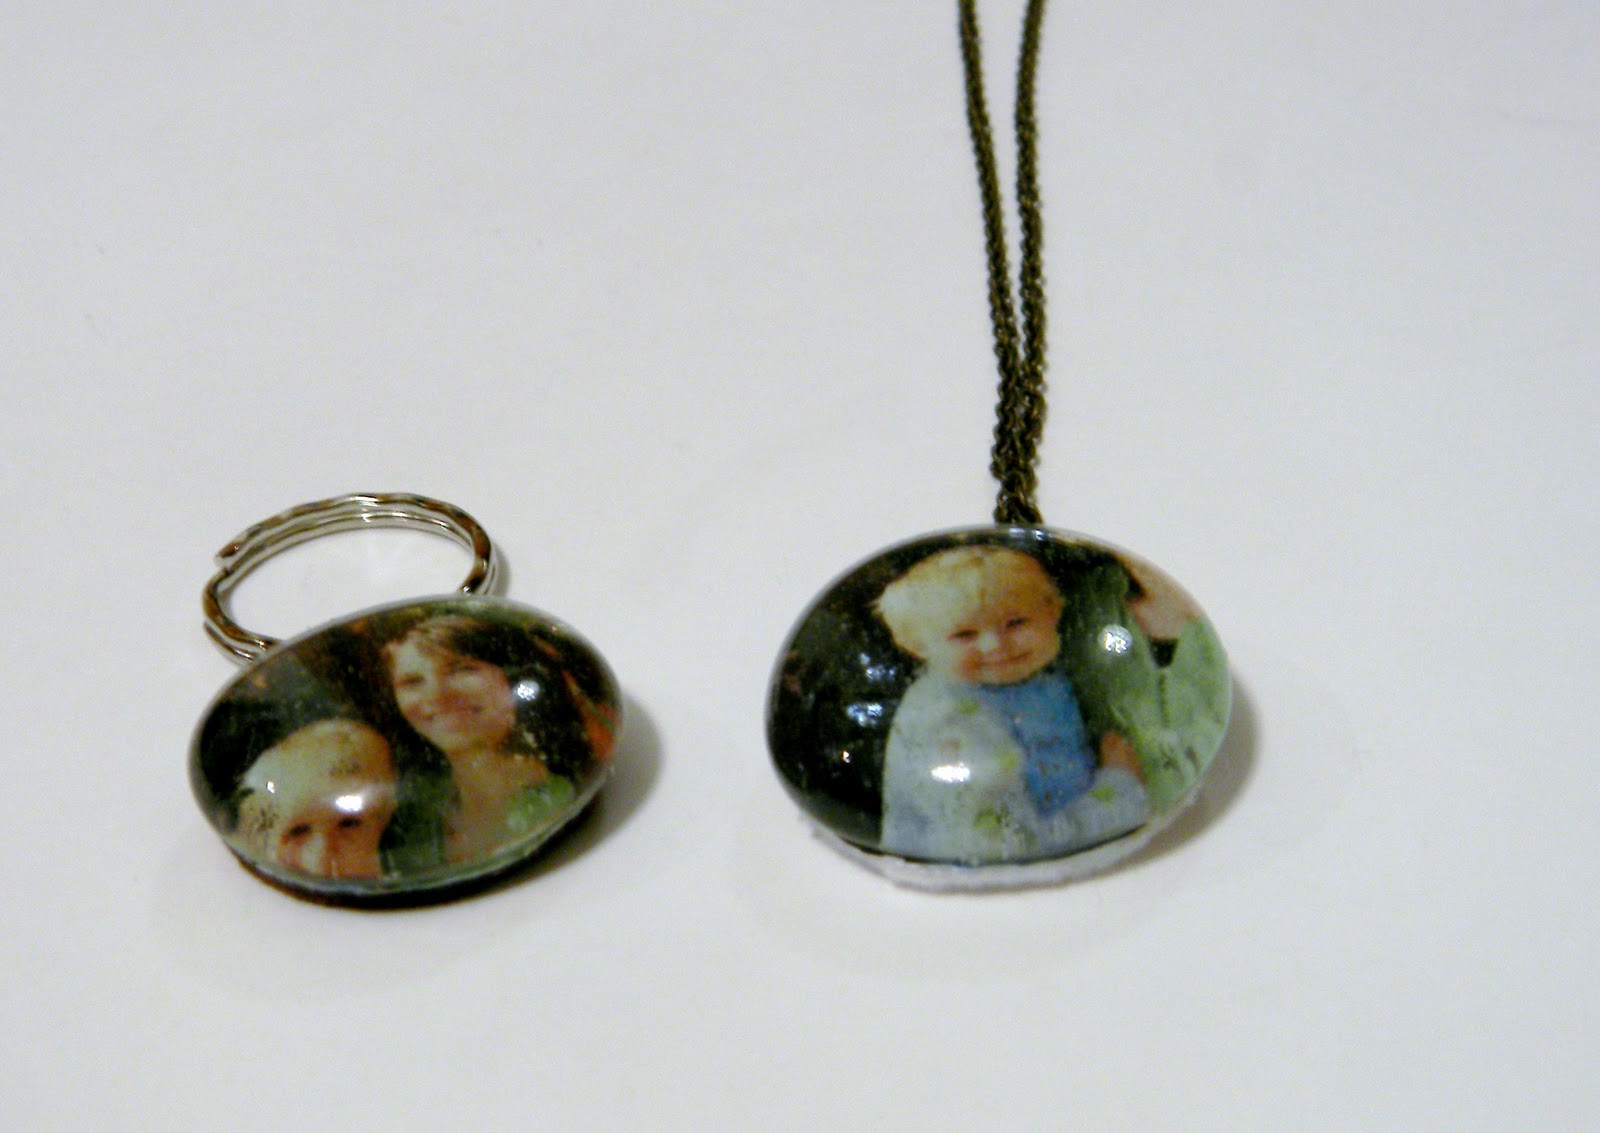
3 & 4. Glass Picture Charms - a “locket” and a keychain
And THIS I actually have a tutorial for! Woo-hoo! (It’s easy, you probably don’t need one. But here it is anyway).
You gotta have:
Clear Glass Stone(s)
Photo (printed on heavy cardstock)
Jump ring
Felt scrap
mod podge and paintbrush
Extra strong adhesive - I used E6000
Hot glue
Scissors
Pencil
Chain of your choice (for the “locket”)
Chain of your choice (for the “locket”)
Split ring (key chain ring - for the key chain. Obviously)
Pick your photo first. I picked a very cute picture of my niece for the locket, and the same picture, but included my sister IL for the key chain. Make sure it’s a shot that will look good when cut into a small circle - i.e. where the people are in focus and close-up, not so far away that they’ll read as stick figures, not a crazy busy background, etc.
Tip: when you size the photo for printing, keep in mind that it will be magnified slightly by the glass stone, so don’t size it so large you’ll be cutting of parts of the head. This is only hypothetical of course.
Print it out on cardstock. It must be printed on heavy paper. Take it from me.

Lay your glass stone on top of the picture, position it right where you want it, and trace around the stone with a pencil.

Cut out the picture.

Spread mod podge on the back of the stone, then

place your photo cut out, face down, on the mod podge.

Press gently, making sure to squeeze out any air bubbles or lumps of mod podge.

Take your jump ring and your heavy duty extra strong adhesive and glue it to the TOP of the stone - on the back, so that most of the jump ring is hanging off the edge of the stone.

Put some hot glue on the back, right over where the jump ring is attached, and

press it onto your scrap of felt.

Trim the felt down so you can’t see it from the front.

Now, you can simply attach it to whatever it is you’re making out of it. For both the necklace and the key chain, I first attached a jump ring through the jump ring glued to the back, then put THAT jump ring on the chain and key ring.

And there you have it!

It’s easy to do and cute, too!
I actually made a necklace with several interchangeable charms this way for a friend of ours for Christmas as well. I didn’t use actual photos in that case, just some fun, colorful designs. (Then I realized that I had made that same friend magnets out of glass stones last year. I am so lame.)
Look below for the parties I link to!


13 comments:
now that is precious Kimberly! what simple and sweet gifts they make!
Love this!
Thank you for your great work and… this Blog is a really pleasant surprise! Keep up the good work!
I made photo pendants for Christmas gifts too. They were really well received and I love being able to make them and not have to order expensive ones online. Here's a link to my guest post tute: http://crystalscraftspot.blogspot.com/2011/01/katies-photo-pendants.html I am not sure why the spacing is a little wonky but other than that all the info is there.
Thank you for joining us at A Crafty Soiree. I love being inspired by the participants. I hope you'll come back next week too, we love to see familiar faces!
That would make a great gift! Very cute!! Thanks for sharing and linking this up!
Such a cute idea!!! I never thought of using them that way. :D
Super duper cute! What a genius idea... thanks for sharing!!
~Alison
http://oopsey-daisy.blogspot.com/
They look wonderful. I'm definitely going to look for glass pebbles and try it out. Thanks for the tutorial.
Love these, so cute! Found you on TT&J.
This one is cute. I would like to make one also. Thanks!
Beautiful! Thanks for linking up to Mad Skills Monday!
That is so cool. I used these flat marbles for xmas magnets last year and I love this idea. I just started my own blog and linked to this post. I hope you don't mind. I am new to this so please let me know if I have broken any protocol. http://insanitybycrafting.blogspot.com/
this is such a cool tutorial. thanks for sharing this!
Post a Comment