You know how there just aren’t enough ideas for wonderful little boy accessories? There just aren’t. I mean, if it was my little nieces birthday, I could think of about a billion things I would make her - starting with a “stuffed tutu” and ending with 100 or so hair accessories - including the ones pictured here that I still have to tell you all about. But it’s not. It’s actually my nephews birthday, and he is now the big 0-4. What do you get a 4 year old who has everything? Men are so hard to shop for...
Not to mention the fact that I vowed NOT to shop for presents this year, but to make them instead. But a 4 year old? What can I make him??? He don’t think he’d like a cute little ruffly tote. And he doesn’t have enough hair for these awesome headbands and barrettes. He has an actual working watch, so I don’t think he’d even appreciate the coolness of this felt beauty. But he isn’t quite at the point where he’d enjoy some photo tile art, either.
I was out of ideas. It sure didn’t help that I forgot all about his party until late yesterday and had less than 24 hours to do something about it. Then I promptly went to bed and woke up to even less hours to do something about it. I racked my brain and could only come up with things that either took too much time to make or just weren’t age or interest appropriate.
I left the kids with mr (oh, thank goodness, a break!) and went with my mom to the store. On the way there I had a sudden epiphany. It must have been divinely inspired.
I don’t actually know what started it, but I was recounting the moment on our trip to Utah when I was asking bug to make all sorts of animal sounds for those listening and I said, “bug, what does a pirate say?” “Arrrrr....” he responded.
And then I realized. What four year old DOESN’T want to be a pirate? Hm? Sometimes even I want to be a pirate! And so, I decided that G would get a treasure chest of goodies.
The first part of this present is a treasure chest. To make my version, you will need:
a rectangular plastic bin (your choice of size) with a “hinged” lid (not a pull off lid...)
contact paper with a woodgrain pattern
“bling” stickers for decoration
other embellishments
a credit card (no, not to buy this stuff, you actually use it in the production process)
wall vinyl
a cricut (optional)
scissors
paper cutter
hot glue gun
treasure
So, take your plastic bin. Lay out your contact paper and mark where you will cut it.
Special note here: I determined before I started that I would leave the rounded edges plastic and NOT cover them with the contact paper in the interest of time and preserving my sanity. If I had more time, I would most likely cover the whole thing, even the rounded corners and edges. I just didn’t want to have to mess with it and take it off and redo it fifty billion times as I knew I would have to if I tried it.
So, again, lay out your contact paper and measure where you will cut it. For me, this meant marking off six rectangles - for the sides, ends, top and bottom.
Use your scissors and paper cutter to cut the contact paper to size and make sure it is straight.
Peel off the back of your contact paper, position it where it needs to be, and press it down firmly.
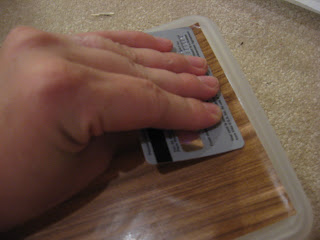
Use a credit card (or other firm straight edge) to smooth out any air bubbles.
For any surfaces that are not clean, clear and smooth, you may need to use your extra adhesive of choice. Just spread it thinly over the surface, then press your contact paper down, then smooth with your credit card.
When you have done this to all six sides,
you’ll need to decide on a piratey saying. Some ideas are:
“Avast ye, mateys!”
“Shiver me timbers!”
“Aye, aye, Captain!”
“Arrrr, me hearties!”
And the like. I went with, “Yo ho ho.”
You could also chest spell out “treasure chest.” Or “Davey Jones’ Locker.” OR “so and so’s treasure” or something.
You get the idea. I’m pretty up on the pirate lingo, aren’t I?
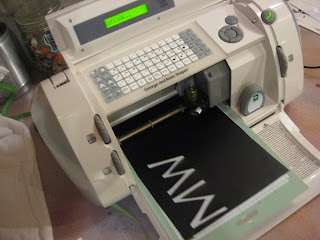
Once you’ve decided, take your wall vinyl (I used black - it seemed the right color choice for a pirate) and print out your piratey saying on your cricut. If you don’t have a cricut, like I don’t, borrow one from your sister, like I did. If you don’t have a sister, OR your sister doesn’t have a cricut, You can always print out your saying from the computer using a font you like, then use this as a stencil on your vinyl. In any case, using some method, cut out some letters from your vinyl to make your piratey saying.
I wish I had noticed that the paper doll cartridge my sister has has a pirate on it and therefore a skull and crossbones. THAT would have been perfect atop the treasure chest. Ah, well.
After this is over, take your “bling stickers” - I am not making this up, my stickers were actually called “bling,” quotation marks and all - and embellish your chest. I used gold, because there’s always gold hinges and scroll work on treasure chest. (I’ve seen a lot of treasure chest, you know. I’m kind of an authority on the matter).
I also used rhinestones, and a gold “medallion” type thing that came in a bag of buttons I bought.
Even though all of these items (minus the medallion) were self-adhesive, I used hot glue to reinforce their stickiness.
Now, stock your treasure chest. I found my treasure in the party favor area. I got gold coins, large diamonds, a compass, and jeweled rings. I also included a gold “doubloon” (A fun gold button), several gems (those decorative glass stones) and some costume jewelry - bangles, a jeweled medallion, a necklace with animal fangs on it. I had a toy telescope in my Halloween costume stash that I threw in there too. Again, I wish I had had more time to mull this over and make it, because here are some other good ideas I came up with:
gold nuggets (small rocks spray painted gold)
those big diamond-shaped sun catcher things you can get in the bead section
jeweled crowns
fancy feathers and plumes
a pirate hat or scarf
a little drawstring treasure pouch
pearls
You could even make this into something fancier by adding a “scroll” with a special birthday message. You can make your paper looked like aged parchment by using a process like the one described here on wikiHow.
OK, you get the idea. Go wild.
Now, the second part of the present is making a fabric “hook.”
Every good pirate captain has a hook instead of a hand. We all know this, it’s common knowledge.
Unfortunately, it’s not very practical, let alone safe, to purchase a hook for a child playing a pirate. I also don’t really like those plasticky hooks. I mean, they’re kind of hard and pointy and you could take out an eye. (I feel like A Christmas Story now...)
So I conspired to make a cuter, more child-friendly version. And here it is.
You’ll need:
a black long-sleeve sweater of some sort (I used a ribbed knit 3/4 sleeve sweater)
some kind of gray material (I used a knit t-shirt)
a scissors
a sewing machine
batting
a skinny dowel
Cut the sleeve off of your black sweater.
Fold your gray material in half and cut a hook shape out of both halves.
Putting the right sides together, sew around the hook shape, leaving the bottom open.
Stuff it with the batting/polyester stuffing. Use a dowel or knitting needle or pencil to make sure it really squishes in there - all the way to the skinny tip of the hook.
When it’s nice and firm, sew up the bottom.
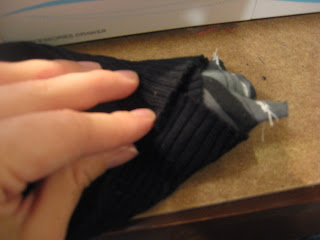
Now, place your hook at the top of the sweater sleeve (where you cut the sleeve from the sweater). Tuck it into the sleeve.
Pull the sleeve up and over the hook, so the sleeve is inside out and the hook is inside the sleeve.
Fold in the sides of the sleeve, so they meet in the middle over the hook.
Sew straight across - over the whole shebang. Sew over this same area multiple times to make sure it’s nice and secure. I think I sewed over it about 5 times. Maybe that’s a little excessive. I don’t know.
Now, turn the sleeve right way out again, and look at that, your hook is sticking out the end and you have a little cuff to put your hand in!
NOTE: When you sew the hook to the sleeve, make sure that the hook is sticking down into the sleeve, so that when you use the hook, there’s a little “nub” to hold onto inside.
My favorite part of this whole present is the fact that the hook itself is zebra-striped. I think all hooks-for-hands should be from this point forward.
So, now you can put your hook inside your chest.
I tossed in a little pirate eye patch as well. If I had had more time, I would have made the patch out of the same black sweater as the hook and cut a skull and cross bones from white felt and sewed it on - using black elastic for the band. Next time a make a treasure chest (and all the cousins loved it so much, I’m going to have to do it again) I will do this for sure.
Wrap it all up and present it to your little pirate.
Now, teach him some things every pirate should know. Like:
“Walk the plank, ye scurvy knave!”
“Ye scurvy bilge rat! Back to the galley with ye!”
“Bail ship!”
“Land ho!”
And, most importantly,
“Hands off me booty!”
(Stay tuned for pictures of the tykes enjoying G's treasure. I had to use my dad’s cell phone because my camera mysteriously died again.)


2 comments:
What a fabulous birthday gift! It all turned out so FABULOUS! Thanks for linking up to Hoo's got talent!
I'm pretty sure you could use this link:
http://www.make-homemade-gifts.com/little-boys-toy-weapons.html
Post a Comment