


(sorry if you saw this on your readers a couple hundred times... I've been having MAJOR issues with my post scheduler thingy.)
Hey, guys, remember back when I was all giddy and excited like a little kid because I was going to share an awesome tutorial on one of my favorite blogs? Remember, I was all like, "seriously, Less Cake, More Frosting is like the Ellen of blogland" or something similar, because really, in blog terms, it is.
Wellllll... Just in case you missed it, I'm giving you the chance to see that very same tutorial right here, right now. Yea!
When Lara described what she needed for her new series - i.e. "If I were stranded on a desert island and had only one craft item..." I thought it would be hard to pick just one. Ribbon? Glue gun? Gorilla glue? Books? (Have you seen all the cool things you can do with book pages?) All phenomenal tools and items to have in your arsenal, but my mind quickly alighted on that one crafting medium that can do it all. Really. It can gussy up shoes, protect paper projects, create a wreath, adhere fabric to all sorts of fun things. It can collage, brushstroke, smooth, stick, clamp, and mold. It could even do your dishes. No, not really, I wish. But it can do everything short of that. I am talking, of course, about the good old Podge. And I can't live without it.
Today I'd like to show you how to create a unique nightlight for your little one's room - or your room, for that matter. And it involves an awesome mod podge DIY "stained glass" technique.

First of all,

(Pay no attention to the items with the black x's over them in that first picture... ha, whoops!)
Ahem:
1. 4" Clear glass globe shade
2. Food coloring in your (or your child's) choice of color
3. Glossy Mod Podge (of course)
4. A tray/cup to mix things up in
5. A medium to large-ish towel that is gross and can be (or is already) ruined
6. A rag or cloth
7. Glass cleaner of your choice
8. A cookie or bar baking sheet that is either a) crummy and used for crafts (like mine) or b) covered with craft paper or aluminum foil
9. A light bulb
10. Twist-on Wire Connectors (wire nuts) - at least two
11. 3 1/4" Glass Globe ceiling fixture
12. Cord with socket and switch
13. Wire strippers
14. Wooden ball knobs (size is your choosing)
15. 4 3/4" Wood circle plaque
16. A drill/electric screwdriver
17. Heavy duty glue of your choice (Pictured: Lock-tite brand Construction Adhesive)
18. Electrical tape
19. Black screws
20. A long screw or nail
I know, that seems like a long and daunting list, but this really is not a difficult thing to make. Take my word for it. I don't like difficult. There are two main components to this project - crafty and technical (or electrical). Both easy, but the crafty part takes some time.
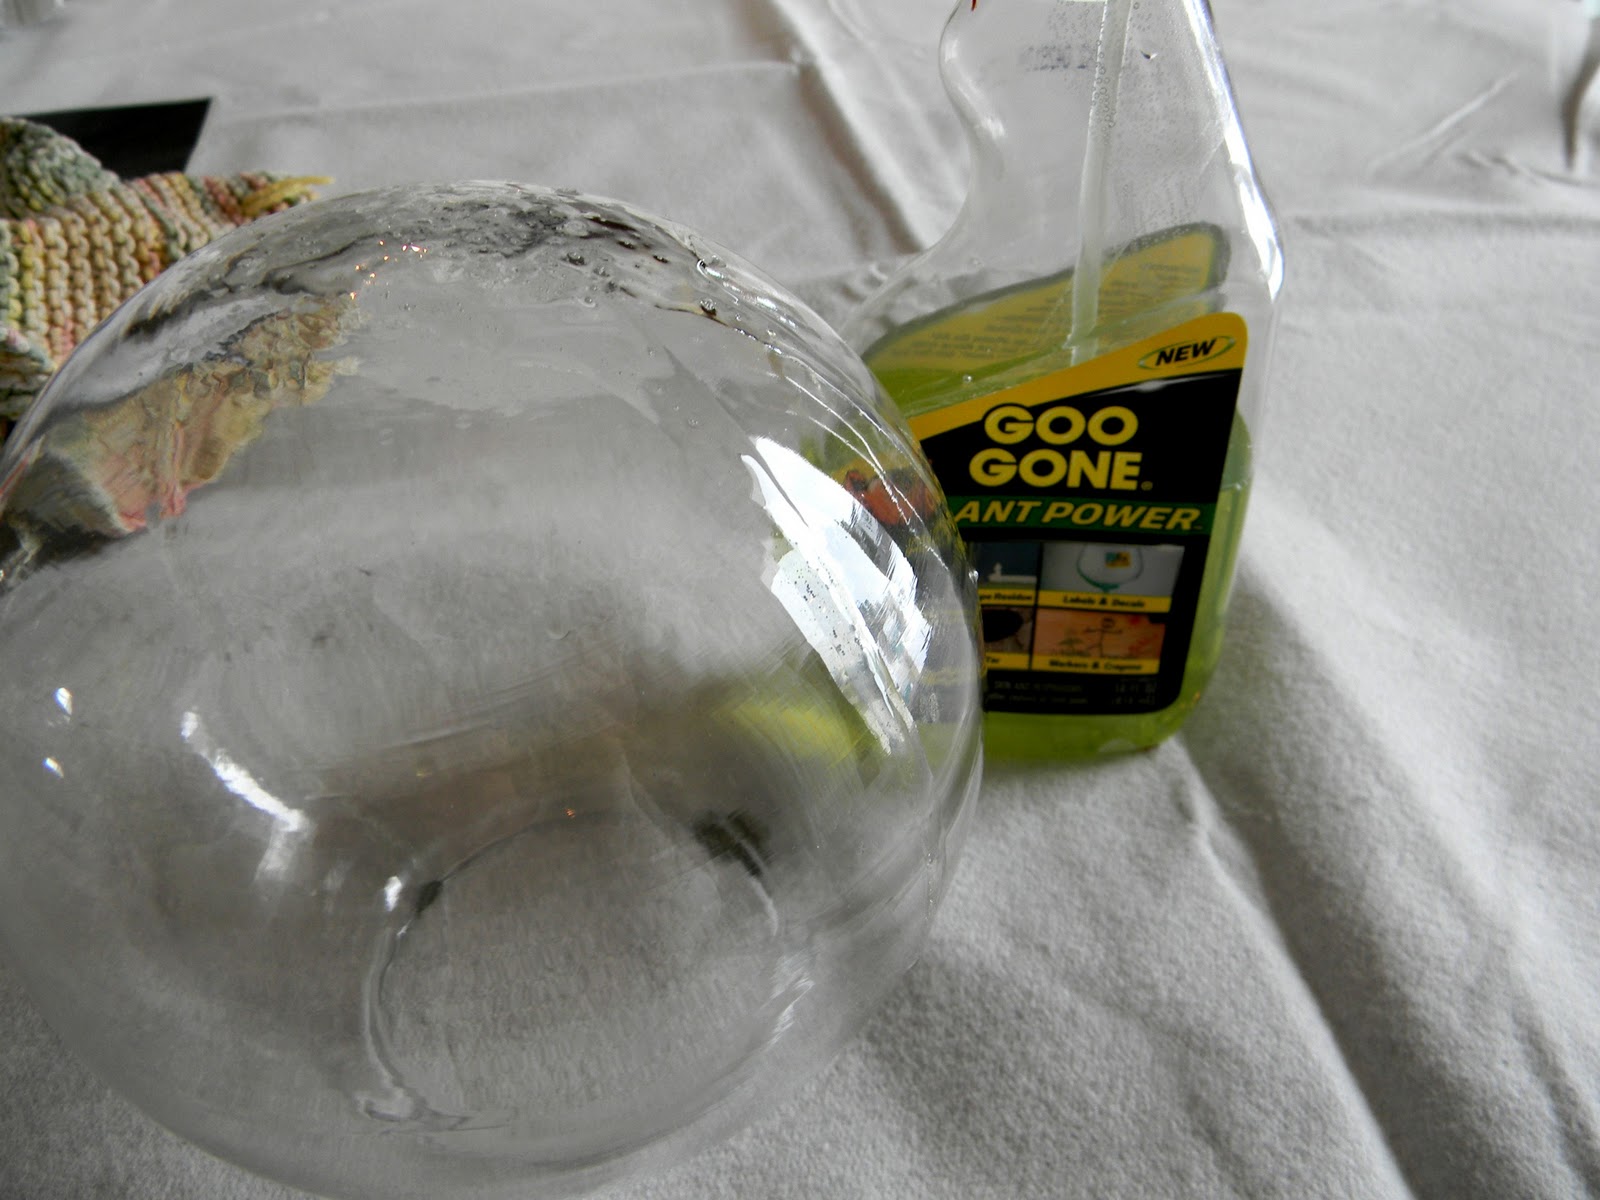
First things first. Make sure your glass globe is all spiffy. I used Goo Gone to get all the price sticker gunk off. I love that stuff. (Goo Gone, not price stickers) Then, wash with your window cleaner.
Pour about 1/2 cup of mod podge into your mixing tray,

and add about 2 tablespoons of water. Mix this well.

Add your food coloring of choice. I've found that the color is more vibrant if you use two colors combined to make your desired color. So, instead of using green, I used yellow and blue.

12 drops of yellow and about 3 of blue to make this:

(Remember that it will be much lighter and translucent when done).
Prepare your space. Fold your towel up and lay your baking sheet out.

Pour the mod podge mixture into your globe.

Tilt it on its side and start rotating it.

Continue to rotate it and tilt the globe downward.

Hold it over your towel to let the excess drip out. (If there's a lot of excess, hold it back over the mixing tray).

Dab the globe a few times on the towel, then let it sit on the towel like this for about 5-10 minutes. This is pretty important. If you don't let the excess drain out of the globe, you will end up with a clumpy white blotch on the very top of you nightlight and that would be lame.

Take your rag and your glass cleaner and very carefully clean off any mod podge mixture that got on the outside of the globe.

Set your oven to 200 degrees. Put your baking sheet in the oven and place your globe - hole up - on the sheet. Bake it for about an hour.
Yep, an hour. It's not a difficult craft, but some steps take a looooong time to complete. So you can go fold your laundry. Or watch Glee reruns on hulu - I know that's what you're really doing.

When it's done baking, it will look kind of like this:

Now, go back to your original mod podge mixture and add a bit more podge, water, and food coloring, to give you a different shade of the same color.

Pour a BIT of the mixture into the globe.

Now, SLOWLY, tilt the mixture down the sides, shifting it slowly one way and then another. Let the drops run down the sides naturally.

Leave it hole down on the towel for 5-10 minutes again.

Use the rag and glass cleaner again.

And bake. Again.
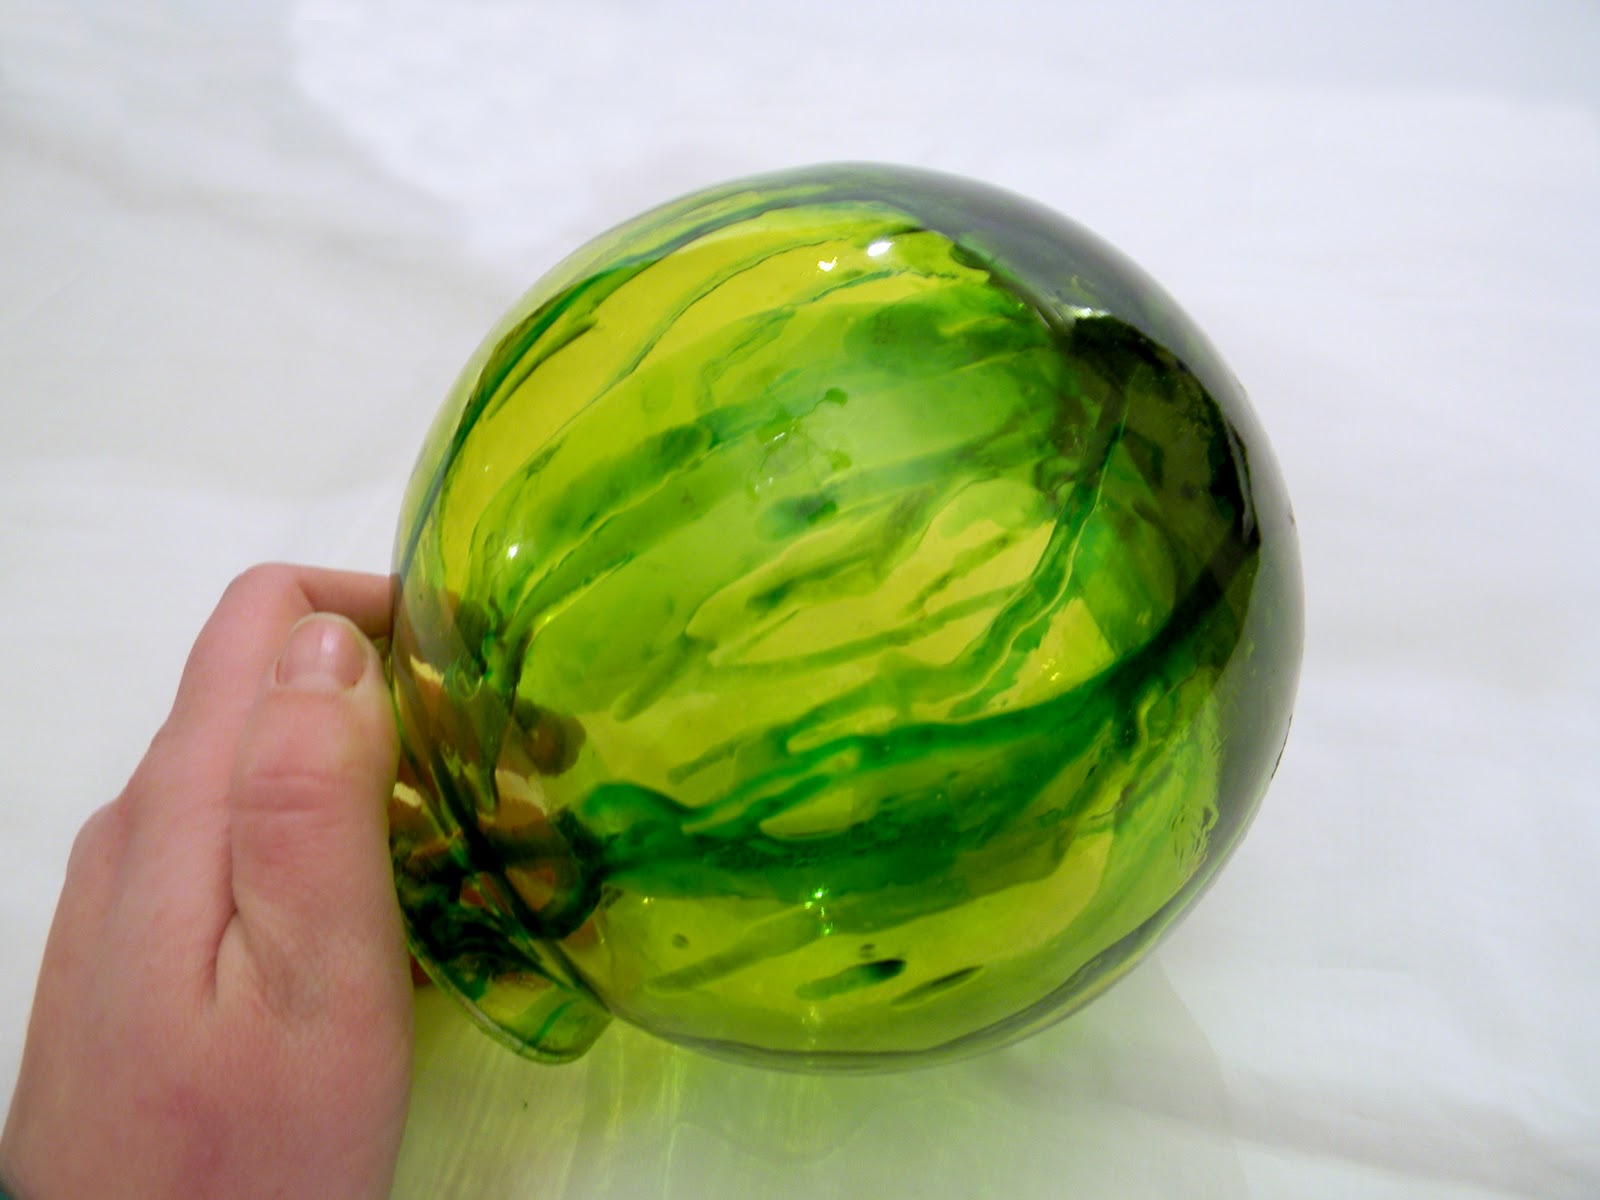
Repeat this whole process for as many different shades of color as you want. I did this FOUR times with different shades of green. And in the end, mine looked like this:

Now, take your circle and four of your call knobs and paint them black. Leave the back of the circle unpainted. Let dry.


Mark where you will want the feet of your lamp to go. I used a tape measure to help me space them, but you can just eyeball it.

Place the ceiling fixture on the front of the circle plaque place your long screw of nail through the holes on each side, pressing down into the wood to mark where your screws will go. (No, those aren't my hands, they're my dad's. Thanks for helping with the electricity!)

Hold your cord up to your drill bits to see which size you'll need to use.

Eyeball the center of the plaque and drill a hole. It doesn't matter if it's exact because your light fixture will cover this up.

Oh, and be sure to protect your work surface. With a hunk of wood, or in my case, a phone book.

Thank goodness that wasn't my dining room table...

Dab some heavy duty glue on the FLAT side of the knob - the side with the hole.

And press into place. Follow the directions on your glue for setting and curing times. Be careful - setting is not the same as curing!

Paint the whole bottom black. (It's best to glue to an unpainted surface to ensure a stronger bond).

AND NOW... on to the technical stuff!
Cut the socket off of your cord. You can probably just use some old scissors.

Thread this cord up through the hole in the circle plaque,

so it comes up the through the top. Use a scissors to snip the cord apart between the two wires. Pull the wires apart a little more. Use the wire strippers to strip just a bit off the ends of the wires.

Tie the wires in a knot. This will help to keep the wires from sliding should any child (or, ahem, husband) pull on the cord.

Now. Take your ceiling fixture and flip it over. Carefully remove the silver plate and dig that fiberglass out of there.

Look closely at the cord wires. See how one is ribbed and one isn't?

Now, take a look at the wires leading from the ceiling fixture. One is white and one is black.

Take the ribbed wire and the white wire, line them up and twist them together.

Place them in the wire connector and twist the connector on.

Wrap the end of the connector and the wire just below it with electrical tape for added security.

Do the same thing to the smooth wire and the black wire.

OK, just a little disclaimer here. I am not an electrician. But my dad is. Which is why he was there to make sure I didn't light myself on fire. If you have any concerns about your lamp project, you'll need to ask someone who knows about electricity. There. I said it.
Conceal the wires under the fixture as you place it on the plaque. Be sure to line up the holes in the fixture with the guide holes you made for the screws.

Using your screwdriver, tighten your two black screws through the fixture into the plaque.

A note about screws: Your black screws should be just long enough to reach into the plaque, but not so long they go THROUGH the plaque and come out the bottom.

Screw in your light bulb.

Place your fun colored globe over it and use the screws that came in the ceiling fixture kit to fasten the globe to the fixture.

And flip the switch!
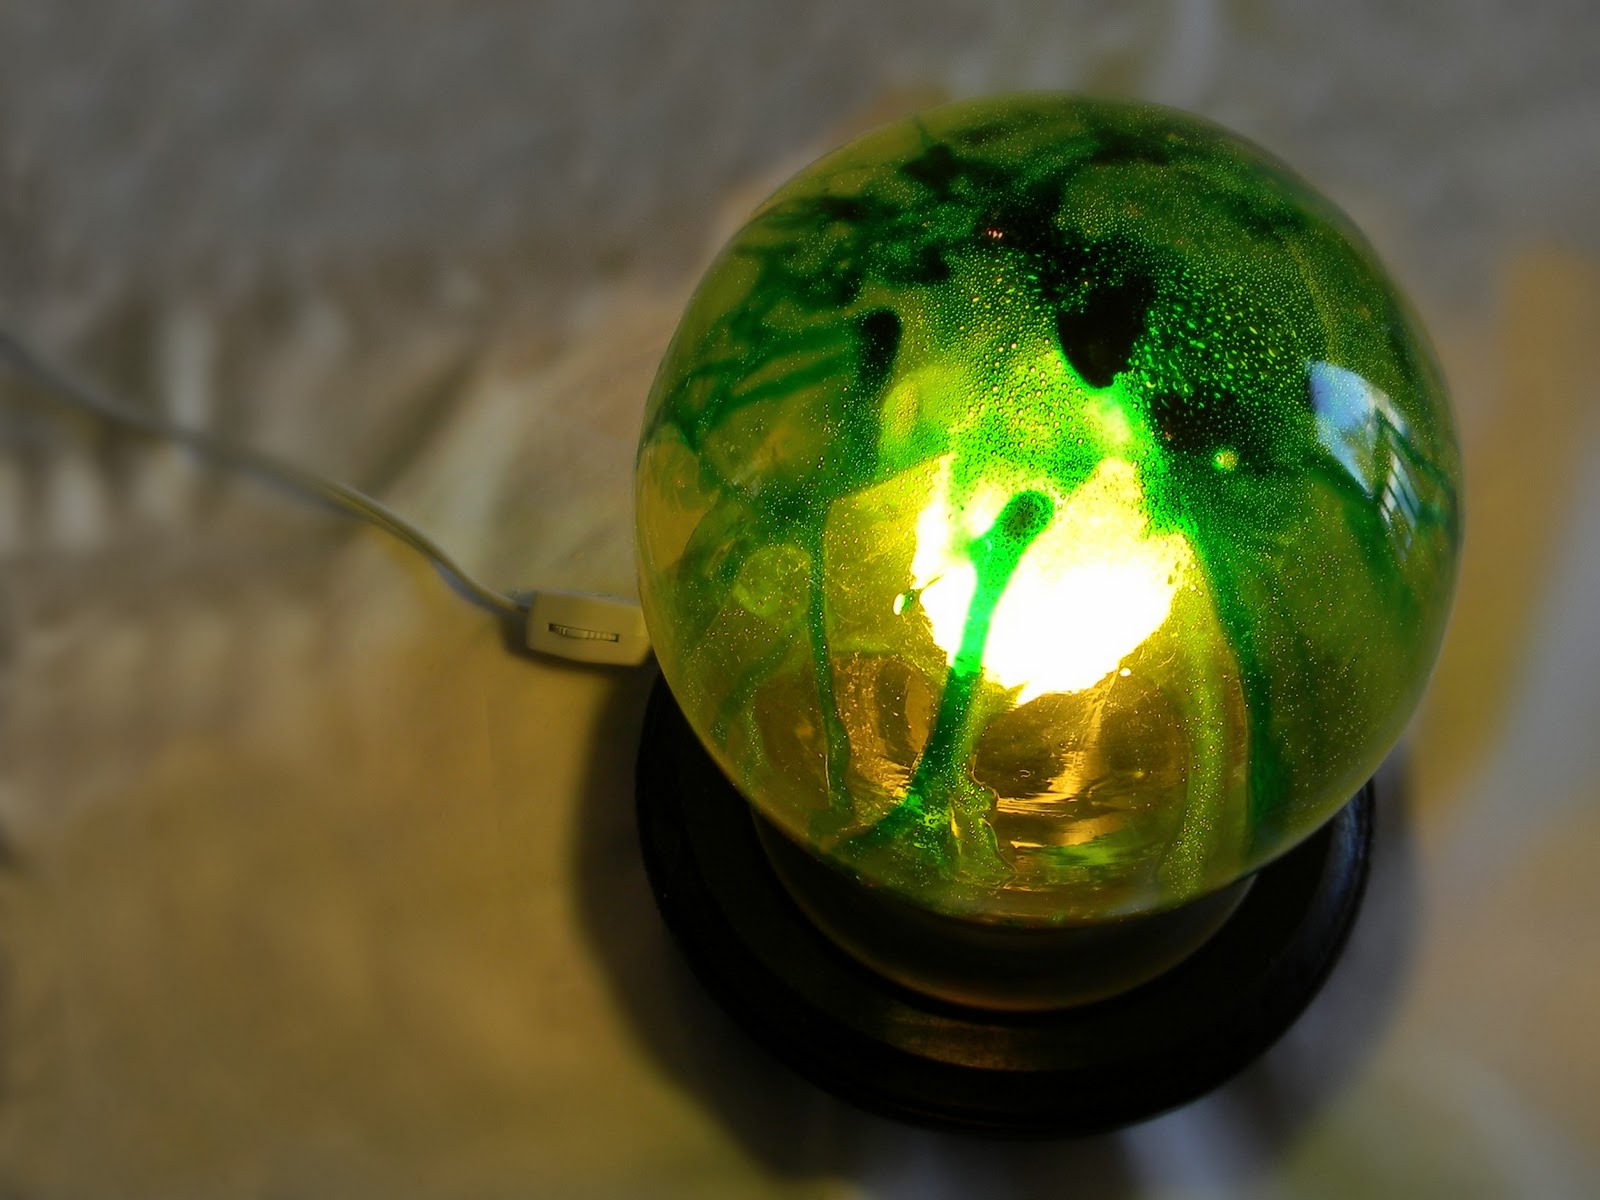
Now your kiddo has a nightlight of his favorite color lulling him to sleep! Oh, who am I kidding. This is totally going in my room.
If you like this mod podge project, check out my Stained Glass Jars, or my Marbled Stained Glass Tray!

*Be sure to check the sidebar for all the fun parties I link to!


12 comments:
FINALLY I can comment on this!! ;)
I don't know how I missed it the first time, but this is absolutely awesome!
Wow! That is so great Kimberly! And I think my non-technical brain may even have understood the electrical-ness of it all!
Im telling you this is the coolest thing I've seen today and I've been blogging all day long lol !! I did not know that you could do that with modge podge and glass but you can bet your butt im trying it. fantastic!!
Still love this, Kimberley! And still....NOT Oprah. But your super cuteness makes me blush! I have baking Mod Podge onto glass on my list of "to try". That list is super long. But still. I am gonna try it! Thanks again for putting all that effort into this entry. I TOTALLY appreciate it. :)
WOW! That's cool!
New follower from the bloghop!
www.scrappy2010ramblings.blogspot.com
How fun is this ! WOW great job !
Visit me and follow me back! Hope you are having fun with the blog hop !
http://lechateaudesfleurs.blogspot.com
What a neat project! I've never seen anything like that before. Love it!
Newest follower. If you have time, pls stop and visit me:
http://stylendecordeals.blogspot.com/
Thanks!
Great idea! I like the way you colored the inside of the globe.
Your picture tutorial is awesome.
http://houseonashwelllane.blogspot.com/
So funny. I was reading up on Ucreate which led me to Less Cake, More Frosting, which led me here for this tutorial. And then I noticed that the picture on the phone book looked just like mine and I laughed because OF COURSE it'd be so typical of a law firm to just use the same template, but then I realized that its actually MY phone book after reading the names and the phone number, haha. Which got me excited, of course. Someone from my area! And then the photo of your kiddos at the park a couple of posts back (2/27). Ahh! The park I played at when I was growing up! (not the same equipment, obviously, haha.)So, to make a long story short... Hi! From an actual neighbor! =). p.s. Love the blog! You've got a new reader!
This is just too fabulous, thanks for the tuturial!
www.thecraftinme.blogspot.com
What a great tutorial! I'm so nervous to do anything creative with anything electrical...this gives me more confidence!
Thanks so much for linking to "20 Below Thursday"! :)
Just wanted to let you know that I featured you today!! Come check it out at LittleEme.blogspot.com and grab your button!! :)
Post a Comment