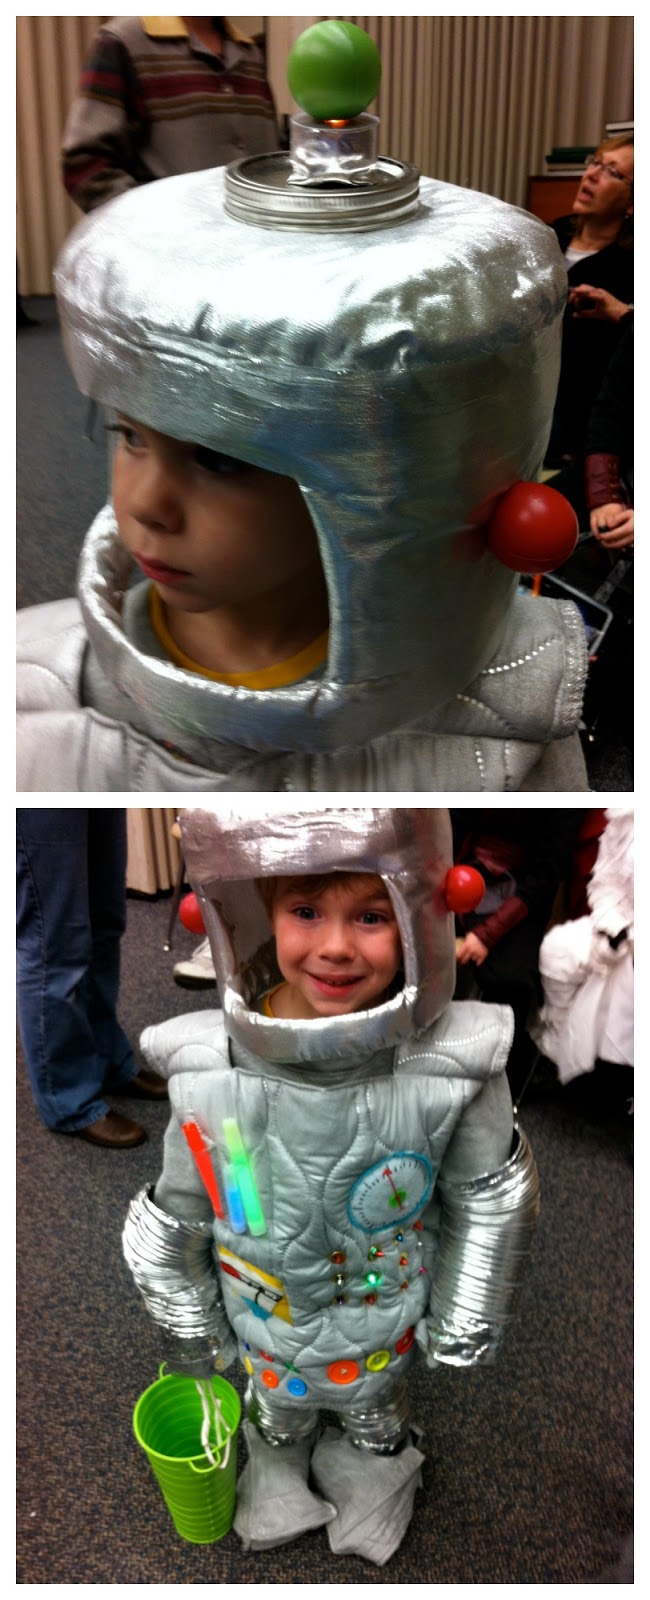
(Robot Costume Part 2: the helmet & limbs)
(Robot Costume Part 3: the Feet)
(Robot Costume Part 4: Girl Version)
Last week I let you in on my best kept secret - i.e. the tutorial I never wrote. This robot costume of mine was a hit with the kids and furthermore, I made it so large on them they actually still fit. We busted it out this year (two years later...) for bug's school dance since this year's costume wasn't done at the time. All the lights still worked and he was still just as psyched about it.
So today, I'm going to share how to make a very easy robot helmet to go with your robot costume. Plus, I'll talk a little about a few other details as well.
For the helmet you need:
A large plastic container
A serrated or electric knife
batting
silver fabric
ping pong balls in a few colors
a battery operated tea light
velcro
a mason jar ring and lid
hot glue gun
Step 1 (not pictured): buy a large container of gross cheese balls - much larger than you would ever buy (especially since you never buy gross cheese balls anyway) - just for the circular plastic container. Put all the cheese balls in ziploc bags - it will likely take 3 extra large ones. Wash the cheese ball container so your kid doesn't get fake cheese powder in his hair.
2. Use a knife to cut the top off of the container.
3. Place it on your child's head and measure about how tall it needs to be. Chop off a few more inches to the right measurement.
4. Cut a window (rounded rectangle) out of the front of the helmet. Fortunately, this gets rid of the label so you don't have to worry about that.
5. Use hot glue to cover the inside and outside with batting. Make sure to glue it over the cut edges. This will make the helmet look bulkier and also protect the head and face from the jagged plastic.
Note: I should add that using a serrated knife did work, but it was a pain in the patootie. A think an electric knife would work better.
6. Use your glue gun to "upholster" the entire helmet with silver fabric. I cut a circle for the top and glue that on first, making sure it extended over the edge. Then I glued a large rectangle around the bucket overlapping the edge of the top circle fabric, cut out the window and glued the fabric around the edges. I didn't have enough fabric to line the inside of the helmet, but that's a good idea too.
7. Glue two ping pong balls to the sides of the head.
8. To add some height and some layering/texture, I glued a mason jar ring and lid to the top center.
9. Take a ping pong ball and cut or poke a hole in it (I used a screw driver). Slide this over the tea light. To make the tea light removable so you can turn it on and off or change the batteries, hot glue velcro to the bottom of the tea light and to the middle of the jar lid so it velcros on and off.
10. Eat a gazillion gross cheese balls until you just.can't. Then make your kids eat them. When there's still an entire large ziploc bag left 9 months later (because these thing NEVER DIE) toss em.
Note: To make the tea light silver instead of white, you could spray paint it first. I tried craft paint which was a fail, so I hot glue some fabric around the sides, leaving the top and bottom free and that worked well too.
Now, just slide it over the head! It simply rests on the shoulders, and though it's much larger than needed and slides a bit when he moves, it stays on well enough for trick or treating and such! Just remember to turn the light on so the ping pong ball on top will light up!
About the arms and legs:
We used dryer vents for the arms and legs and they looked awesome (though they did take a beating and would need to be replaced if you use this costume for multiple years.)
In a home improvement store, you'll find the dryer vents near the appliances (duh). They are quite long and you'll likely need to only buy one for all four limbs. They come in different diameters, and I selected the largest available in order for bugs feet to fit through well. Even though we got them bigger then technically needed, they were still a bit of a struggle to pull on over a bulky sweatsuit - though not too bad - and they were snug enough to simply cover the arm and leg without needing to be sewn, pinned or glued which was really fortunate since I'm not sure how well that would have worked!
Just hold them next to the limb in question and cut about two inches longer (for human error while cutting). Cut them to size with a tin snips or a heavy duty shears will probably work as well. Once you've cut them, fold the jagged edge over and cover just the edge with duct tape to protect from cuts.

*Be sure to check below for all the fun parties I link to!*


You. Are. Awesome.
ReplyDelete