Well, I'm super excited because the time has come for me to share my own yarn projects with all of you! One more week of yarn goodness and then we'll show this series the door... but I couldn't let my guest bloggers have all the yarn fun!
So, first up, I'm sharing an updated take on a yarn look from two years ago. Remember the pixie tutu I made mini? That turned into one of my most popular posts and pins to date! The other week it was Hawaiian day at Zoe's school and she wanted to know what that looked like. I showed her a few pictures of hula dancers from online and she was ENTRANCED:
"Can you make me one of these??"
"One of what?"
"One of these to wear?!"
And, assuming she meant the whole ensemble - particularly the fun skirt and gobs of flowers, I set to work.
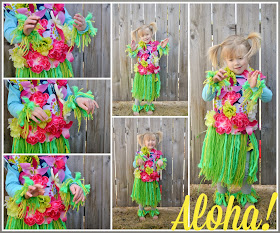
This is a cute little dress up idea that is very easy, requires next to NO sewing, and is super fun - for a theme day at school, playing pretend at home or even for Halloween! Here are the separate components of the ensemble:
A flower laie (because what hula girl would walk around without one???), wristlets, a flower belt, a "grass skirt", and anklets.
So let's break it all down, shall we?
You do NOT need to go buy a grass skirt that is going to shed itself all over your carpet and leave your child bare in spots! Nope! All you need is some yarn and a little elastic! I had all this yarn on hand, so I didn't buy a thing to make the skirt itself.
Obviously, the tutorial for this skirt is exactly the same as the pixie tutu, except I didn't unravel any yarn or tie any braids or knot anything. I just sewed the elastic in a circle the size of mini's waist, cut strands of yarn DOUBLE the length I wanted the skirt, grabbed about 5-9 yarn pieces at a time, folded them in half, stuck them under the elastic, pulled the ends through the loop of the fold and pulled, but not too tightly. Bam. Done. Basically you're making one of those no sew tulle tutus but with yarn.
Next up, the anklets and wristlets. These were present in every hula dance photo we looked at, so I assumed they were important. And guess what. No tutorial needed, because you make them EXACTLY as you make the skirt, but with skinny elastic. Holla!
Ok, moving on to the belt. In keeping with the general theme, this is EASY. You cut a thick ribbon about the size of your child's waist, a little smaller. You cut two more pieces of ribbon that are thinner width. They can be as long as you'd like. Then you dismantle six thousand dollar store flowers. Ok, maybe not six thousand. But close. You want to take them apart completely, because you don't want any of the pokey plastic parts sticking your kid in the stomach and making her whine. Then you take the thin ribbon and hot glue it to the ends of the thick ribbon, wrapping the thick ribbon around it nicely. Hot glue the flowers all along the thick ribbon. And you're done. Belt. Just wrap it around the top of the skirt and tie a bow in the back.
Finally, the laie. It's a lot like the belt, would you believe it? You only need one thick ribbon though. So you cut some thick ribbon to the length you want - so you can slip it over your child's head and it will hand about to their belly button. Tie the ends in a knot. Hot glue disassembled flowers all along on one side of the ribbon. Done! Woo hoo!
I discovered that the dollar store had a number of different flowers that looked very tropically, to me. Many of them lose their shape when you pull all the plastic parts off, but you can glue and pinch them together in such a way that they look good as new.
I had all of this on hand except the flowers so the whole thing only cost a couple bucks! And one short evening of crafting.
Watching this crazy hula dance and seeing this grin? Totally worth it.
***

And, guys. My link party is looking so very sad. Please link up! Come on! It's fun! (that's a button down there. Click it.)


*Be sure to check the right sidebar for all the fun parties I link to!


Oh, dang, that is cute overload!!! What a beautiful ensemble. I would wear the wristlets and anklets myself!
ReplyDeleteToo cute! Thanks for linking up to Inspire Us Thursday on The Inspired Wren.
ReplyDelete