Although there has been no talk about it around this blog yet, I am fully aware that there is a holiday approaching. And with a holiday approaching, you know what I get to make! Yep - some more door decor!
Remember what started it all? This cute little book page wreath made out of small circles which I scalloped individually. Yeah, it made me insane. But hooked.
Then came this pretty little ode to summertime:
Still one of my favorites. And then came a long line of holiday inspired wreath-y-ness. A MOGO Birthday wreath, a Ribbon Spider Wreath, a Candy Corn Sunburst, a Comfy Cozy wreath, Crazy Canes, Vintage Romance... a lot of wreaths. You may recall that my husband started calling me the wreath lady (calling up images of 80 year old gossips at the church gathering glueing smelly fake flowers to grapevines...), but I've made peace with that.
I missed a holiday. I fully intended on posting an Easter wreath, but tragedy struck.
THAT, my friends, is one reason you should never spray paint cheap styrofoam. I guess.
I did find a way around the set back, but by the time the dust had settled, Easter was over. So you'll have to wait until next year.
That's why I was extremely excited for the 4th. This marks one whole year from when I first embarked on my door decor obsession. You can read all about it here. But for now, I though I would repost last year's "wreath" which was actually not a wreath at all, but rather a found object door hanger.
And later on I'll show you what I made this year!
****
Well, I’ve only been “on my own” for the four years that we’ve been married. Meaning I haven’t had much time to build up my stock of holiday tchotchke. I’ve tried to work on it slowly so as not to overwhelm mr with all of the holiday necessities we are still missing. He has no idea that you need a different door hanging for Valentine's, St. Patrick's, Halloween, Christmas, New Years, 4th of July, Thanksgiving, Easter, Boxing Day, Kwanzaa, Hanukah, Summer, Spring, Fall, Winter, June and September. He also has no idea that you need other holiday inspired decor for each of the above mentioned holidays and more sprinkled throughout your entire house. And he’s oblivious to the fact that storage space for each said trinket and hanging is secondary and, dare I say it, trivial.
My front door looked like this:
And it was sad. It knew a holiday was coming and felt distinctly underdressed.
So I set to work making what I call:
I wondered if I had anything hanging around on hand that could be put to 4th of July use?
Amazingly, I found a few things I think work perfectly. If you’d like to create something like what I made above, you’ll need:
8 paint stir sticks
an old hard cover book (like from the 60’s or something...)
red, white and blue scrapbook paper
a paper cutter
mod podge (ha!) and brush
a cropadile (or other hole puncher that is heavy duty)
(not pictured):
a measuring implement of some sort (ruler, dot marker, etc) and marking implement of some sort (marker, pencil, etc.)
thick beading wire
Something sharp and pointy to poke tiny holes with (sorry, I don’t know what to call the actual tool. I feel kind of dumb...)
white fabric
Just a note: Part of the charm of this project is that it isn’t perfect. Far from it. It’s kind of distressed in a crafty chic kind of way. (At least that’s what I like to think) This is why I used subtly patterned paper - for a little texture - and multiple different patterns per color. And that’s why this was a good project for me. No perfection required!
Cut your red and white paper into long strips, altering the width.
Take the long strips and cut them into three or four short pieces per strip.
Smear mod podge along one side of a stir stick.
Pick a color and lay those strips down on the stir stick, placing each strip right up against the last.
Keep doing this all the way down the strip until it is covered.
Turn it over. Trim the ends of the strips so that when they are folded in they don’t hang over the edge of the stick.
Smear mod podge down the back of the stir stick.
Fold down each strip on one side of the stick.
Smear mod podge over the top.
Fold down each strip on the other side of the stick.
Smear one more layer of mod podge over the top for good measure. (and to seal)
Set aside.
Do this with 7 more strips - four red, four white.
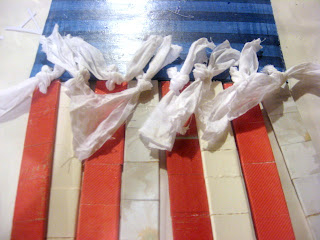
When you’re done, and they are all dry, flip them over to the front (the side WITHOUT the seams where the strips were folded down) and mod podge over the tops of each to seal.
They look like this:
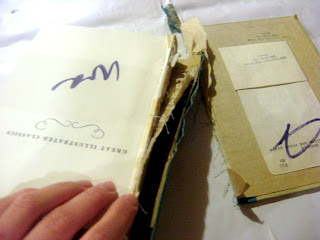
Rip off the front cover of the old book. (I know, I know. I desecrate books. It’s nothing personal.)
Lay this down on some blue paper.
Mark where to cut the paper to fit around the cover.
Cut the paper to size.
Smear mod podge on the book cover.
Place this down on the blue paper about an inch from the top and press firmly.
Mod podge the flap of blue paper on the top down onto the cover.
Mod podge the bottom of the paper up onto the cover.
Mod podge over the whole thing to seal it, front and back (waiting for each side to dry before flipping).
Using the cropadile, punch a hole in the middle of book cover on the top side (this is how you will hang it on your door).
Take your pointy, pokey tool thing and poke two little holes just under this larger hole to either side of it.
Take a short piece of thick beading wire and poke the ends through the little holes from front to back of the cover. Twist the ends together on the back.
Cut a strip of white fabric about two inches wide and four or five inches long and tie the ends in a double knot.
Thread this through the larger hole and tuck the section on the front of the cover through the loop of fabric strip poking through the back.
Using a measuring implement of some sort and a marking implement of some sort (I used a hole guide and a marker. Imagine that.) Measure and mark where you will punch holes in the top of every stir stick.
Punch the holes with the cropadile.
Line your sticks up in order under the book cover. Place them exactly where you want them to go. Use the hole guide (or ruler) and marker to measure and mark where you will punch holes in the cover in order for them to line up with the holes in the sticks.
Punch the holes with the cropadile.
Cut your fabric into strips - about one inch wide.
Take a strip and poke one end into the hole in a stir stick from back to front.
Poke the other end of the fabric strip through the corresponding hole in the book cover from back to front.
Adjust the stick to the desired position.
Tie the fabric strip in a double knot.
Repeat this process with the seven other sticks.
Trim the ends of the fabric.
Add some vinyl stars you cut out with your sister’s cricut. (or embellish in some other way...)
And this is how it looks! Not bad, huh?
But here’s where the “Nonpartisan” part comes into play... and where you will use that little wire loop you created on the top of the book cover.
Considering I don’t have much in the way of decorations, I just can’t commit to one design. There are so many different ways to beautify this project, I couldn’t pick one. So I didn’t. I remained completely uncommitted. I created four more designs. Want to know how? (sorry I didn't get pictures of this part...)
To do this part, you’ll need:
red fabric
one more old book PLUS the back cover of the first old book you already destroyed
blue scrapbook paper
cropadile
Vinyl lettering (via the cricut)
white buttons of various shapes, sizes and persuasions
3 white paper doilies
a lime green star Christmas tree ornament
white paint
Rip the covers off the old book.
Cut each cover so that it is slightly smaller than the first book cover which is already in use.
Smear them with mod podge.
Cover them with blue paper in different shades and subtle patterns using mod podge.
Smear them with mod podge again to seal.
Using the cropadile, punch a hole in the tops of the book covers, in the middle.
Cut out three strips of red fabric, about an inch wide.
Poke one end of a fabric strip through the holes in the book covers. Do NOT tie them in a knot.
For the doily “stars”:
Take a doily and scrunch it up into a flower shape - kind of smooshing the sides up so when you look down on it, it’s kind of a “t” shape.
Dab some hot glue on the underside of the “flower” shape, at the point.
Press firmly down onto the book cover.
Dab some hot glue on the inside of the doily and scrunch the sides together so it makes a rosette shape.
Repeat this with the other two doilies.
For the button “stars”:
Using hot glue, glue your buttons down onto the book cover in a random pattern.
For the letters:
Pick a patriotic phrase and cut it out of wall vinyl with your sister’s cricut (or yours, if you’re lucky enough to have one). I made one word larger so it would stand out.
Stick them right to the book cover in a spacing you like. Press down firmly. Mod podge over the top.
The last design is the easiest. I simply took the ribbon off the lime green star ornament and painted it white.
NOW, after creating the alternate designs, you can attach them to the original pennant.
Poke the red fabric strip on one of the alternate designs through the wire loop on the top of the pennant.
Tie in a single knot, so it’s tight enough to hold, but loose enough to untie easily so you can switch out the designs when you want to.
(note: for the single star ornament, I flipped the pennant around and hung it on the back so it lays against a plain blue background and not the vinyl stars.
And there you have it! One project, with five different looks! It’s very flip-floppy. A very noncommittal, nonpartisan flag for you. And all from stuff you’ve got laying around!
I think this one is my favorite.
And this was my view as I left the house to run to a meeting at church tonight. We’re now, officially, Americans!

*Be sure to check just below for all the fun parties I link to!


